Category: How To

Don’t know how to do something in android? Looking for a solution to an Android issue, this is the place for all your Android-based how-to guides & tips.

If you are looking for a device-specific guide, please use the tags below or the search form.

Samsung | OnePlus | Motorola | Asus | Xiaomi | Redmi | Realme | Oppo | Vivo

  • How to Turn On Gmail Dark Mode on Android Phone

    How to Turn On Gmail Dark Mode on Android Phone

    Gmail has built-in dark theme to ease eye strain and improve battery life. Here’s how you can turn on the Gmail dark mode on an Android phone and tablet.

    As with most apps nowadays, Google recently introduced a brand new dark theme in the Gmail app. You can enable the dark mode in Gmail from the app settings. Once enabled, Gmail uses a sort of a dark gray color instead of the true black color as part of the dark theme. If you are using the app frequently or for prolonged periods of time, it is better to enable the dark theme in the Gmail app. This reduces eye strain, especially at night times or in places with low ambient light. If you are using a phone Amoled screen, you will even see improved battery life. Other than that, compared to the light theme, the dark theme in Gmail looks really good.

    Though the Gmail theme change setting is hidden pretty deep in the Settings, it is pretty easy to enable.

    In this simple and straightforward guide, let me show you the steps to turn on Gmail dark mode in Android phone or tablet.

    Turn on Gmail dark mode theme

    The dark theme option for Gmail is in its Settings page. Follow the steps below to open the Gmail settings page and turn on the dark mode.

    1. Open the Gmail app from the app drawer. If you placed the Gmail app on your home screen, you can open it from there.

    2. Tap on the hamburger menu (three horizontal lines) on the top left corner. This action will open the sliding menu.

    3. Scroll down and select the “Settings” option in the sliding menu. As soon as you tap on it, the Gmail settings page will open.
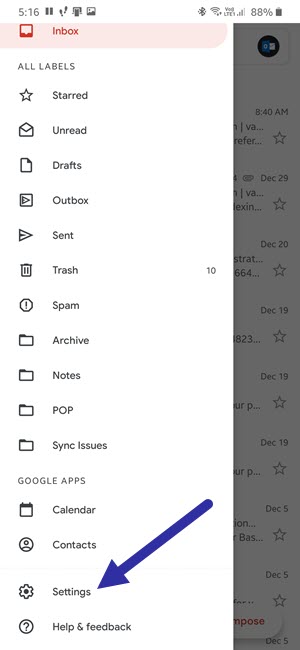
    gmail settings 311220

    4. Select the “General settings” option.

    gmail general settings 311220

    5. Tap on the “Theme” option at the top of the Gmail settings page. This is the option that allow you to change the Gmail theme as needed.
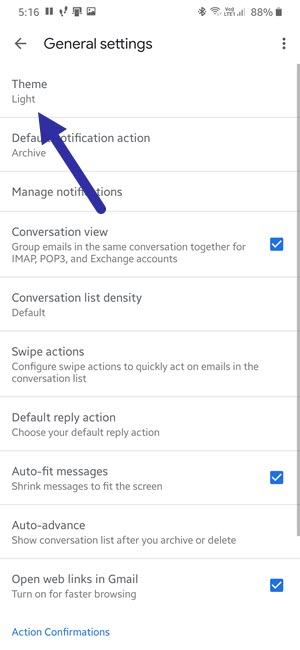
    gmail theme settings 311220

    6. Select “Dark” from the flyout menu.
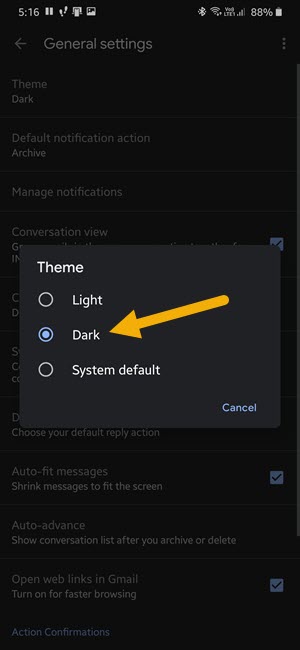
    turn on gmail dark mode 311220
    Select ‘Dark’ to enable dark mode in Gmail app.

    That is it. As soon as you do that, the dark mode is enable in the Gmail app.
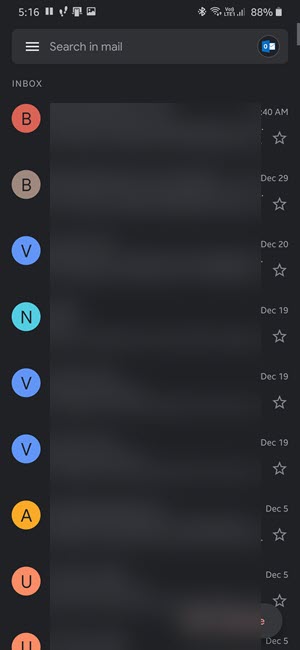
    gmail drak mode theme 311220

    Wrapping up: Gmail dark mode

    As you can see, though the option can be hard to find at times. It is very easy to turn on Gmail dark mode.

    While selecting the dark theme, you can also select the “System Default” option. Doing so will make the Gmail app use the current system theme. i.e, if you set your system theme to dark mode, Gmail will also use dark and vice-versa. This is particularly helpful if you set a schedule to auto-switch between light and dark modes. That way, you don’t have to manually switch between light mode and dark mode depending on the time of the day.

    Sometimes, the notification row icons might not switch to the light theme when you select dark mode in Gmail. In those cases, simply close the Gmail app and reopen it.

    I hope the steps to turn on dark theme in Gmail helped you. If you need any help, comment below and I will try to help as much as possible.

    Did you know you can remove the Meet now button in Gmail app?
  • How to Install Play Store in Android Studio Emulator

    How to Install Play Store in Android Studio Emulator

    No Play Store in your Android emulator? Follow these simple steps to install the Play Store in Android Studio Emulator.
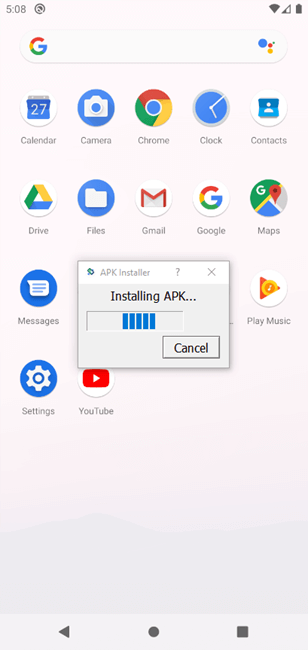
    Depending on how you installed the emulator in the Android Studio, there might no be a Play Store. If you are just using the emulator to test your own apps then you don’t need the Play Store. That being said, if you want to try apps that are already available via the Play Store then you need to have it installed in the Android emulator. Of course, if you really want to you can install APK files in the emulator directly in two different ways.

    However, if you want the full authentic experience or to avoid the hassle of installing apps via APK files, you have to have the Play Store in the Android emulator. The good thing is, the AVD Manager in Android Studio allows you to create emulators with Play Store built into them.

    In this quick and simple article, Let me show you a simple way to create a new Android emulator with Play Store built into it.

    Steps to Install Play Store in Android Studio Emulator

    To install the Play Store in the Android Studio emulator, you have to create a new emulator with a system image that already has Play Store included. The good thing is, the AVD Manager gives you the system image with the Play Store. You don’t have to download it from a third-party.

    You might have to download a system image which will around 1.5GB to 2GB. If you have data limits on your internet connection, becareful.

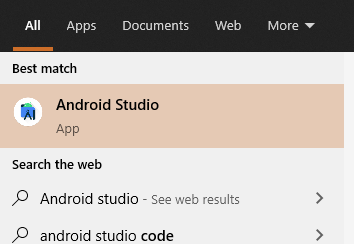
    1. Open Android Studio. If you are using Windows, open the Start menu, search for “Android Studio” and click on it. If you have one, you can also double-click on the desktop shortcut.

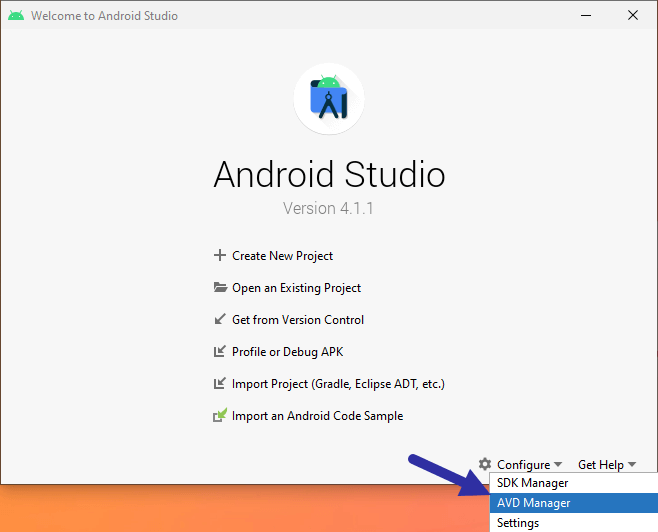
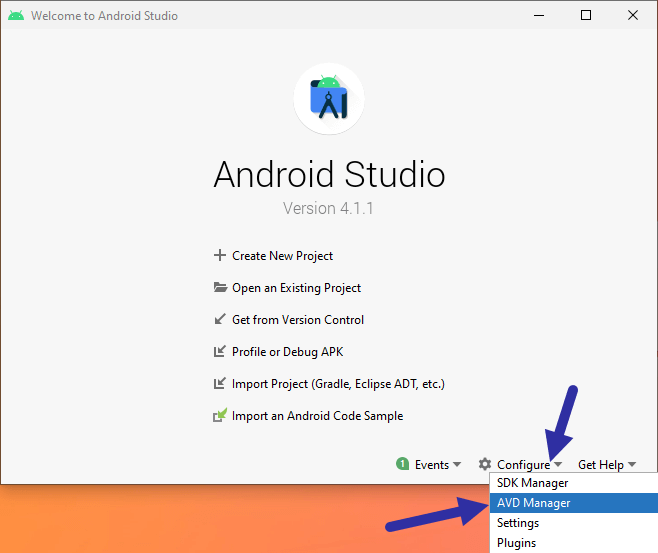
    2. Click “Configure → AVD Manager” option on the main screen.

    open avd manager 271220 1

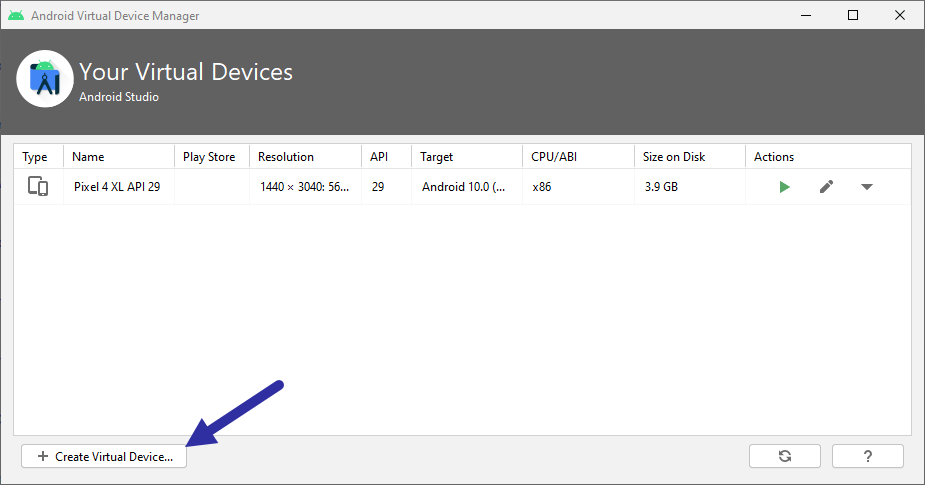
    3. After opening the AVD Manager, click on the “Create virtual device” option. This is how you create a new emulator.

    create new virtual device 271220

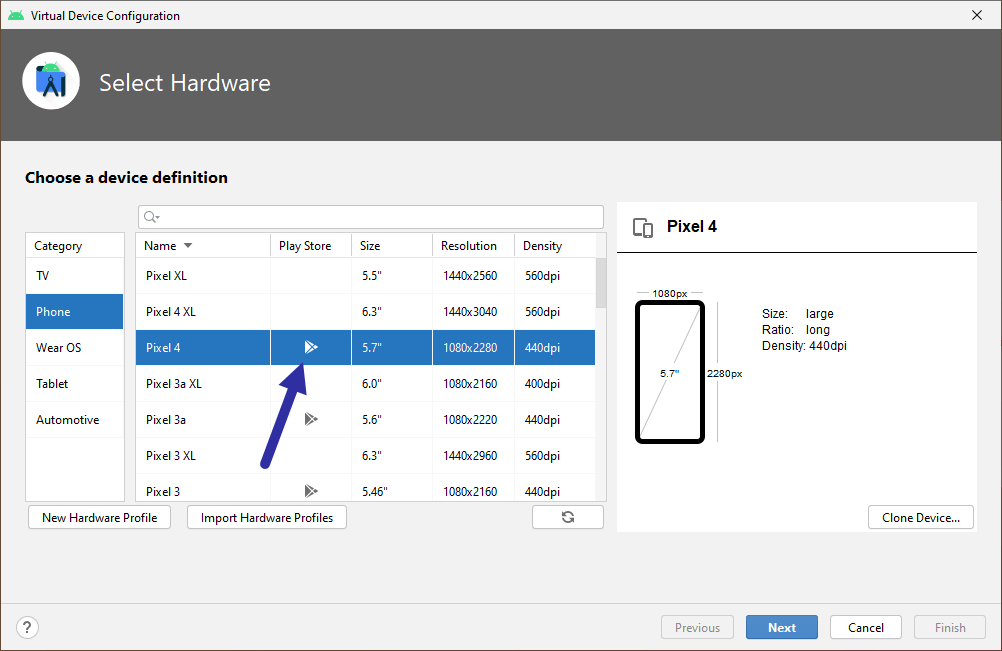
    4. Select “Phone” on the left panel, select the device in the middle plane. While selecting, make sure it has the “Play Store” icon in the Play Store column. This icon signifies the virtual device is compatible and comes with the Play Store. Click on the “Next” button.

    android emulator with play store 271220

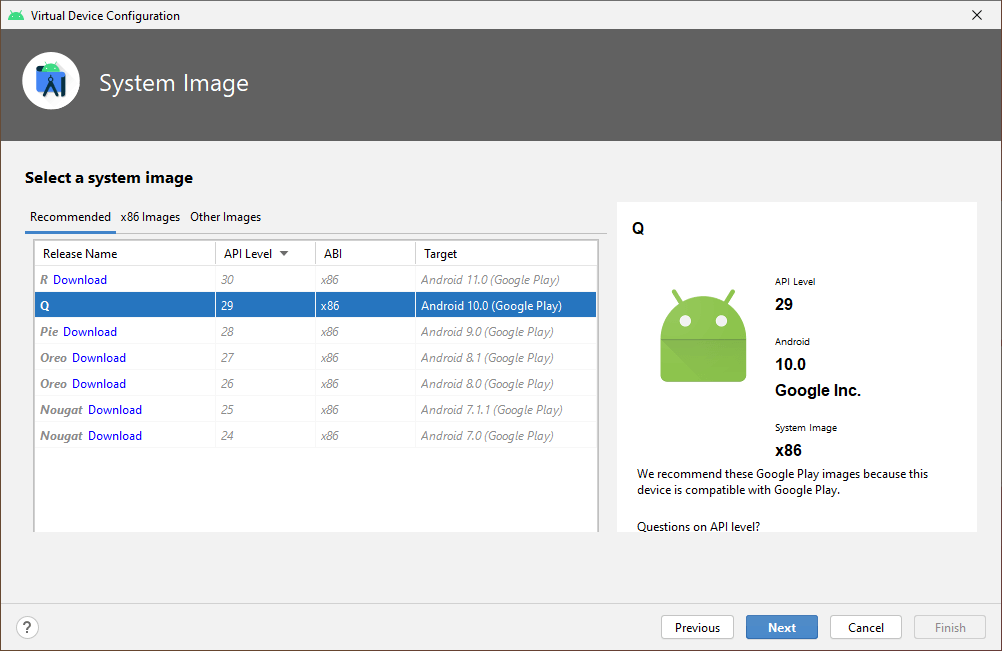
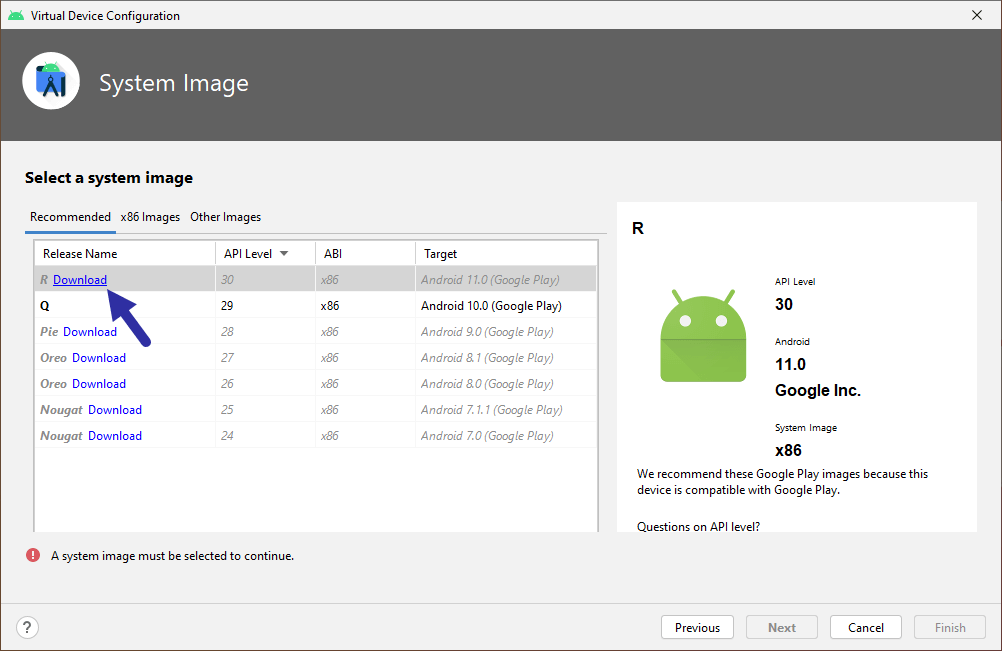
    5. Here, select the system image you want to install and click “Next”.

    system image with play store 271220

    If the system image is not installed, you can download and install it by clicking on the “Download” link next to Release Name. This action will download the system image from Google. As I said before, the system image will be anywhere from 1.5GB to 2GB.download system image with play store 271220

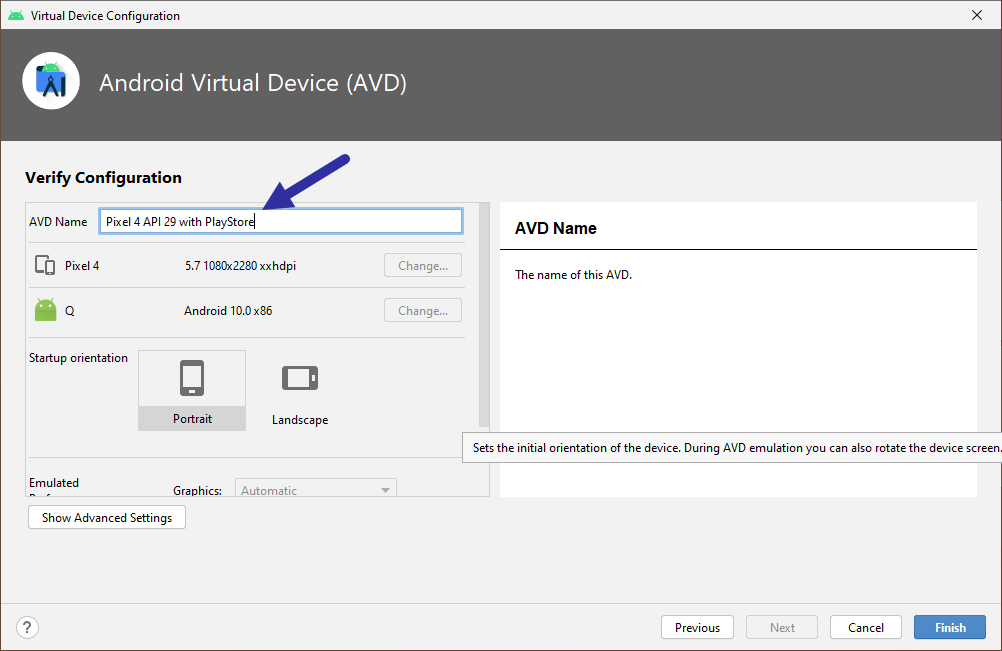
    6. Name the virtual device and click on the “Finish” button.

    name virtual device 271220

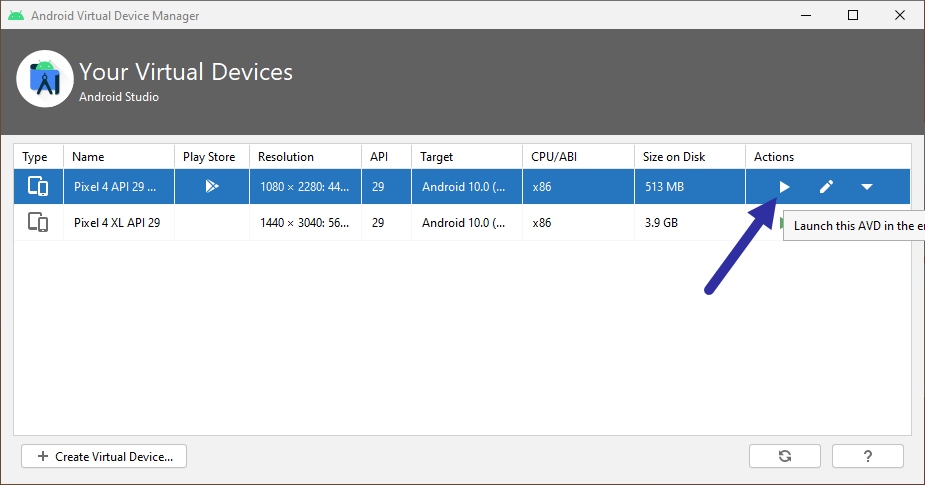
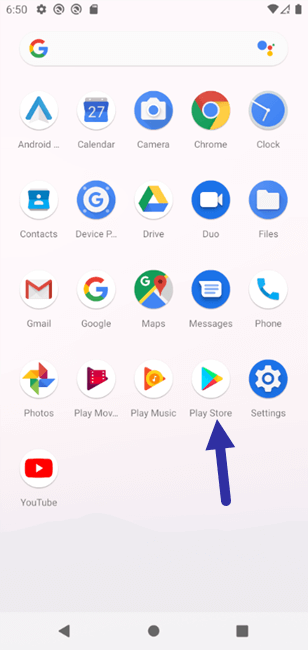
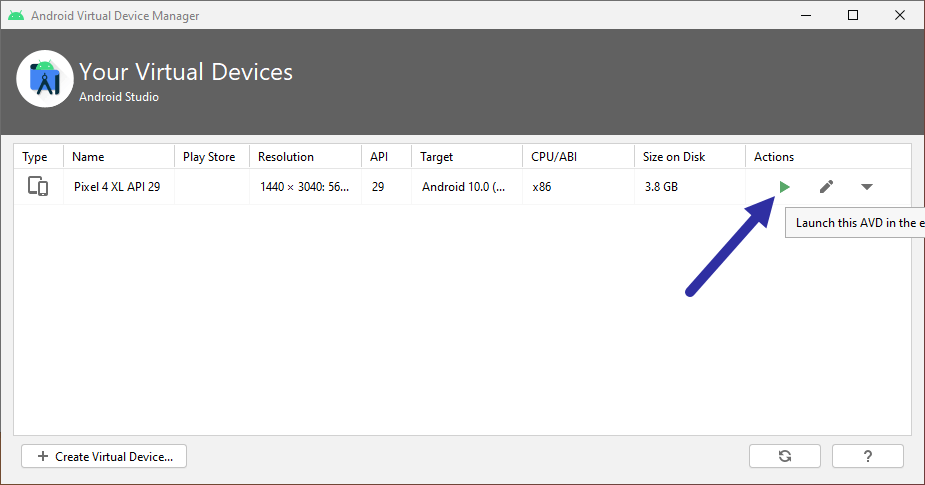
    That is all. With that, you have created a new emulator with Play Store, AKA, you’ve installed Play Store in Android Studio Emulator. You can launch the emulator by clicking on the “Play” icon in AVD Manager.

    launch emulator 271220
    install play store in android studio emulator 271220

    Why can’t I install Play Store manually?

    In case you are wondering why you need to create an entirely new virtual device just to have Play Store, it’s because Google doesn’t allow you to install the Play Store like any other app. The Play Store is deeply linked with the Android operating system and other core Google apps. As such, it is not possible to install it via the APK file. A few of the main reasons for this kind of behavior being security, reliability, and control.

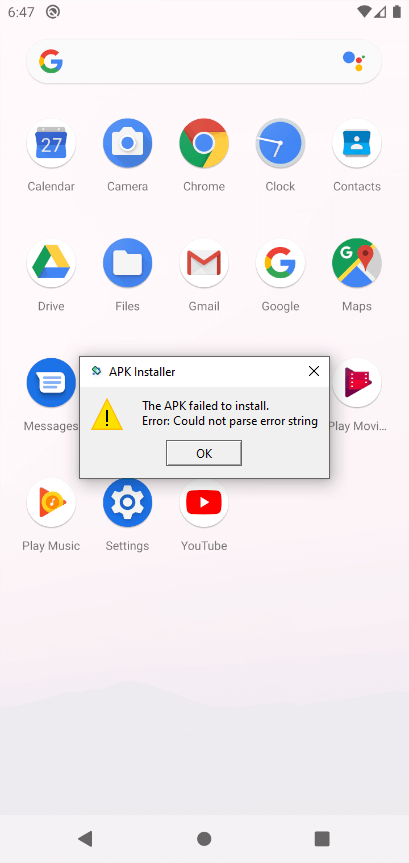
    You can try to install the Play Store by download an APK from the internet. However, when you try that you will see the “The APK failed to install. Error: Could not parse error string.” message.

    apk failed to install 271220

    Now, there are some roundabout ways like using Open GApps. However, it is not worth the time and you couldn’t guarantee its compatibility or reliability. This is especially important since Google itself gives you the option to install a system image with Play Store already included.

    I hope that helps. If you need any help, comment below and I will try to help as much as possible.

  • How to Find Android SDK Folder Location in Windows

    How to Find Android SDK Folder Location in Windows

    Don’t know where the Android SDK folder is in Windows? Here are simple steps to find the Android SDK folder location no matter where it is in your system.

    When you install Android Studio, it automatically installs the Android SDK so that you can develop and run apps directly on your computer. By default, in Windows, Google installs the Android SDK folder in the User directory. However, that might not be the case at all times. For example, if you install the Android Studio in some other directory, then the Android SDK location will be different. This is also true if you are using a portable version of Android Studio.

    If you want to use ADB commands or any other Android platform-tools from the command line, you need to know the Android SDK platform. For example, recently I wanted to install an APK file in the emulator with an ADB command. To do that, I needed to know the Android SDK location in Windows. Without knowing the exact location, I could not execute the ADB command.

    The good thing is, it is pretty easy to locate where the Android SDK folder is.

    In this quick and straightforward guide, let me show you the steps to find the Android SDK folder location no matter where it is.

    Android SDK folder location in Windows

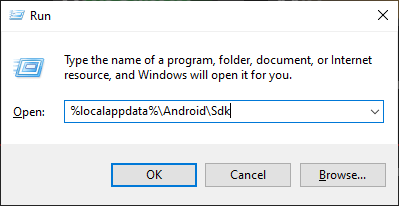
    The default Android SDK location in Windows is “%localappdata%\Android\Sdk“. Just open the Run window (Windows key + R), paste the given path, and click “Ok”. This will open the Android SDK folder instantly.

    windows android sdk lcoation 281220

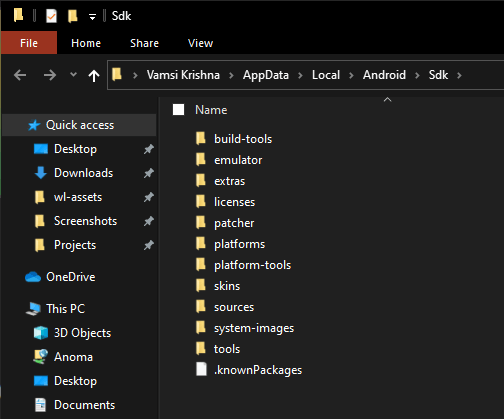
    In case you are wondering, %localappdata% is a Windows environment variable mapped to the Local App Data folder (C:\Users\Username\AppData\Local) in your user directory.

    android sdk folder 281220

    Find SDK location in Android Studio

    The SDK Manager in Android Studio gives you the exact location of the SDK folder. Here’s how you can open the SDK Manager to find the location.

    1. First, open the Android Studio. If you are using Windows, you can search for “Android Studio” in the Start menu or double-click on the desktop icon.

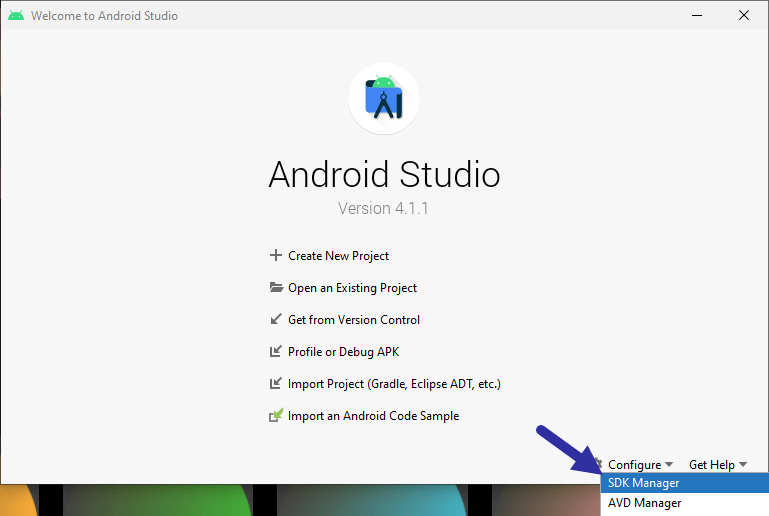
    2. After opening the Android Studio, click on the “Configure” button and select the “SDK Manager” option. If you are inside the Android IDE, select the “File → Settings” option.

    open sdk manager 281220

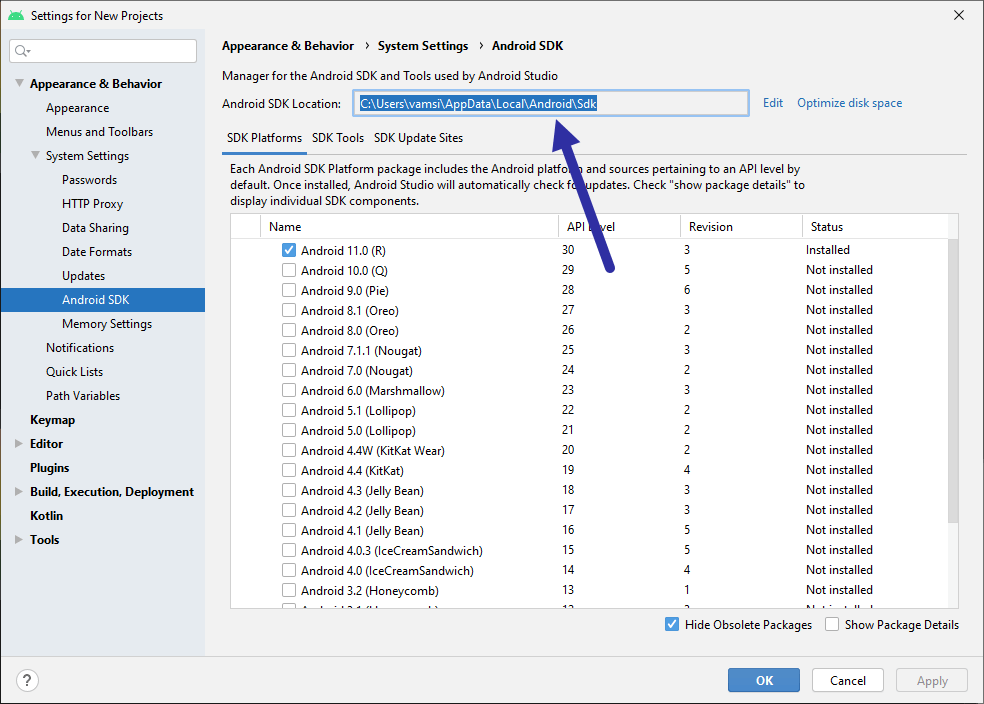
    3. As soon as you click on the option, Android Studio will open the Settings window. Here, you will see the Android SDK location on the right panel in the “Android SDK Location” field. If you are not seeing it, make you are on the “Appearance & behavior → System settings → Android SDK” page.

    sdk location in sdk manager 281220

    Once you found the location, you can copy it by double-clicking on the location and pressing the “Ctrl + C” shortcut.

    That is all. It is that simple to find the SDK location in Android Studio. The good thing about this method is that it allows you to manage the SDK to install new APIs, SDK tools, and even update sections of SDK as and when the updates are available. If you don’t need a specific API, you can simply uninstall it by unchecking it in the SDK manager.

    I hope that helps. If you need any help, comment below and I will try to help as much as possible.

  • How to Install APK File in Android Studio Emulator

    How to Install APK File in Android Studio Emulator

    When running an Android Studio emulator, you can install APK files directly. Here are the steps to install APK file in the Android emulator.

    If you don’t have Play Store installed in your emulator, it can be pretty hard to install apps. Of course, if you are developing an app with Android Studio, you can run it directly from the Studio itself. However, if you want to install your favorite app or test a third-party app in the emulator, you have to install it via the APK. This is especially true if your emulator doesn’t have Play Store installed or if the app itself is not available via the Play Store. For example, recently I wanted to try an app that is blocked in the Play Store in a safe environment. So, I downloaded the apk file, installed apk in the Android emulator, and run it there. Though the app is garbage, it satisfied my curiosity.

    It’s not obvious at first glance, but the Android Studio emulator gives you two ways to install an APK file. I will show those two methods. Follow the one you like.

    Without further ado, let me guide you through the steps to install APK file in Android emulator.

    Jump to:

    Drag and drop to install APK file in Android Studio Emulator

    To install apk file, just drag and drop the file on the emulator. Android will automatically install the apk. For more guidance, follow the below steps.

    1. Open Android Studio

    The first thing you need to do is open the Android Studio. To do that, double-click on the desktop icon or search for it in the Start menu.

    open android studio 271220

    2. Open the AVD manager in Android Studio

    Next, open the AVD manager by clicking on the “Configure → AVD Manager” option in the Android Studio main screen.

    open avd manager 271220

    3. Launch the emulator from AVD manager

    In the AVD manager, click on the “Play” button next to the emulator. This action will open the Android emulator. If you don’t have an emulator in the AVD Manager, create one by clicking on the “Create virtual device” button.

    open android emulator 271220

    4. Drag and drop APK file in emulator

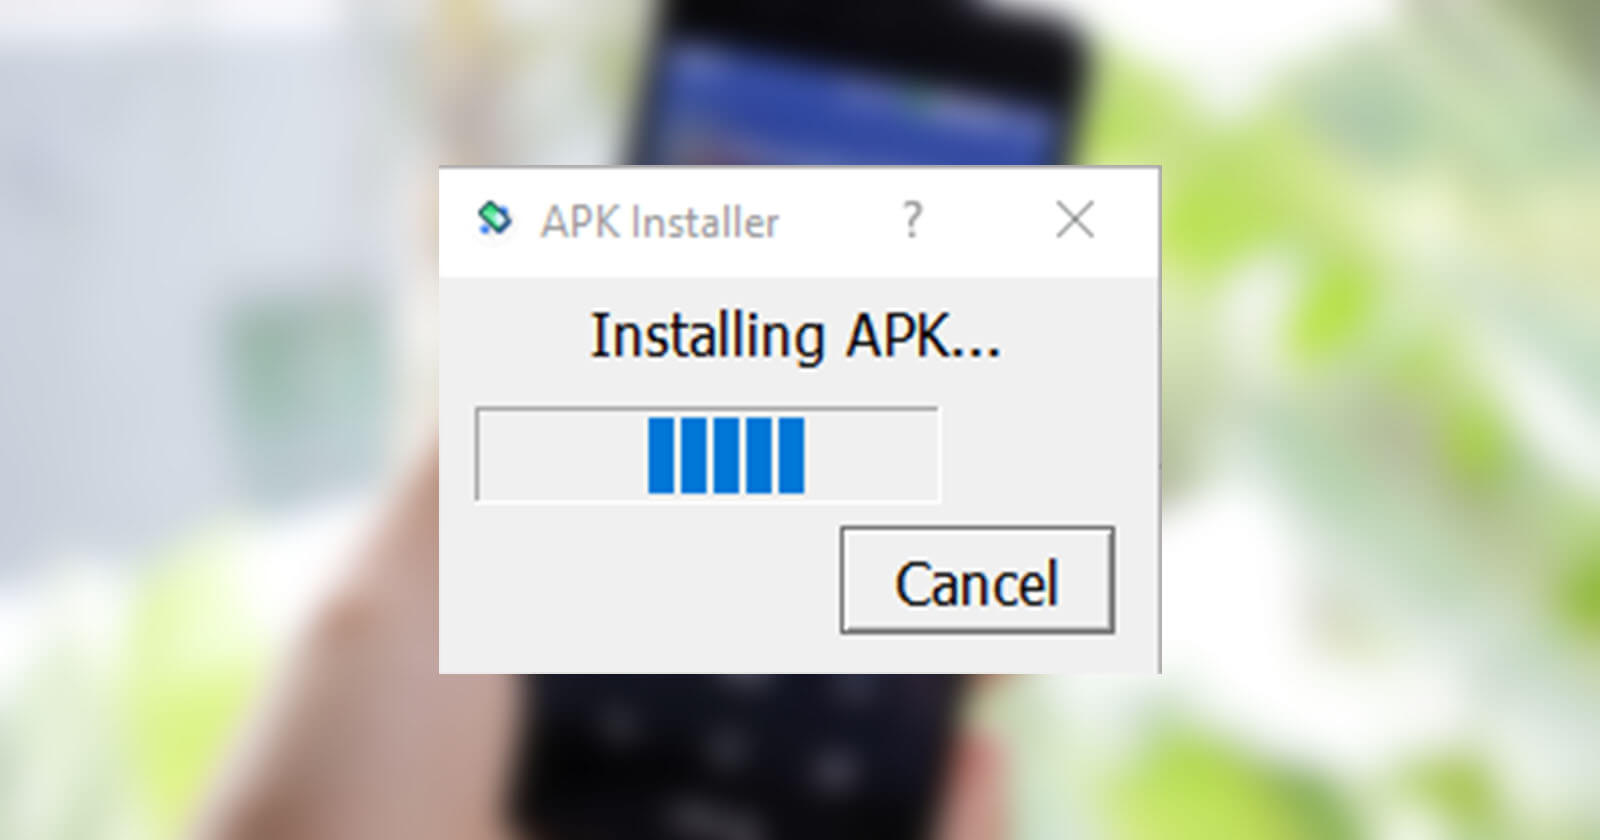
    After opening the Android emulator, drag and drop the APK file in the emulator. As soon as you do that, the emulator will recognize the APK and installs it automatically.

    install apk in android emulator 271220

    Once the app has been installed, you can launch it from the app drawer. Keep in mind that once the app has been installed, you might not see it on the home screen. That is the reason why you need to go to the app drawer to find the newly installed app. Of course, this completely depends on the launcher you are using in the emulator.

    ADB command to install APK in Android Studio Emulator

    When the Android emulator is actively running, you can also use the ADB command to install an apk file in the emulator. This is very helpful if you want to execute additional commands or create your own script. So, here’s how you can install APK files in the emulator with the ADB command.

    Before proceeding, make sure you know the Android SDK location and the APK file location on your hard drive. Since we are executing a command, both these location paths are important.

    1. First, open the Android Studio and click on “Configure → AVD Manager” to launch the AVD manager.

    open avd manager 271220

    2. Here, click on the “Play” button next to the emulator to start it.

    open android emulator 271220

    3. Once you have the emulator running, open a command window. In Windows, you can do that by searching for “CMD” in the Start menu.

    4. In the command line window, execute the below commands one after the other. Replace the dummy SDK path and APK path with the actual Android SDK path and APK file path.

    cd "c:\path\to\android\sdk\platform-tools"

    next

    adb install "c:\path\to\app.apk"

    adb command to install apk file 271220

    As soon as you execute the command, ADB will install the APK file in the running Android emulator. Once installed, you will see the “Success” message. You can open the newly installed app from the app drawer in the emulator.

    app installed with adb command 271220

    That is all. I hope that helps. I hope that helps. If you need any help, comment below and I will try to help as much as possible.

  • How to Add or Remove Apps to Sleeping Apps List on Samsung

    How to Add or Remove Apps to Sleeping Apps List on Samsung

    Samsung Android phone lets you put any app to sleep. Here’s how you can add or remove any app to the Sleeping Apps list on Samsung.

    In Android, you can install almost any application either from the Play Store or using an APK file. Every app you install can start or stop automatically. The app auto-start feature is pretty helpful as it allows the app(s) to send and receive notifications and provide other app-specific services.

    However not every app needs to auto-start or always run in the background. This is especially true for apps you only use occasionally. After all, when there are more apps running in the background the system memory (RAM) fills up quickly and even the phone battery drains faster. To avoid these kinds of situations, you can put unused apps to sleep using Samsung’s Sleeping Apps feature. Apps added to the Sleeping Apps list are automatically put into sleep if the apps are not used for a while. This prevents the apps from auto-starting and draining battery and system memory unncessarily.

    In this quick and straightforward guide, let me show the steps to put unused apps to sleep by adding them to the Sleeping Apps link on a Samsung phone.

    Put unused apps to sleep – Add app to Sleeping Apps list

    To add an app to the Sleeping Apps list, follow the steps shown below.

    1. Open the Settings app.
    2. Select the “Device care” option.
    3. Tap on the “Battery” option.
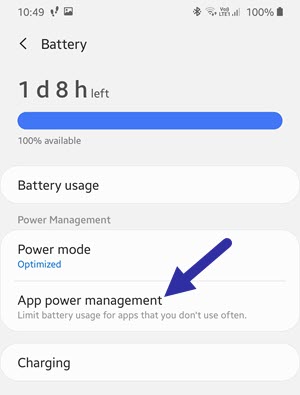
    4. Here, tap on the “App power management” option.
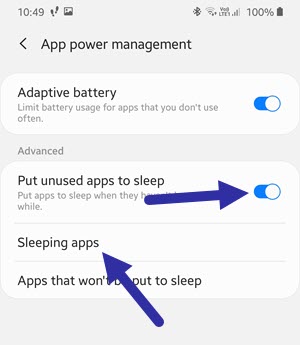
    5. Turn ON the “Put unused apps to sleep” option.
    6. Next, select the “Sleeping apps” option.
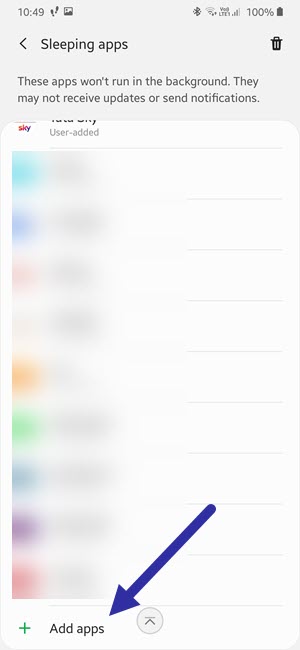
    7. Scroll all the way down and tap on “Add apps”.
    8. Select the app(s) from the list.
    9. Tap on the “Add” button to add it to the Sleeping Apps list.
    10. Close the Settings app.

    Detailed steps

    You can enable the “Put unused apps to sleep” from the Device Care section in the Settings app and then add apps to the Sleeping Apps list.

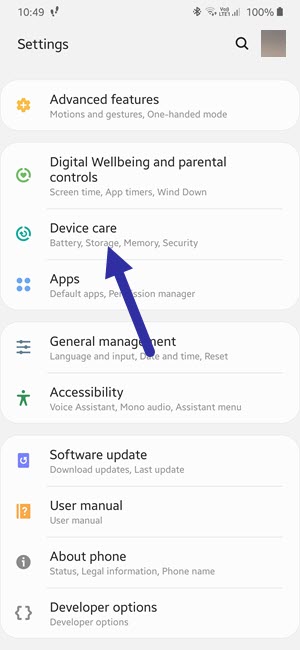
    1. First, open the Settings app from the app drawer. In the Settings app, scroll down and select the “Device Care” option.

    Note: If you cannot find the Device Care option in the Settings app, you can find it as an app icon in the app drawer.

    samsung device care

    2. Since the Sleeping Apps feature is considered a power management feature, tap on the “Battery → App power management” option.

    samsung app power management

    3. Once you are here, turn on the “Put unused apps to sleep” option.

    4. Next, tap on the “Sleeping apps” option. This is where you will be able to add apps to the sleep list.

    turn on put unused apps to sleep on samsung

    5. Scroll all the way down on this page. At the bottom of the page, tap on the “Add apps” option.

    add apps to sleeping list samsung

    6. Your phone will now show all the apps that are not on the sleep list. Select the apps you want to put to sleep and then tap on the “Add” button.

    select apps to add to sleeping list samsung

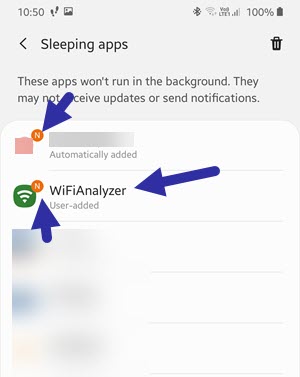
    7. As soon as you tap on the add button, the selected apps will be added to the Samsung sleeping apps list. You will generally find the newly added apps at the top of the list with the “N” indicator on the icon.

    8. You can now close the Settings app.

    apps added to sleeping list

    From now on, the apps you put in the Sleeping Apps list will automatically put into sleep mode if you don’t use them for around a week or so. Once an app is put to sleep, it might not be able to run in the background or send you notifications.

    That being said, you can still manually open the app like always. When you manually open the app, the sleep clock for that specific app will reset. So, if you don’t use the app again for a week or so, it is deemed unused and Samsung will put the app to sleep.

    In case you are wondering, as of writing this there is no way to change how long the phone will wait before putting an unused app to sleep.

    Remove app in Sleeping Apps list

    Just as you can add apps, you can also remove apps from the Sleeping Apps list. Here are the steps to follow.

    1. Open the Settings app.
    2. Go to the “Device care → Battery” page.
    3. Tap on the “App power management” option.
    4. Select the “Sleeping apps” option.
    5. Tap on the “Dustbin” icon on the top-right corner.
    6. Select the apps to remove from the list.
    7. Tap on the “Remove ” button at the bottom.
    8. Close the Settings app.

    That is all. It is that simple to add or remove to sleeping apps list on a Samsung Android phone. If you need any help, comment below and I will try to help as much as possible.

    If you like this article, check out how to change the ringtone on a Samsung Android phone.

  • How to Change Country in Google Play Store on Android

    How to Change Country in Google Play Store on Android

    To install apps available only in some countries, you can change the country in the Google Play Store. Here’s how you can do it.

    By default, the Google Play Store will default to the country you are living in. In case you are wondering, it gets the details of the country you are living in using the IP address and geo-location information. In case the Play Store cannot determine your location with IP or geo-location information, it sets the Play Store country from the connected Gmail account.

    Depending on where you live, some apps and even the Play Store functionality might be limited or outright not available. For example, if a specific app in the Play Store is available in the United States of America, you will not be able to download it from any other country. This can be a hassle when you are on a tour for work or vacation. To remove these kinds of geo-restrictions, you can change the country in the Google Play Store. Though the option is pretty well hidden, it is pretty easy to modify the country information in Google Play Store.

    In this quick and straightforward article, let me show you the steps to change the country in the Google Play Store.

    Important prerequisites

    To change the Play Store country, you need to be in that country. More specifically, your device should be in that country. Since the Play Store gets its geo-location information from the IP address, you can use a VPN service to change your IP address. For example, to set the Play Store country to the United States, you have to use the United States location in the VPN service.

    Also, don’t forget to turn OFF GPS. If you don’t turn off the GPS, the Play Store will use it to get the real-location.

    For some countries, Play Store also requires you to add a payment method of that country. The payment method can be anything like a debit card, credit card, internet banking, PayPal, etc. Depending on the country, the payment methods will be different.

    Do keep in mind that even when you move to another country or use a VPN service, it can take some time for the Play Store to detect the change. Until the Play Store detects the change in the location, you cannot change the country information.

    Steps to change country in Google Play Store

    Follow the steps given below to change the country in the Google Play Store.

    1. Open the Google Play Store.
    2. Tap on the hamburger (☰) icon.
    3. Select the “Account” option.
    4. Go to the “Preferences” tab.
    5. Under the “Switch to country Play Store” choose the payment method of your choice.
    6. Fill in the payment details to change the country.

    Detailed steps

    1. First, open the Google Play Store app by tapping on the Play Store icon in the app drawer.

    2. After opening the Play Store app, tap on the hamburger (☰) icon appearing on the top left corner of the app. This is where you will find all the options to access the main settings and other options.

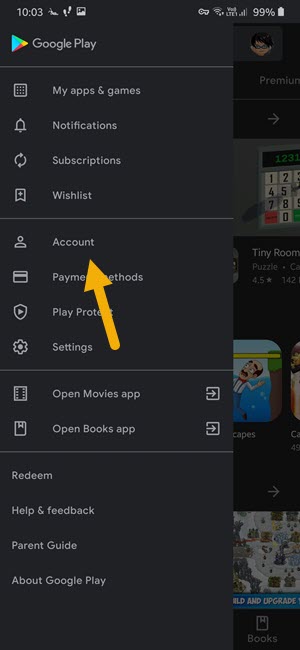
    3. From the sliding menu, select the “Account” option. This is where you will find the options related to your Play Store account.

    4. In the account screen, select the “Preferences” tab. This is where you can change the country information for Play Store.

    5. Under the “Country and Profiles → Switch to <country> Play Store” section, tap on the payment option of your choice. Then, fill in the required payment details and confirm the changes.

    As soon as you confirm the country changes, Google will queue the request and completes it in 48 hours. In those 48 hours, you might not be able to purchase or install apps using the new country info. That being said, in most cases, the changes are pretty instantaneous.

    Important Note: You can only change the country once every 365 days. So, please be completely sure when trying to change the country in Google Play Store. I recommend you switch the Google Play Store account first and then change the country. That way, you will have access to both profiles as and when needed.

    Cannot change the country

    If you cannot see the “Switch to <country> Play Store” section, it means that the Play Store did not detect the country change. As I said before, it can take some time for the Play Store app to detect the change and give you the payment options to switch country. Also, don’t forget to turn OFF the GPS to prevent the Play Store from knowing your real country.

    That is all. I hope that helps. If you need any help, comment below and I will try to help as much as possible.

  • How to Change Ringtone on Samsung Android Phone

    How to Change Ringtone on Samsung Android Phone

    You can set any song as a ringtone on Samsung. Here are the steps to fully change the ringtone on a Samsung Android phone.

    Changing the ringtone on a phone is one of the most common things most of us do. In fact, the ability to change the ringtone is available in almost all types of phones, including the good old feature phones and even the dumbphones. One of the best things about having a custom ringtone is that it makes it easy to differentiate your phone ring from other phones that use the default ringtone. In general, most phone manufacturers use their own default ringtone to differentiate themselves. However, it can still be an issue if multiple people have phones from the same manufacturer.

    Thankfully, you can easily change the ringtone from the Android settings. A Samsung phone is nothing different as it has a long list of awesome ringtones to choose from. If needed, you can set your favorite song or audio clip as the ringtone on Samsung.

    In this quick and straightforward article, let me guide you through the steps to change the ringtone on a Samsung phone.

    Steps to change ringtone on Samsung

    To change the ringtone on a Samsung phone, follow the steps listed below.

    1. Open settings on Samsung.
    2. Tap on the “Sounds and vibration” option.
    3. (optional) Select the SIM card.
    4. Choose the “Media Storage” option if prompted.
    5. Select the ringtone of your choice.

    Note: To set a song or other audio file as the ringtone, follow the section below the detailed steps.

    Detailed steps

    1. First, open the Samsung settings app. You can do that by tapping on the “Settings” icon in the app drawer. Being a system setting, you will find the option to change the ringtone in the Settings app.

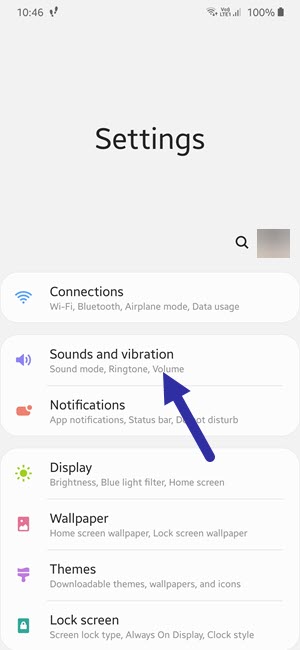
    2. After opening the Settings app, tap on the “Sound and vibration” option. As you can tell from the name itself, there is where you can change the ringtone and other sound settings.

    open sound settings samsung

    3. On this page, tap on the “Ringtone” option.

    select samsung ringtone settings

    4. If your Samsung phone has multiple active SIM cards, you will be prompted to choose a SIM to change the ringtone. This lets you set different ringtones for different SIM cards.

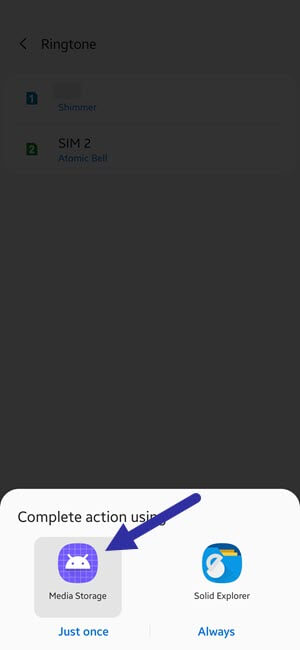
    5. If your phone prompts you to select an app to complete the action, select the “Media Storage” option. This dialog only appears when there are multiple apps that can complete this specific action.

    select media storage on samsung

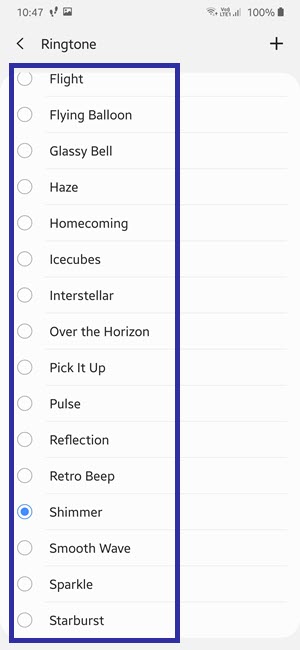
    6. Samsung will show a list of predefined ringtones. Select any ringtone of your choice to listen to it.

    7. Once you find the ringtone of your choice, keep the selection as is, and tap on the “Back” button on the top left corner.

    change samsung ringtone

    The setting is saved automatically. From now on, you will listen to the new ringtone whenever you receive a phone call.

    Set custom song or audio as the ringtone in Samsung

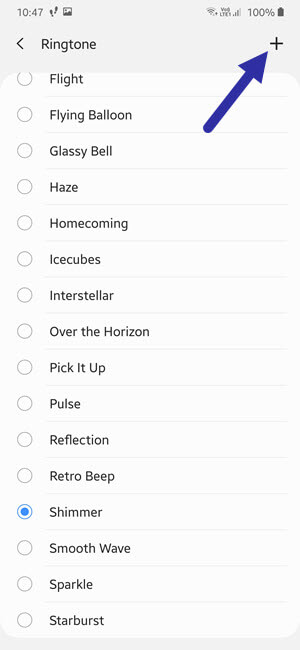
    Apart from the predefined ringtones, you can also set a custom song or audio file as the ringtone. This is particularly useful if did not like the predefined ringtones or if you just want to use your favorite song, music, or audio file. Before following the below steps, make sure the song or audio file is in MP3 format and stored in the Internal Storage (not in external or SD card storage).

    1. Open settings on Samsung.
    2. Tap on the “Sounds and vibration” option.
    3. (optional) Select the SIM card.
    4. Choose the “Media Storage” option if prompted.
    5. Tap on the “+” icon on the top-right corner.
      add custom song as ringtone on samsung
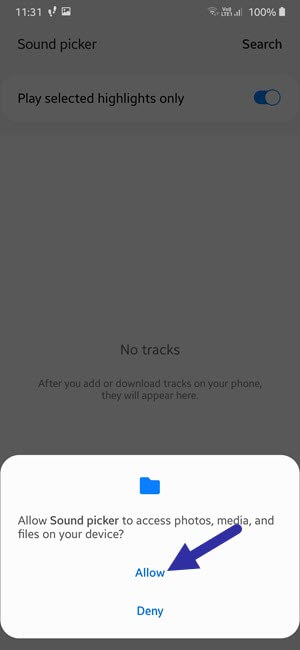
    6. If prompted for permission, tap on “Allow”.
      allow media permission
    7. Browse through the catalog and select the song of your choice.
    8. (optional) You use the “Search” option on the top to find the song you are looking for.
    9. After selecting, tap on the “Done” button on the top.
    10. Close the Settings app.

    From now on, your Samsung phone will play the custom song or audio clip as the phone ringtone.

    Important note: While picking a song from the catalog, the “Play selected highlights only” option might be turned ON by default. What this option does is play a section of the selected song it thinks is good. It might not play the song from the beginning. If you want the song to play from the beginning, turn OFF the “Play selected highlights only” option.

    That is all. I hope that helps. If you need any help, comment below and I will try to help as much as possible.

  • How to Turn ON Wi-Fi Calling on Android (with pictures)

    How to Turn ON Wi-Fi Calling on Android (with pictures)

    Wi-Fi calling feature gives you the best possible indoor connection. Here’s how you can turn on Wi-Fi calling on Android.

    Most modern Android phones and a lot of carriers support Wi-Fi calling. When indoors, it is better to enable the Wi-Fi calling feature because it gives you better quality audio and even reduces call drops and other general disturbances. Generally, cellphone reception will be pretty good when you are outdoors. However, when indoors, the reception might be reduced due to a number of reasons. This can cause low-quality audio, disturbance in the audio, and even the call drops. This is especially true if the cell reception is generally low where you live.

    To mitigate all this, most carriers now support Wi-Fi calling. As the name implies, when enabled, your phone and the carrier will utilize the Wi-Fi signal to enhance the overall call quality. The good thing is, the Wi-Fi calling feature is virtually free and built into almost all Android phones and tablets. As long as your carrier supports Wi-Fi calling, you can turn on the Wi-Fi calling feature on Android and start using it.

    In this quick and straightforward guide, let me show you the steps to turn on Wi-Fi calling on Android.

    Jump to:

    Steps to turn ON Wi-Fi calling on Android

    To enable Wi-Fi calling feature on an Android device, follow the steps listed below.

    1. Open the Settings app.
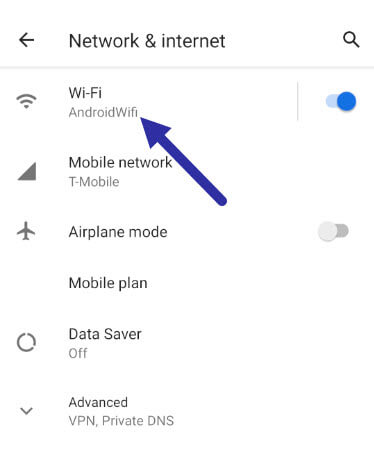
    2. Select the “Network & Internet” option.
    3. On this page, select the “Wi-Fi” option.
      select wi fi settings 291120
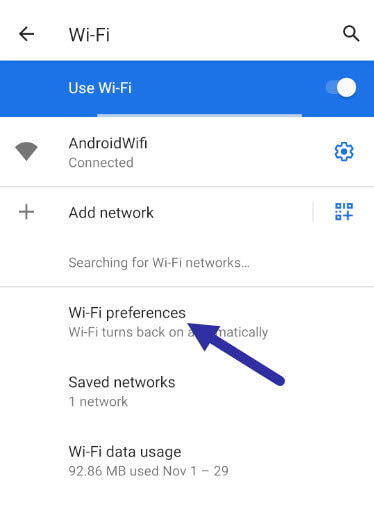
    4. Select the “Wi-Fi Preferences” option.
      android wi fi preference 291120
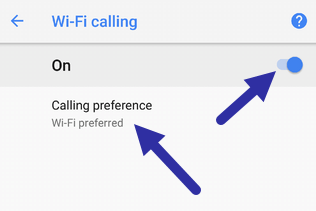
    5. Now, tap on the “Wi-Fi calling” option.
    6. Turn on the Wi-Fi calling feature.
    7. Select the “Calling preference” option.
    8. Select the “Wi-Fi preferred” option.
      turn on wi fi calling on android 291120
    9. Close the Settings app.

    From now on, your Android phone will automatically choose the Wi-Fi connection, if already connected to it, for regular phone calls. If the Wi-Fi signal is low, of poor quality, or lost, the phone call will seamlessly and automatically switch to the regular carrier signal. You don’t have to do anything and the call won’t be dropped even if you are in the middle of a conversation.

    Enable Wi-Fi calling on Samsung phone

    If you are using a Samsung Galaxy phone, these are the steps you should follow to turn on Wi-Fi calling on a Samsung phone.

    1. Open the Settings app on your Samsung phone.
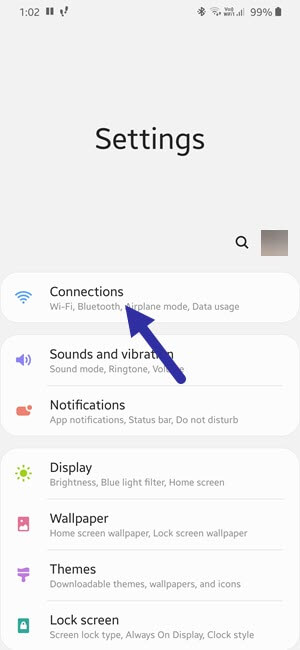
    2. Select the “Connections” option.
    3. samsung connections setting 291120
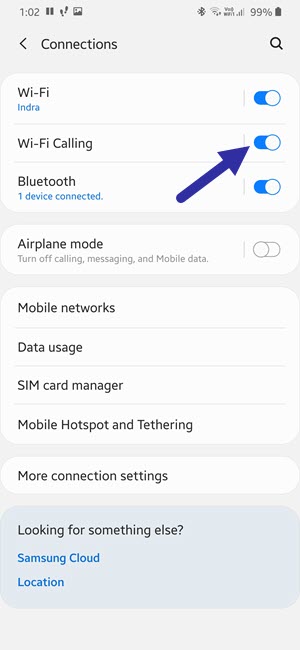
    4. Now, turn on the “Wi-Fi calling” feature.
      turn on wi fi calling on samsung 291120
    5. Close the Settings app.

    Just like the regular stock Android, your Samsung phone will choose the Wi-Fi connection, if already connected to it, for regular phone calls. If the Wi-Fi signal is low, of poor quality, or lost, the phone call will seamlessly and automatically switch to the regular carrier signal. You don’t have to do anything and the call won’t be dropped even if you are in the middle of a conversation.

    Important points to remember about the Wi-Fi Calling feature

    There are a few things you should note or remember when it comes to Wi-Fi calling on Android. Here is what they are:

    • Wi-Fi Calling feature should be supported both by your Android device and the cellular carrier. If you don’t see the Wi-Fi calling option in your Android settings, it is possible that your device doesn’t support it. If you are unsure about your mobile carrier, you have to contact their customer support.
    • Depending on your Android device manufacturer, the Wi-Fi Calling feature can be in a different place or page. However, you will generally find it on the Wi-Fi settings page in the Settings app.
    • Wi-Fi Calling uses the regular VoIP protocol (Voice over Internet Protocol). As such, you need to have an active internet connection to use Wi-Fi calling.
    • If your Wi-Fi connection is not strong enough, the voice clarity may be reduced. Depending on the device, the phone will switch to the carrier single if it thinks the cell signal gives you a better experience.
    • If too many devices are connected to the same Wi-Fi network, the Wi-Fi calling quality might deteriorate. So, it is not a good option for public spaces like airports or coffee shops.
    • Compared to the regular cellular network, Wi-Fi Calling gives you better battery life.
    • On most Android phones, the Wi-Fi calling feature can be turned on or off directly from the Notification Shade itself. Just slide down the notification shade and tap on the Wi-Fi calling icon to turn it on or off.

    That is all. I hope that helps. If you need any help, comment below and I will try to help as much as possible. If you like this article, check out how to find if your Android phone supports Wi-Fi 5Ghz.

  • How to Change the Keyboard on Android (with pictures)

    How to Change the Keyboard on Android (with pictures)

    If you have multiple keyboards, you can switch keyboards on the fly in Android. Here are the steps to change the keyboard on Android.

    Being the open platform that it is, Android lets you install any third-party keyboard you want directly from the Play Store. In fact, most phone manufacturers pre-install their own keyboard and even make it the default. If you don’t like the default keyboard or if you’ve installed some other keyboard, like Google Keyboard, you have to manually change the keyboard. This allows you to use the newly installed keyboard.

    For example, my Samsung phone comes preinstalled with the Samsung Keyboard. However, I like to use Gboard for my daily usage. So, I installed the Gboard keyboard from Play Store and followed the below steps to change the keyboard from the Samsung keyboard to the Gboard keyboard.

    In this quick and straightforward guide, let me take you though the steps to manually change the keyboard on an Android phone.

    Steps to change keyboard on Android

    All the keyboard settings are managed by the Language & Input tool of the Settings app. Follow these steps to change keyboard on an Android phone:

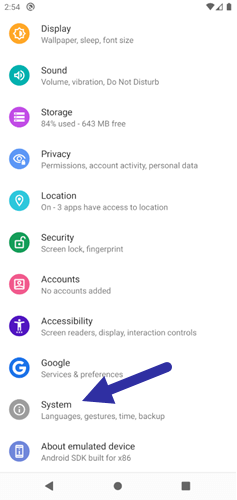
    1. First, open Settings and tap on the “System” option. You will find the option at the bottom of the Settings page.

    open system page in android settings 261220

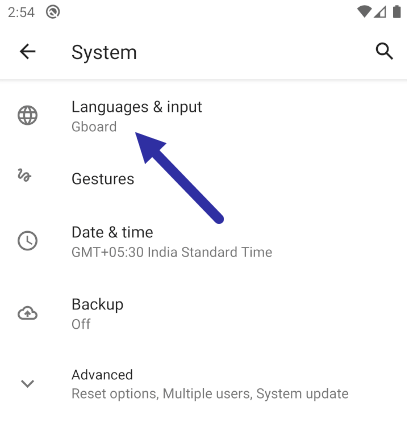
    2. Select the “Language & input” option on the System page.

    select language and input 261220

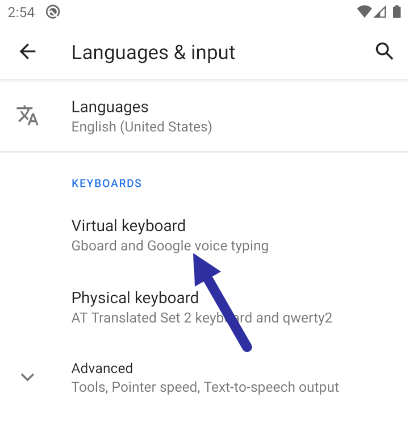
    3. Tap on the “Virtual keyboard” option. This is where the software keyboard settings are available.

    virtual keyboard settings 261220

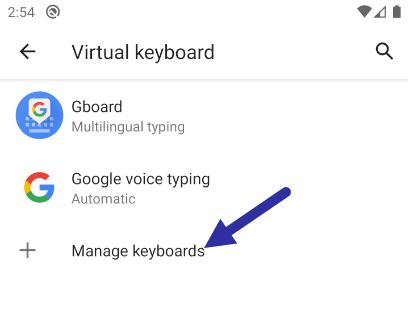
    4. Now, tap on the “Manage keyboards” option. Before you can change the keyboard, you need to enable it first in the keyboard section. Otherwise, you will not be able to select the alternate keyboard.

    manage keyboards in android 261220

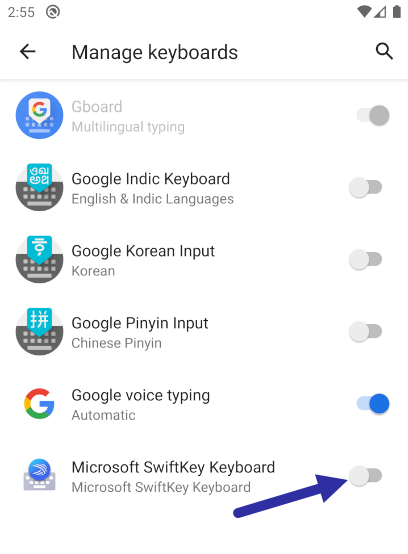
    5. Turn on the keyboard that you want to enable. In my case, it is “Swiftkey Keyboard”.

    turn on keyboard 261220

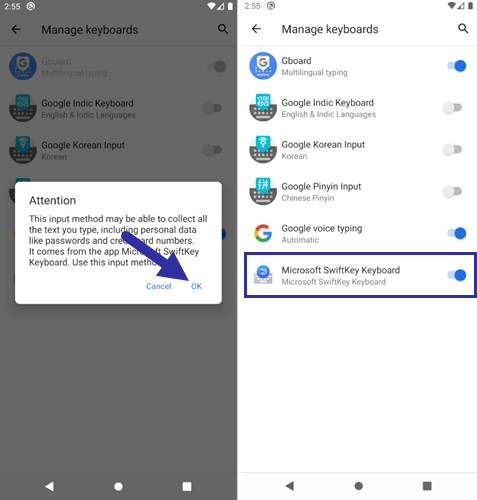
    6. Android might show a warning message when you turn on the keyboard. Just tap the “Ok” button to continue. As soon as you do that, the keyboard will be enabled.

    enable alternate keyboard in android 261220

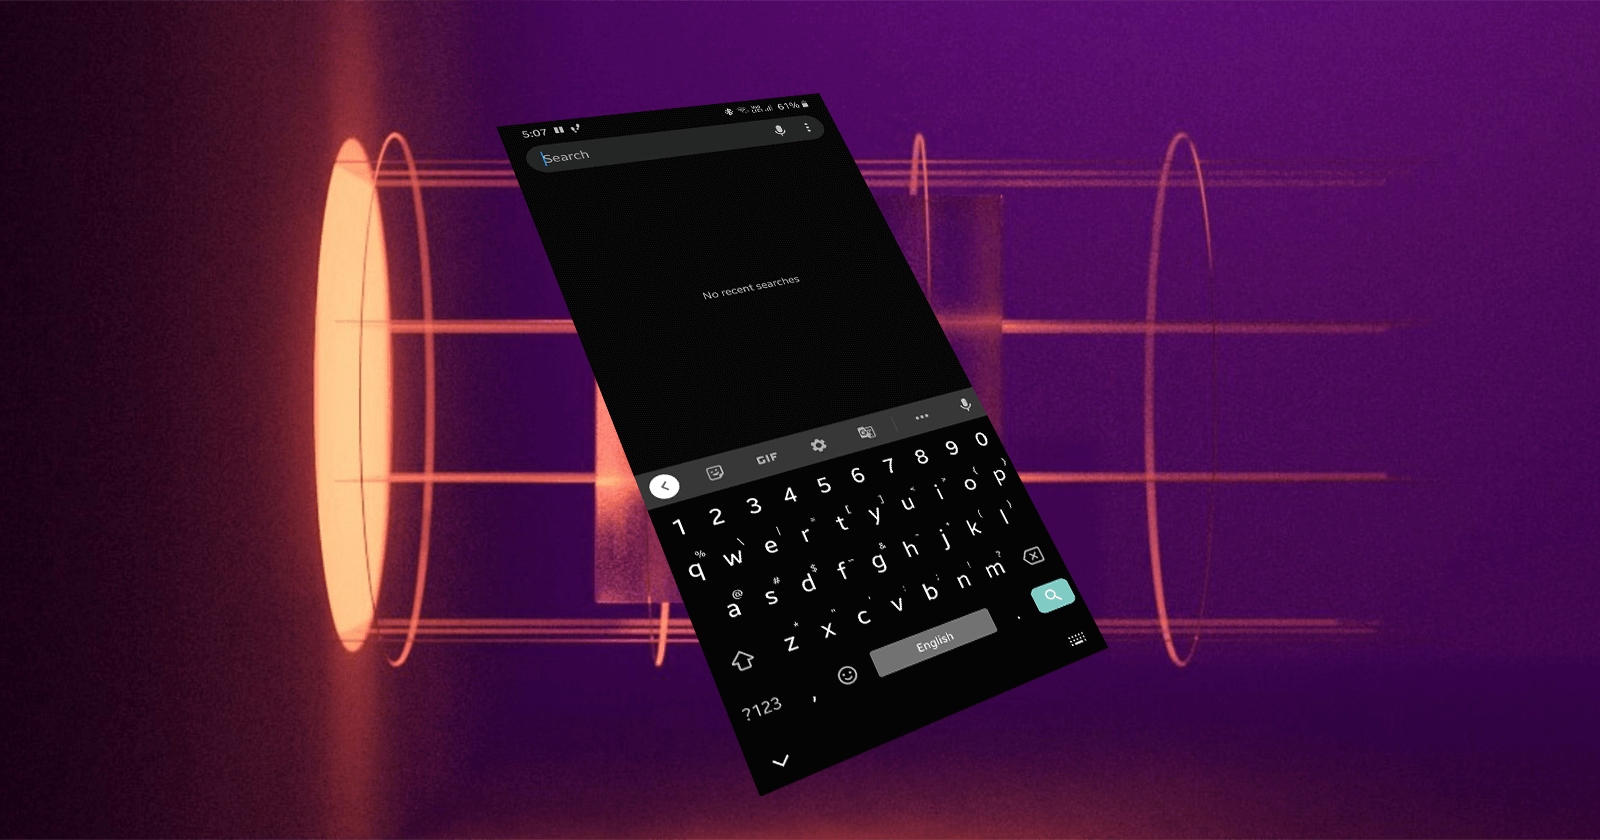
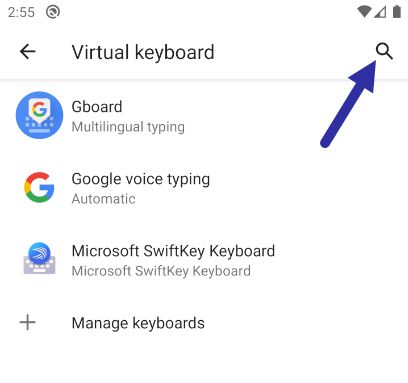
    7. Open the touch keyboard. You can do that by tapping on the search icon/field in the Settings app or in any text field.

    tap on search icon 261220

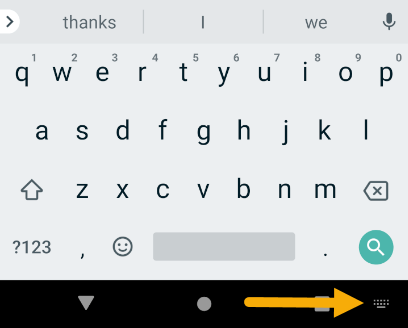
    8. After opening the software keyboard, tap on the “keyboard icon” in the bottom-right corner.

    keyboard settings icon 261220

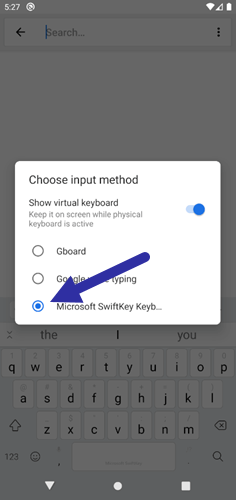
    9. Select the keyboard of your choice in the “Change input method” section.

    change keyboard on android 261220 1

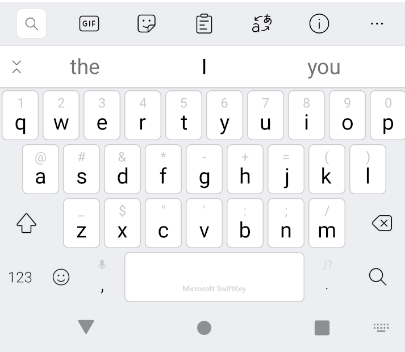
    As soon as you select the option, the Android will activate the keyboard you choose and opens it automatically. You can start using it immediately.

    gboard keyboard 261220

    That is it. With the above steps, you’ve successfully changed the keyboard on an Android. Do keep in mind that depending on the phone manufacturer and the Android version, the options can sometimes be in a slightly different place. However, it shouldn’t be that hard to find them.

    Downtime gaming: How to play T-Rex game in Chrome

    Troubleshooting

    I cannot see my keyboard in “Change input method”

    If you cannot see the keyboard in the “Change input method” flyout menu, it is possible that you either did not install the alternate keyboard or did not enable the keyboard in the “Manage keyboards” section. If you don’t do these two things, you will not see your keyboard in the keyboard settings. Also, some keyboard apps might require additional setup before you can change to them. If that’s the case, open the keyboard app from the App Drawer and follow the setup wizard. Once done, you can change the keyboard following the above steps.

    I hope that helps. If you need any help, comment below and I will try to help as much as possible.