Category: How To

Don’t know how to do something in android? Looking for a solution to an Android issue, this is the place for all your Android-based how-to guides & tips.

If you are looking for a device-specific guide, please use the tags below or the search form.

Samsung | OnePlus | Motorola | Asus | Xiaomi | Redmi | Realme | Oppo | Vivo

  • How to Turn ON Hotspot on Samsung Android Phone

    How to Turn ON Hotspot on Samsung Android Phone

    To share the internet with other devices, you have to turn on the mobile hotspot on your Samsung phone. Here’re the steps you should follow to do so.

    Though not often, there might be situations where you need to share the mobile data in your Samsung phone with other devices. There are any number of situations like unstable internet at your home or office, quick internet access to your laptop while traveling, sharing the internet with your friends or family, etc., where a mobile hotspot is very useful. No matter the reason, the Samsung phone makes it easy to create and turn on the hotspot. Once you turn on the hotspot, any device can connect to it with a password and use your internet.

    In this quick and straightforward article, let me guide you step by step on how to turn on the hotspot on a Samsung Android phone and how to manage it properly for better security.

    Jump to:

    Steps to turn ON hotspot on Samsung phone

    You can turn on the mobile hotspot on a Samsung phone in two different ways. One — from the Settings app and the other from the Notification slide. If this is your first time enabling the Hotspot, I recommend you follow the first method as you need to know the default hotspot password.

    Turn on hotspot from settings

    1. First, open Settings from the app drawer.
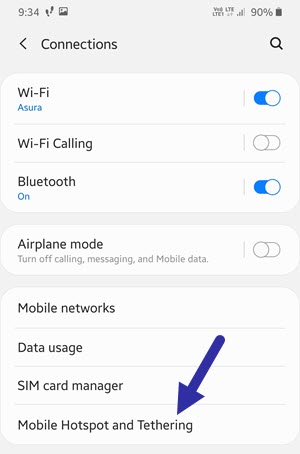
    2. Tap on the “Connections” option in Settings.
    3. Select the “Mobile Hotspot and Tethering” option.
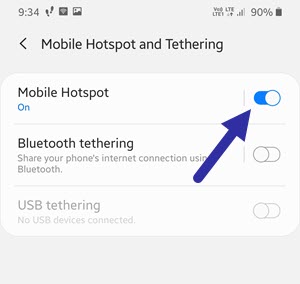
    4. Now, turn on the “Mobile Hotspot” option using the toggle button.

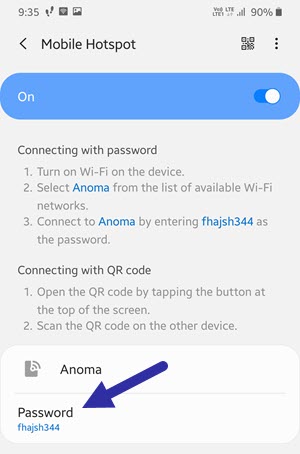
    By default, the hotspot is password protected. Each Samsung device has a different default hotspot password. To know your Samsung mobile hotspot password, tap on the “Mobile Hotspot” option. You will see it under the “Password Section.” If you want to, you can also change the Samsung hotspot password.
    Turn on hotspot from notification slide

    Samsung gives you a quick way to turn on the hotspot directly from the notification slide itself.

    First, swipe down from the top edge to open the Notification panel. From the icon grid, find and tap on the “Mobile Hotspot” icon. Once turned on, the icon will change to blue or some other accent color.
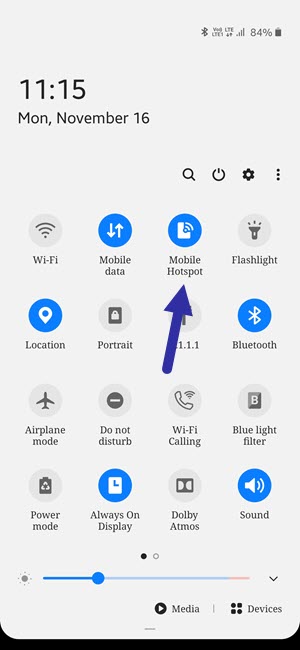
    Depending on how the icons are laid out, the mobile hotspot icon can be in a different location in the notification panel. So, if you cannot find the icon right away, go to the second page by swiping to left in the notification panel.

    Configure Samsung mobile hotspot settings

    Samsung offers extra configuration options to better manage the hotspot. Though these options are not necessary to configure, modifying them as need will make your life a tad bit easier. For example, the default hotspot password is just jumbled letters and numbers which hard to remember.

    Change hotspot password

    To change the hotspot password on Samsung Android phone follow the steps given below.

    1. Open the Settings app.
    2. Go to the “Connections → Mobile hotspot and tethering” page.
    3. Tap on the “Mobile Hotspot” option.
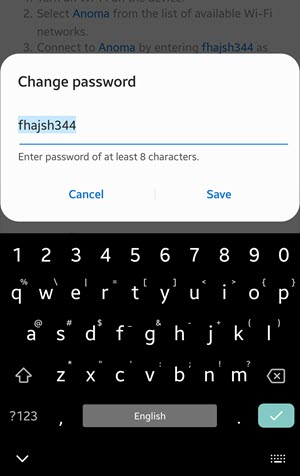
    4. Tap on the “Password” option.
    5. Input the password of your choice and tap on the “Ok” button.
    6. Close the Settings app.

    While setting the password, make sure that it is easy to remember but hard to guess. I recommend you make the password at least 8 characters long with both alphabets and numbers in it.

    Change hotspot timeout setting

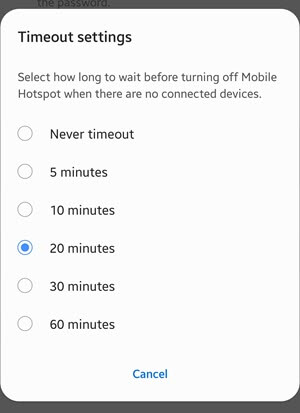
    When no device is connected to the hotspot, it is best to turn it off. In Samsung, you can configure the hotspot to turn itself off after a set timeout when there is no device is connected to it.

    1. Open the Settings app.
    2. Go to the “Connections → Mobile hotspot and tethering” page.
    3. Tap on the “Mobile Hotspot” option.
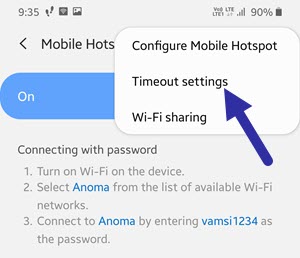
    4. Tap on the “three vertical dots” on the top-right corner.
    5. Select the “Timeout settings” option.
    6. Select the timeout length of your choice.
    7. Changes are saved automatically.
    8. Close the settings app.

    Things to keep in mind while using hotspot

    While using the hotspot feature, there are few general things you should know. They are as follows:

    • You need to turn off the WiFi to turn on the hotspot. If you don’t, you will see a message asking you to turn off WiFi.
    • Sometimes, if the data saver feature is turned on, you might be able to turn on hotspot.
    • Since mobile data is limited, be wary when connected to other devices. It is very easy to go overboard and reach/exceed the data limit. This is especially true when a computer is connected to the mobile hotspot. If you are using Windows 10, I recommend you enable metered connection to limit computer data usage.
    • You can see how many and what devices are connected to the WiFi hotspot from “Settings → Connections → Mobile hotspot and tethering → Mobile hotspot” page.
    • From the same page, you can change the device name by tapping on the default name. This is that name that appears to other devices.

    That is all for now. I hope that helps. If you need any help, comment below and I will try to help as much as possible. If you like this article, check out how to remove a WiFi network on Samsung Android phone.

  • How to Remove Google Meet Tab in Gmail App on Android

    How to Remove Google Meet Tab in Gmail App on Android

    You can easily get rid of the Meet tab in the Gmail app. Follow the steps in the article to remove the Google Meet tab in the Gmail app on Android.

    With all the work from home happening around the globe, Google is putting a lot of money and thought into its other products like Google Meet. In fact, Google Meet came out of nowhere (kind of) and got quickly integrated into various different Google services and apps. One such integration is the new “Meet” tab in the Gmail app. As you can guess, the new Meet tab in the Gmail app allows you to quickly connect with your peers without the need to open another app.

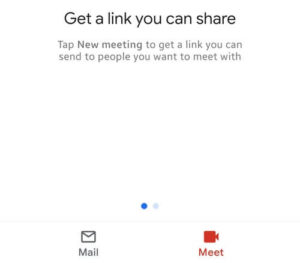
    Rather than the “Meet” tab be an opt-in feature, Google chose the enable it by default in the Gmail app. Though this the most obvious integration, it’s just a distraction if you are not a Google Meet user. Thankfully, if you don’t like the new Meet tab, you can get rid of it from Gmail and restore the previous appearance.

    Follow the steps below to remove the Google Meet tab from the Gmail app on Android.

    Steps to Remove Google Meet Tab in Gmail App

    You would think that the option to disable the Meet tab in the Gmail app will in the general settings page. However, Google in their infinite wisdom chose to put it on the Gmail Account page. Never the less, it is pretty easy to remove the Meet tab in Gmail. Follow the steps below.

    1. Open the Gmail app.
    2. Tap on the “Three lines” icon.
    3. Scroll down and select “Settings”.
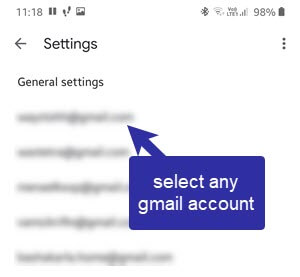
    4. Select any Gmail account from the list.
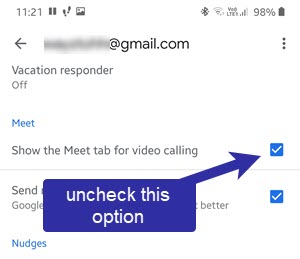
    5. Scroll down and uncheck the “Show the Meet tab for video calling” option.

    Detailed Steps

    1. First, open the Gmail app. You can do that by tapping on the Gmail icon in the app drawer.

    2. After opening the app, tap on the “three horizontal lines” appearing in the top-left corner. This is called the hamburger menu icon.

    Note: Depending on the app update, Google might change the position of the Menu icon. However, you can generally recognize it with “three horizontal lines”.

    3. Now, scroll all the way down and select the “Settings” option.

    4. In the Settings page, select any Gmail account. As I said before, the option to remove the Meet tab is available only on the Gmail account settings page.

    5. Here, scroll down until you find the “Meet” section. Generally, you find it in the middle part of the page.

    6. Once you are here, uncheck the “Show the Meet tab for video calling” option.

    As soon as you uncheck the option, Gmail will restart itself to apply the changes. From now on, you will not see the Meet tab on the main Gmail screen.

    Since there are no extra tabs at the bottom, the user interface looks clean and you will get a bit more screen real estate to work with emails.

    That is all. I hope that helps. If you need any help, comment below and I will try to help as much as possible.

  • How to Set Spotify Sleep Timer on Android

    How to Set Spotify Sleep Timer on Android

    The sleep timer automatically stops Spotify after a set time. Here are the steps to set the Spotify sleep timer on an Android phone or tablet.

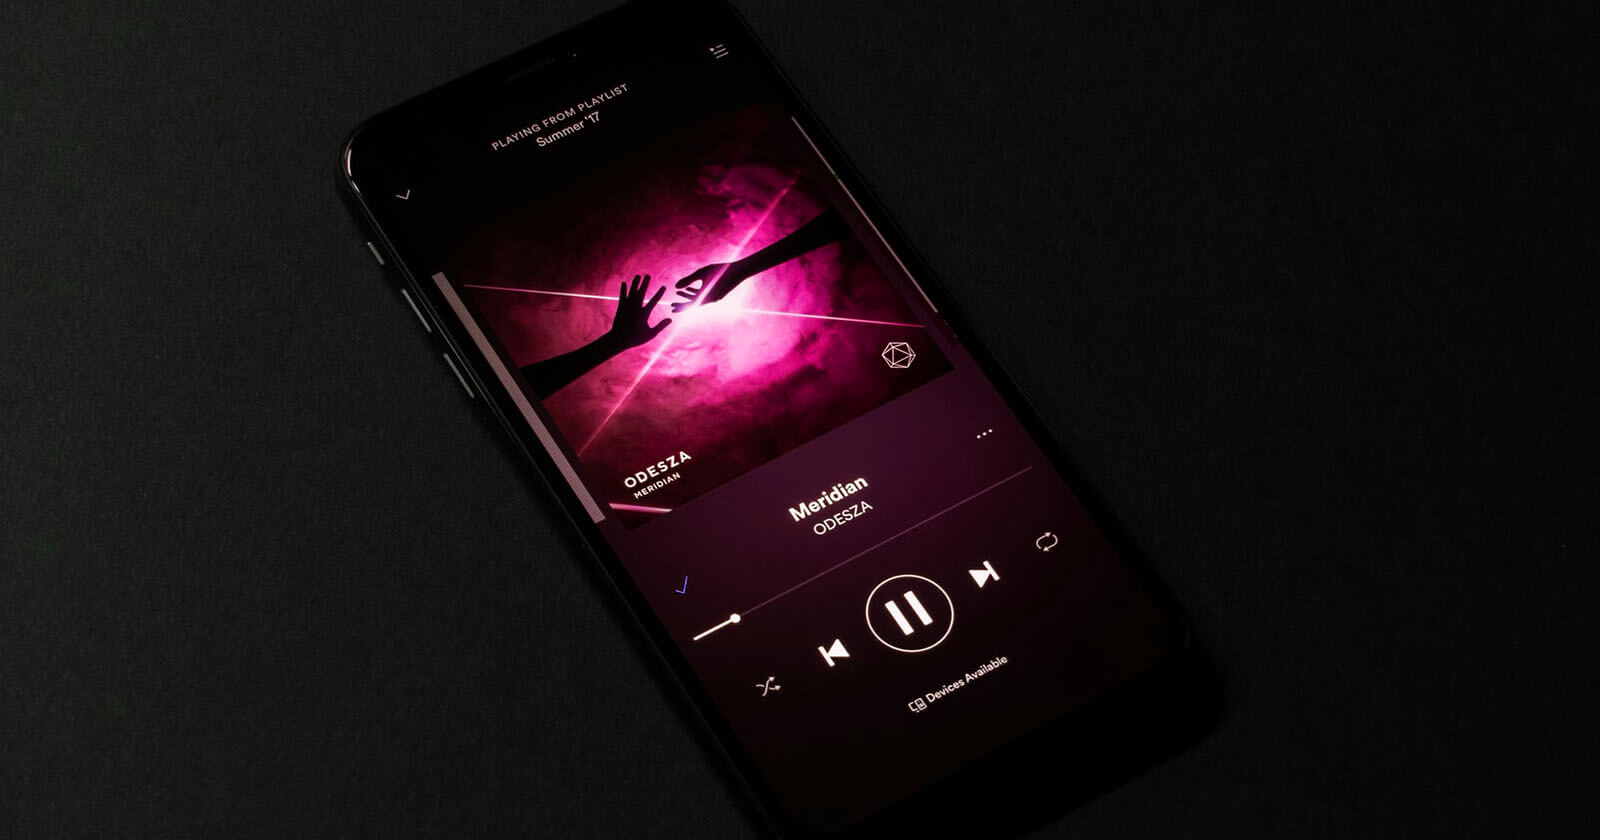
    For music and podcasts, there is no better alternative than Spotify, at least for me. I’ve been using the app for quite a while and it is pretty awesome at what it does. The user interface is minimal but dense enough to give you all the information you need. Most of all, the seamless syncing and cross-play between devices are the best compared to any other music streaming app for Android or otherwise.

    While listening to music and podcasts, it is very useful to set a sleep timer. For example, if you like to listen to music or podcasts before going to bed, the ability to set the sleep timer in Spotify is a godsend. In case you don’t know, a sleep timer automatically stops Spotify from playing after a set amount of time. That way, the battery won’t drain playing music into the ether. Thankfully, you can use the built-in option to enable the Spotify sleep timer as and when needed.

    In this quick and straightforward guide, let me show you the steps to set the Spotify sleep timer on any Android device.

    Steps to set the Spotify sleep timer

    To set the Spotify sleep timer, follow the steps given below.

    1. Open the Spotify app.
    2. Play any music or podcast of your choice.
    3. Tap on the three vertical dots on the top right corner.
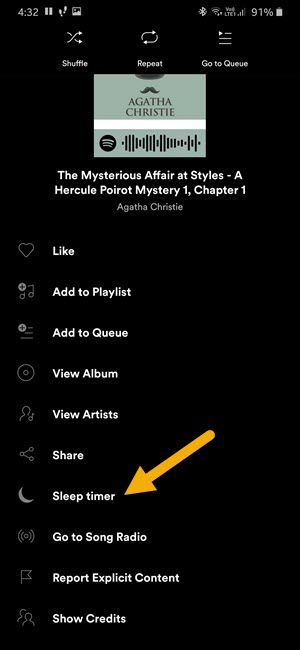
    4. Select the “Sleep timer” option.
    5. Select the timer to set it.

    Detailed steps

    1. First, open the Spotify app on Android. You can do that by opening the app drawer, find the Spotify icon, and then tapping on it.

    2. After opening the Spotify app, play the music or podcast of your choice. The sleep timer setting is only available via the music menu.

    3. In the media playback screen, tap on the three vertical dots appearing on the top right corner. If you want to, you can pause the media playback for the moment.

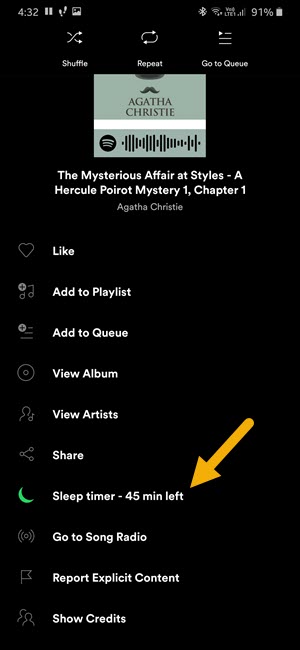
    4. The above action will open the music menu. Here, tap on the “Sleep timer” option. Typically, you will see it at the bottom of the screen. Depending on the screen size, you might have to scroll a bit to see the option.

    5. As soon as you select the option, Spotify will show predefined timers. Select the sleep timer as you need. In my case, I choose 45 minutes as it is enough time for me to fall asleep.

    6. Once the sleep timer is set, you will see the “Your sleep timer is set” message at the bottom. The message will disappear after a couple of seconds.

    You can also verify if the Spotify sleep timer is properly set or not from the music menu. To do that, tap on the three vertical dots and you will see the sleep timer in the menu. The good thing is, the timer will update in real-time so that you will know how much time is left.

    Cancel Spotify sleep timer

    To cancel the Spotify sleep timer, tap on the three vertical dots, and then tap on the “Sleep timer” option. When the sleep timer is active, tapping on it again will cancel the Spotify sleep timer.

    That is all. I hope that helps. If you need any help, comment below and I will try to help as much as possible.

  • How to Play T-Rex Dinosaur Game on Chrome Android

    How to Play T-Rex Dinosaur Game on Chrome Android

    Here is how you can play the hidden t-rex dinosaur game on Chrome Android without disconnecting from the internet.

    For a long time now, the Chrome browser on Android has an awesome hidden game. In general, the game is known as the Chrome t-rex dinosaur game. In the game, all you have to do is jump over the obstacles. As far as the mechanics go, the dinosaur game itself is pretty simple and straightforward. But, it is really addictive and fun to play. In fact, you can spend a solid 15 to 20 minutes doing nothing but play the game.

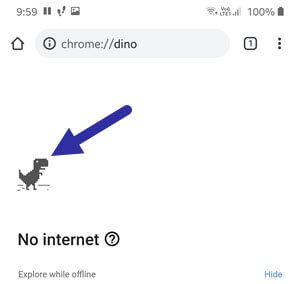
    By default, the game automatically appears when there is no internet connectivity. You can identify the game by seeing the little dinosaur image on the screen. When you see the dinosaur image just tap on it and the game starts.

    Though the Chrome dinosaur game is pretty popular, there are still a lot of users who don’t know how to open the dinosaur game in Chrome Android. This is especially true when you don’t want to disconnect from the internet just to play the game.

    In this quick article, let me show how to play the dinosaur game in Chrome Android without disconnecting from the internet.

    Steps to play t-rex dinosaur game on chrome android

    To play the dinosaur game in Chrome on Android, follow the steps listed below:

    1. Open the Chrome browser.
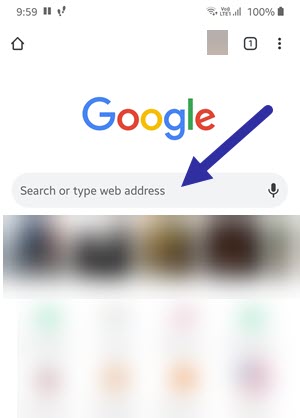
    2. Tap on the URL bar.
    3. Type “chrome://dino” and hit “Go”.
    4. Next, tap on the “Dinosaur” icon to start the game.

    Detailed steps with images

    1. First, open the Google Chrome browser on your Android phone. You can do that from the app drawer.

    2. After opening the Chrome browser, tap on the URL or address bar. If you are on a new tab, the URL/address bar appears like a regular old search bar. Just tap on the available address field.

    3. In the address bar, type “chrome://dino”. This is the secret URL that lets you play the dinosaur game without disconnecting from the internet.

    4. After typing the URL, tap on the GO button on the keyboard. You will see it as the arrow (→) icon on your keyboard.

    5. After the secret page has been loaded, tap on the dinosaur image.

    As soon as you tap on the dinosaur image, the game starts. The game automatically goes full screen so you can play without any distractions whatsoever.

    How to play the Chrome dinosaur game

    The dinosaur game is pretty simple. As soon as the game starts, just tap on the screen to make the dinosaur jump the coming obstacle. The more obstacles you jump, the higher will be your score. Though this sounds simple, remember that as the game progress, the speed at which the obstacles come towards you will increase. So, to beat the high score, you need to be fast and accurate with your jumps. A jump too fast or slow will end your run almost instantly. For the most part, there are recoveries in this game if you mess up.

    That is all. I hope that helps. If you need any help, comment below and I will try to help as much as possible. If you like this article, check out how to clear Chrome browsing history on Android.

  • How to Delete Chrome Browsing History on Android Phone

    How to Delete Chrome Browsing History on Android Phone

    This simple Android guide shows how to fully delete browsing history in the Chrome browser on Android to protect privacy and browsing habits.

    Every time you open a website or web page in the Chrome browser, it is automatically logged and saved to the history page. This is called Browsing History. In case you are wondering, saving your web activity within the browser is not specific to Chrome. Almost every browser does this. There are a few important reasons why a browser saves your web activity. Some of those reasons include but not limited to help you find previously visited webpages, autofill address bar when typing the web URL, etc.

    Though the Chrome browsing history is useful in many ways, it is recommended that you clear it from time to time. This is especially important if you want to share the Chrome browser with others or just to erase your past web activity en mass. No matter the reason, the Android Chrome browser makes it easy to delete browsing history with just a few taps.

    In this quick and straightforward article, let me guide you step by step to delete Chrome browsing history on Android.

    Steps to Delete Chrome Browsing History

    To delete the Chrome browsing history, follow the steps as shown below.

    1. Open the Chrome browser.
    2. Tap on the “three vertical dots”.
    3. Select the “Settings” option.
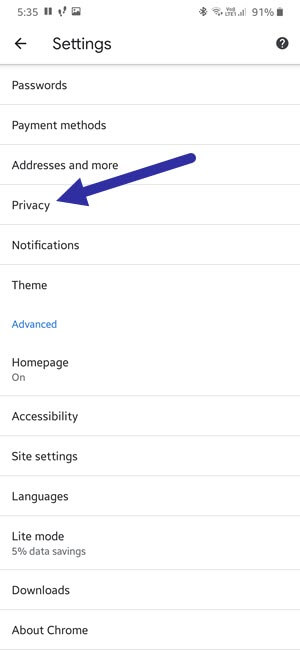
    4. Select “Privacy” from the page.
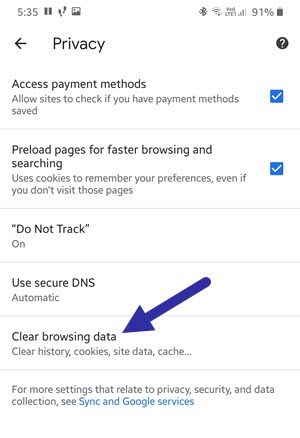
    5. Tap on the “Clear browsing data” option.
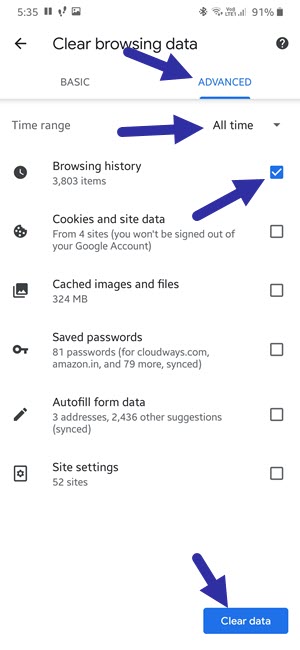
    6. Go to the “Advanced” tab.
    7. Select the “Browsing history” checkbox.
    8. Uncheck other checkboxes.
    9. Tap on the “Clear data” button.

    Detailed Steps

    1. Open the app drawer and tap on the Chrome browser to open it.

    2. After opening the browser, tap on the “three vertical dots” on the top-right corner. This is the menu icon.

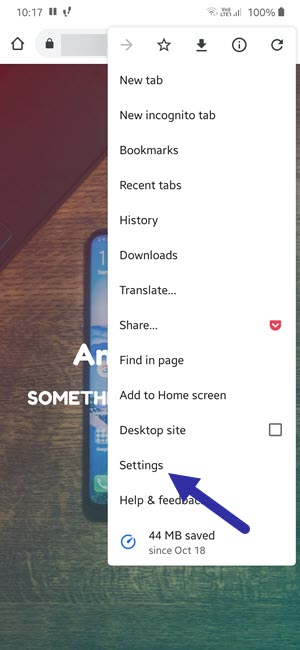
    3. From the Chrome menu, tap on the “Settings” option. This is where you will find all the options to manage the Android Chrome browser.

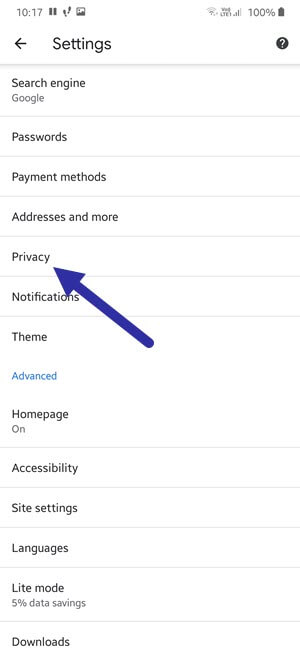
    4. The browsing history is considered a privacy option. So, on the Settings page, select the “Privacy” option.

    5. Here, select the “Clear browsing data” option. This is where you will find all the browsing activity related options.

    6. Go to the “Advanced” tab. This tab gives you additional controls for clearing the browsing data.

    7. Select “All time” from the Time Range dropdown menu. If you don’t want to delete all the browsing history, you can select the time range of your choice from the same dropdown menu.

    8. Next, select the “Browsing history” checkbox.

    9. Since we only want to delete the Chrome browsing history on Android, uncheck all the other checkboxes.

    10. Finally, tap on the “Clear data” button.

    As soon as you click the Clear Data button, the Chrome browser in Android will delete the browsing history. Once that is done, you can close the browser.

    Important Note: When you delete browsing history in Chrome on Android, it is only deleting the browser history in that specific device. The browsing history on other devices like your computer or phone will stay intact. If you want to completely delete your browsing activity from all the devices at the same time, you have to do it from the Google Accounts page.

    That is all for now. I hope that helps. If you need any help, comment below and I will try to help as much as possible. If you like this article, check out how to clear Chrome cookies on Android.

  • How to Remove WiFi Network on Samsung Android Phone

    How to Remove WiFi Network on Samsung Android Phone

    If you no longer need access to a specific WiFi network, you can remove that WiFi network from Samsung phone. Here’re the steps.

    In any Android device, you can connect to as many WiFi networks as you want to. In fact, the Android device will automatically store the details of every WiFi network you connect to. This makes it easier to connect to that same network in the future. As you can guess, having the ability to save WiFi network details and connect to it when the network is available is very useful in a lot of situations.

    However, this might not be the case for every WiFi network. There might be times when you don’t want to connect to a specific WiFi network automatically. This is especially true with WiFi networks you don’t trust.

    When you don’t want to connect to a WiFi network, you can delete or remove that WiFi network on your Samsung phone. All you have to do is find the WiFi network and delete it from the saved list.

    Steps to Remove WiFi Network from Samsung Phone

    Follow the steps shown below to remove or delete WiFi network on a Samsung Android phone.

    1. Open Settings.
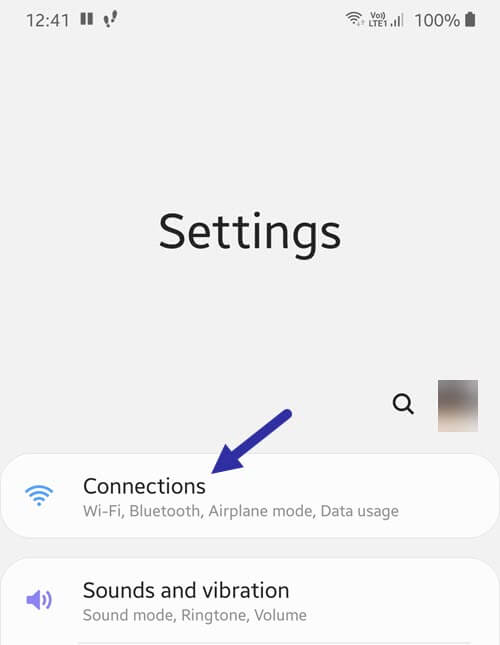
    2. Tap on “Connections”.
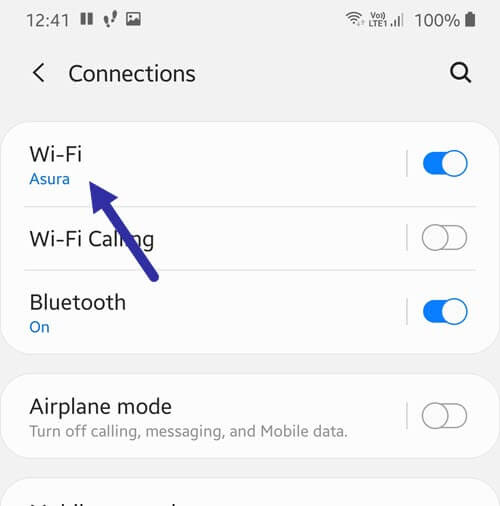
    3. Now, tap on the “Wi-Fi” option.
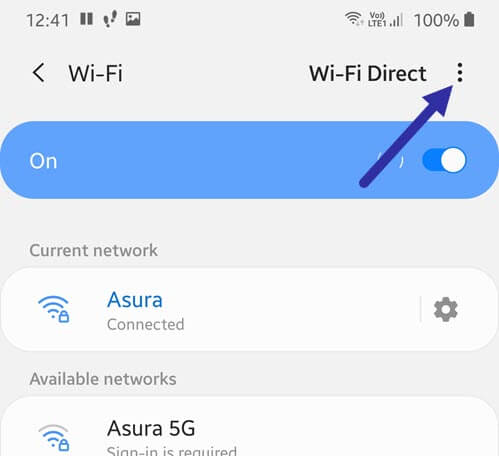
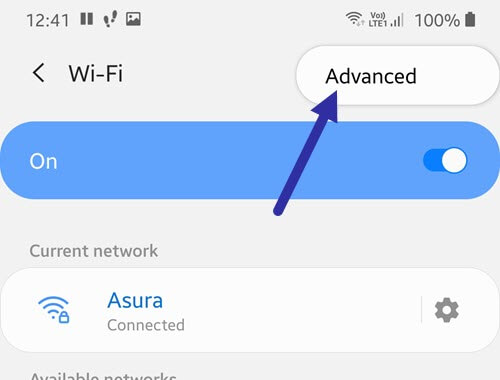
    4. Tap on the “Menu” icon.
    5. Select “Advanced”.
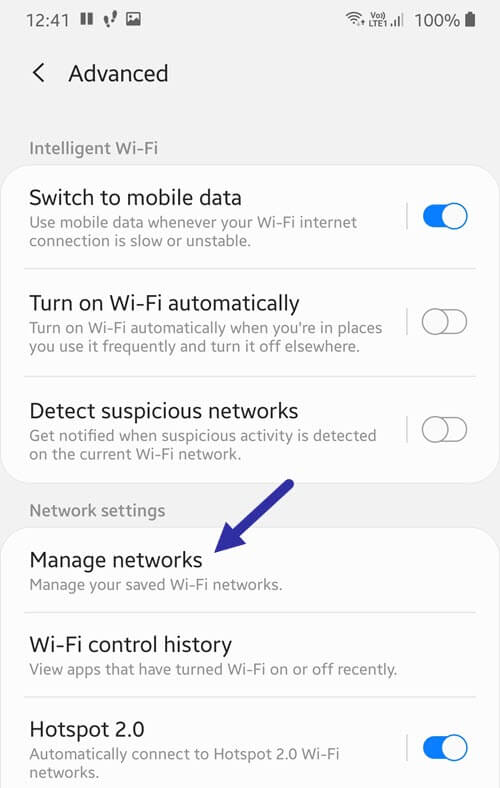
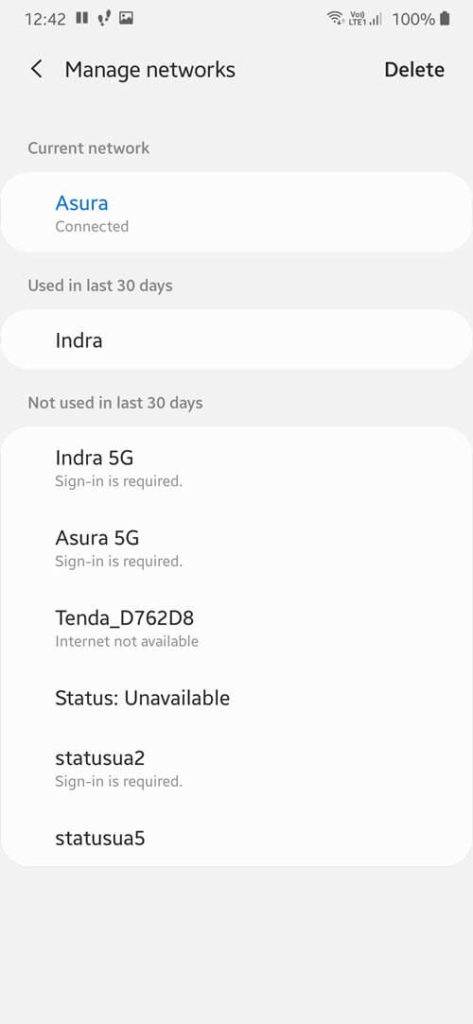
    6. Select the “Manage networks” option.
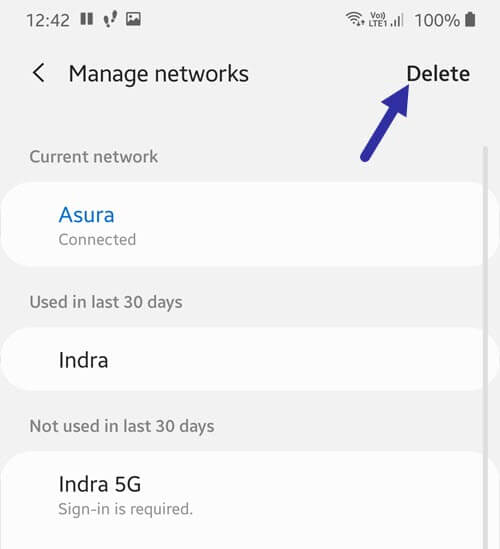
    7. Tap on the “Delete”
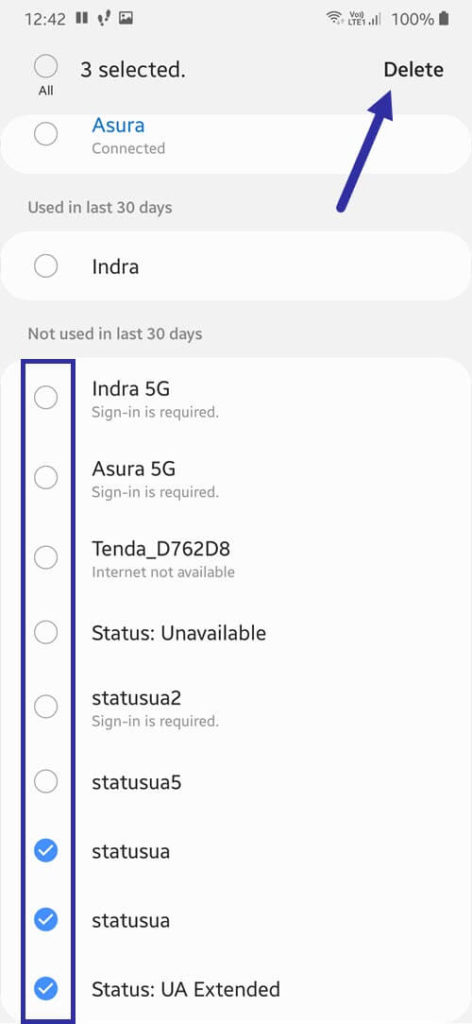
    8. Select the WiFi network(s) you want to delete.
    9. Tap the “Delete” button.

    Detailed Steps

    1. First, open the Settings app on your Samsung phone or tablet. You can do that by tapping on the Settings (gear) icon in the App drawer.

    2. After opening it, tap on the “Connections” option. This is where you will find various network options like WiFi, Bluetooth, Mobile Data, Hotspot, etc.

    3. Now, tap on the “WiFi” option. Don’t tap on the toggle button, it will either enable or disable WiFi.

    4. Here you will see the current and available WiFi networks. Tap on the “Menu” icon on the top-right corner. You will see it as a three-dotted vertical line.

    5. Select the “Advanced” option form the menu.

    6. On this page, select the “Manage networks” option under the “Network settings” section.

    7. Now, tap on the “Delete” button on the top-right corner.

    8. Select the WiFi networks you want to remove. In my case, I’ve selected three WiFi network to delete.

    9. After selecting, press the “Delete” option to remove WiFi network on Samsung phone.

    10. Finally, close the Settings app.

    That is all. It is that simple to remove WiFi network on a Samsung Android phone running One UI.

    I hope that helps. If you need any help, comment below and I will try to help as much as possible.

  • How to Set Data Limit on Samsung Android Phone

    How to Set Data Limit on Samsung Android Phone

    To restrict mobile data usage, you can set data limit on your Samsung Android phone. Here are the exact steps you should follow to do so.
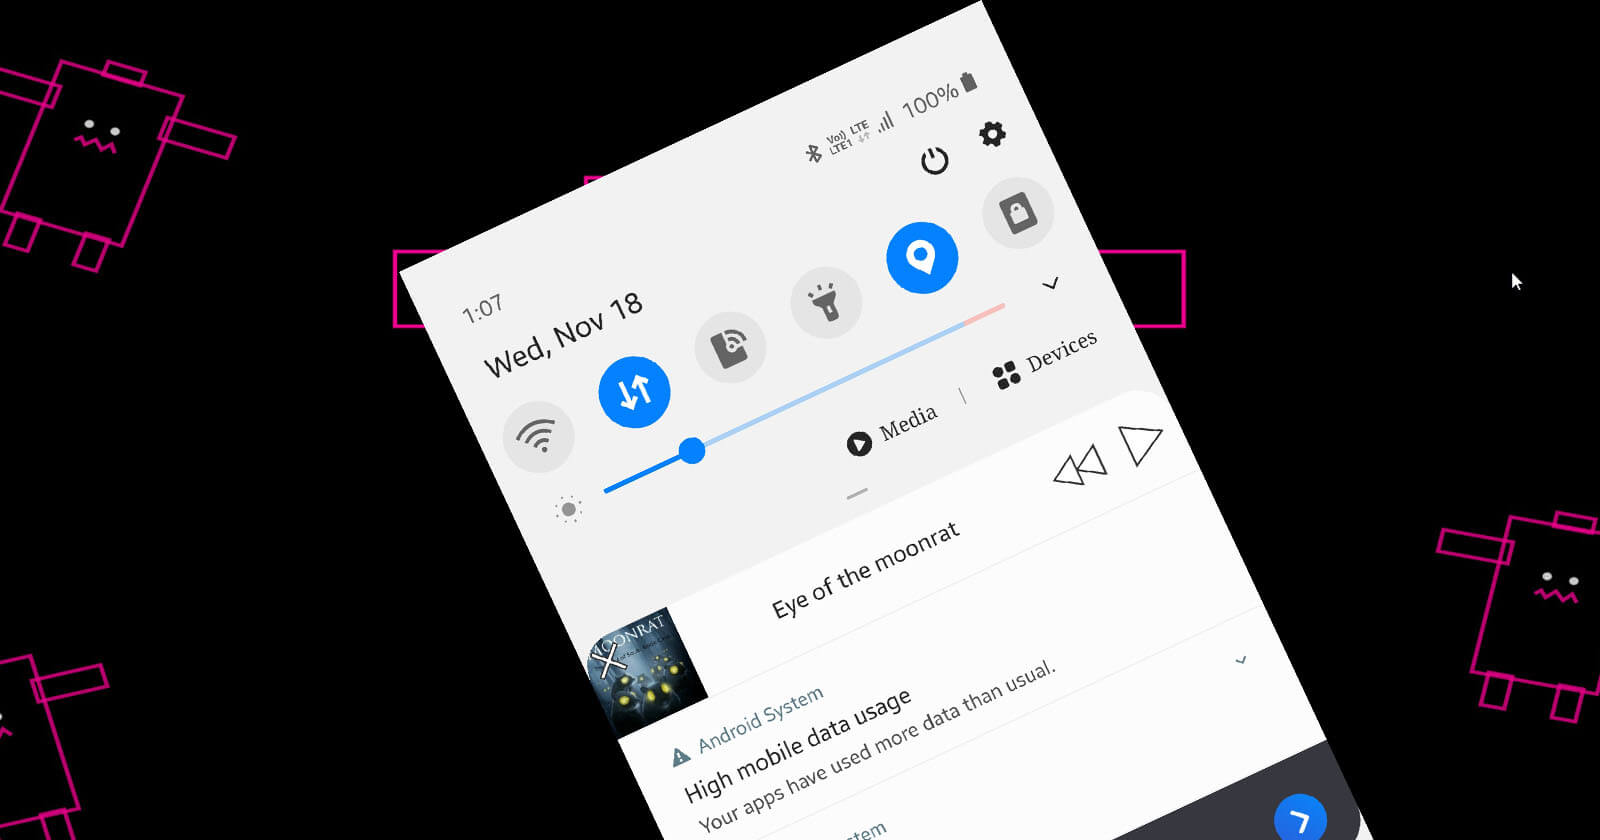
    No matter where you live, mobile data is limited and precious. Unlike your regular broadband connection where unlimited or over-the-top FUPs (Fair Usage Policy) are a norm, the mobile data is still very much limited. Some networks limit you on daily basis and some on monthly basis. Not only that but the amount of mobile data you get is entirely dependent on your connection plan. For instance, I get 1.5GB/day. When I exceed that limit, the speed drops to 64kbps which is practically unusable. Some ISPs might even charge extra when you go over the limit.

    Considering how important and limited mobile data is, it is important that you set data limits to make sure you won’t go overboard on any given month. The data limit also helps you budget mobile data so that you won’t be stranded in emergencies. If you are using a Samsung Android phone, it has a built-in way to quickly set and change the data limit.

    In this quick and straightforward article, let me guide you through the steps to set the data limit on a Samsung Android phone.

    Jump to:

    Steps to set data limit on Samsung

    To set the data limit on Samsung, follow the steps shown below.

    1. Open settings on the Samsung device.
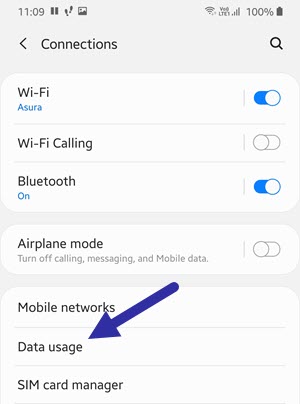
    2. Tap on the “Connections” option.
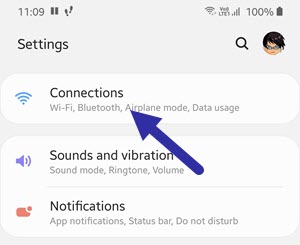
    3. Select the “Data usage” option.
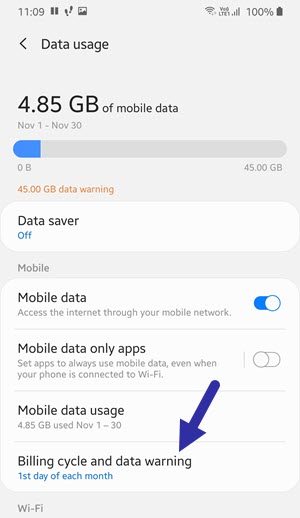
    4. Now, select the “Billing cycle and data warning” option.
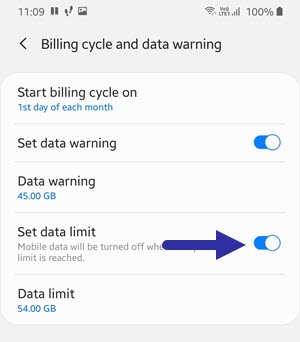
    5. Turn on the “Set data limit” option.
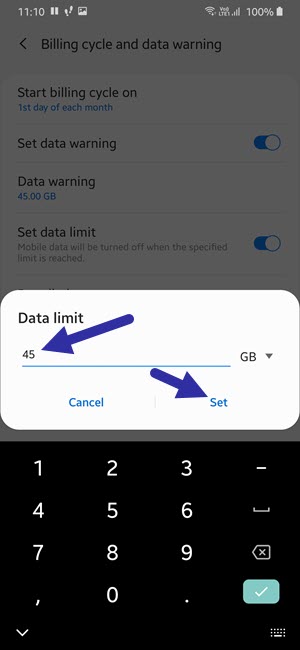
    6. Tap on the “Data limit” option.
    7. Set the limit in GBs and tap “Set“.
    8. Close settings.

    Detailed steps with images

    1. First, open the Settings app and tap on the “Connections” option. This is where you will find all the options related to mobile data.

    2. Here, select the aptly titled “Data usage” option.

    3. Select the “Billing cycle and data usage” option. In this case, the billing cycle, in general, refers to the monthly quota for your mobile data.

    4. On this screen, turn on the “Set data limit” option. This is the option that lets you restrict mobile data on Samsung.

    5. Now, tap on the “Data limit” option. This option lets you set the absolute limit for the mobile data.

    6. Set the data limit in GBs and tap on the “Set” button. Once your phone reaches this limit, it will stop you from using any more.

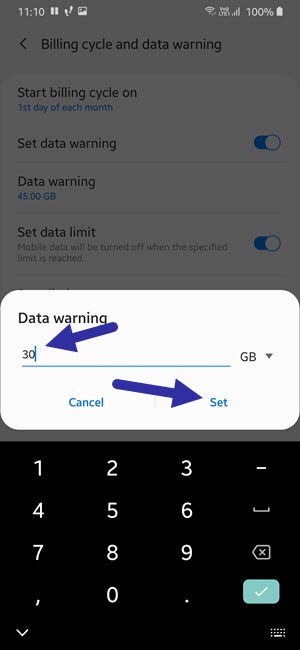
    7. Next, you need to set the data limit warning. That way, the phone can show you a warning message when you are reaching the data limit. To do that, tap on the “Data warning” option on the same page.

    8. Set the data warning limit in GBs. The warning limit should be below to actual data limit. Otherwise, the data warning will be useless. In my case, I set the data warning limit at 10GBs less than the actual data limit.

    9. Finally, close the settings app.

    That is it. Once you set the data limit, your Samsung device monitors how much data you are using. When you reach the limit, it will stop you from using any more data to help avoid excessive billing.

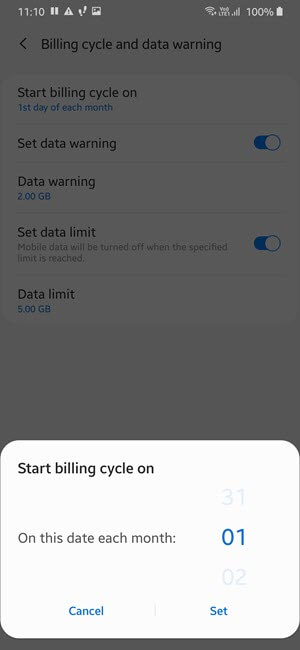
    Important note: By default, the billing cycle is set to the 1st of every month. If your mobile data billing cycle is different, i.e, if it resets at a different data, you need to change it for accurate data limit. To change the billing cycle, tap on the “Start billing cycle on” option, and set the data limit as needed.

    Steps to change data limit on Samsung

    If the data limit is too restrictive or not sufficient, you can change the data limit on Samsung. Here’s how.

    1. Open Settings and select “Connections”.
    2. Go to the “Data usage → Billing cycle and data warning”.
    3. Select the “Data limit” option.
    4. Change the data limit as needed.
    5. Tap “Set” to save changes.
    6. Close settings.

    Note: If the data limit option is grey out, it means that you did not set the limit in the first place. Turn on the “Set data limit” option to enable the “Data limit” option.

    That is all. I hope that helps. If you need any help, comment below and I will try to help as much as possible. If you like this article, check out how to turn on hotspot on a Samsung phone to share the internet.

  • How to Switch Accounts in Google Play Store (Change Account)

    How to Switch Accounts in Google Play Store (Change Account)

    You can use the Play Store with multiple Gmail accounts. Here are the steps to switch accounts in the Google Play Store on Android.

    To use the Google Play Store on Android, you are required to login with a Google account. If you don’t have a Google account, you can signup for one while setting up the Android device or from the web. Every app you purchase and download is linked to your Google account. Since apps and purchases are linked, when you sign in to another device using the same Google account, all relevant app data is restored automatically.

    Though not well known, you can log into the Play Store with multiple Google accounts. When using multiple accounts, you can change your Google Play account and restore the purchases and apps from that account. This is especially useful if you bought apps from the Play Store using multiple accounts. Basically, you can switch between accounts in Play Store to manage all your purchases in one place. There is no need to log out from one account to use another account.

    In this quick and straightforward article, let me show you the steps to switch accounts in Google Play Store on an Android device.

    Switch accounts in Google Play Store

    To change or switch accounts in the Google play store, follow these steps.

    1. Open the Google Play Store.
    2. Tap on the “User” icon.
    3. Select the account you want to switch to.
    4. If needed, close and re-open the Play Store app.

    Detailed steps

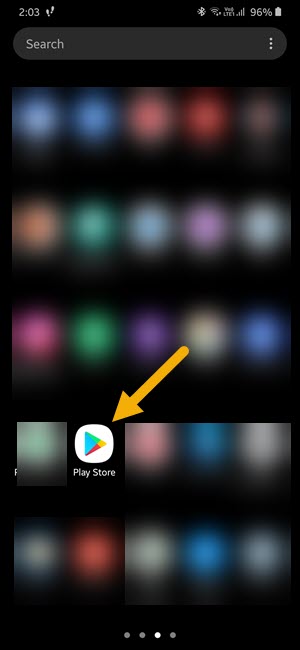
    1. First, open the app drawer, find the play store icon, and tap on it. Doing this will open the Play Store app on your phone or tablet.

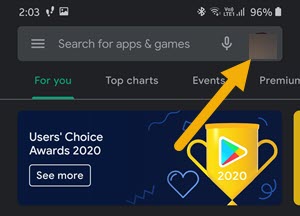
    2. After opening the play store app, click on the user icon. You will see it in the top-right corner. In general, you can easily recognize it by your Google user account icon.

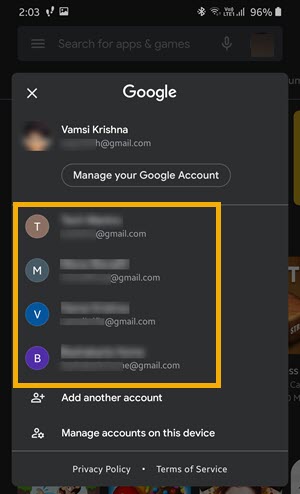
    3. The play store will now show an account selection pop-up. You will see all your linked Google accounts in this pop-up. Select the account you want to switch to.

    As soon as you select the account, the play store app will automatically switch the account and reload itself. Once that is done, you can install apps and restore purchases using the switched account. When needed, you can switch back to the old account by following the same steps.

    Cannot see additional Google accounts in the play store

    If you don’t see additional Google accounts in the pop-up screen, it is possible that you did not sign into them. Thankfully, you can add another account to the Play Store from the same pop-up screen. To add another account, tap on the “Add another account” option and follow the wizard. Once you are done, the account is added to the Play Store. You can then follow the steps shown above to switch accounts on the Google Play Store. In addition to the Play Store app, the Google account is also added to your Gmail account.

    I hope that helps. If you need any help, comment below and I will try to help as much as possible. If you like this article, check out how to remove the Meet tab in the Gmail app.

  • How to Completely Clear Chrome Cookies on Android

    How to Completely Clear Chrome Cookies on Android

    This simple Android guide takes you through the steps to completely clear all Chrome Cookies on Android phones and tablets.

    On Android, Google Chrome is the browser. In fact, it comes bundled in all Android devices. Though there are other browsers for Android, there is no denying that Chrome is the most dominant of them all with nearly 90% Android market share. Like any other web browser, whenever you visit any website in the Chrome browser, the website will automatically set cookies. These cookies are important and used in many different ways by the websites.

    Though cookies are useful in many ways, they might also cause problems from time to time. For example, corrupted cookies can make the Chrome browser slow and websites to not load as they should. Not only that but if you want to reset your preferences, you have to delete cookies in the Android Chrome browser.

    In this quick article, let me show you the steps to completely clear Chrome cookies on Android.

    Jump to:

    Steps to Clear Chrome Cookies on Android

    To clear all Chrome cookies on Android follow these steps:

    1. Open the Chrome browser.
    2. Tap on the “three vertical dots“.
    3. Select “Settings.”
    4. Select the “Privacy” option.
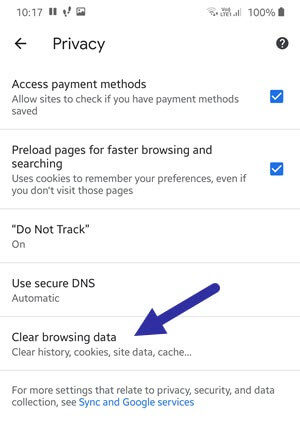
    5. Tap on the “Clear browsing data” option.
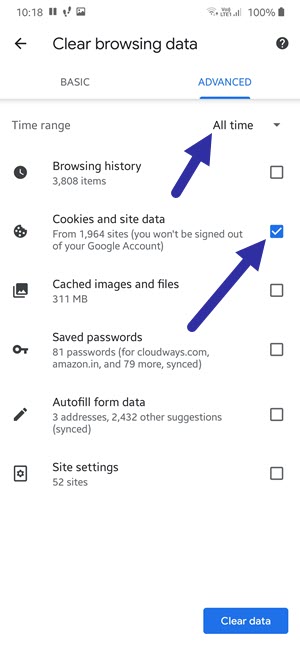
    6. Select “All time” from the Time Range dropdown.
    7. Select the “Cookies and site data” checkbox.
    8. Tap on the “Clear” button.
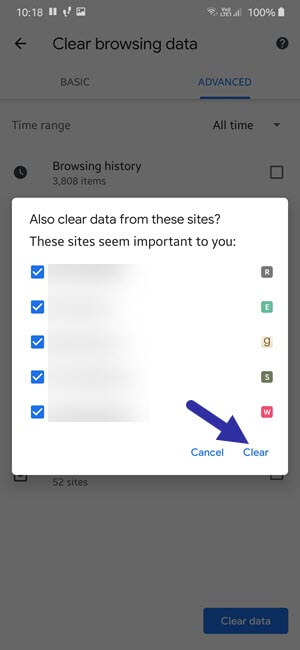
    9. If you see a confirmation message, tap on “Clear” again.
    10. Close the Chrome browser.

    Detailed Steps

    1. First, open the Google Chrome browser from the app drawer.

    2. After opening the browser, tap on the “three vertical dots” icon on the top-right corner. This opens up the Chrome menu with a bunch of options.

    3. From the menu, select the “Settings” option. This is where you can change and configure all sorts of Chrome options.

    4. On the settings page, select the “Privacy” option.

    5. Now, tap on the “Clear browsing data” option.

    6. Select “All time” option from the “Time Range” dropdown menu at the top. You can choose any timeframe as you want.

    7. Since we want to delete all Chrome cookies, tap on the “Cookies and site data” option. Uncheck all other checkboxes. The same option also tells you how many sites are storing cookies and other site data in Chrome. In my case, a total of 1,964 sites are storing cookies and site data.

    8. Tap on the “Clear” button at the bottom.

    9. When Google thinks some cookies and site data are important, it might show a pop-up asking if you really want to delete those specific cookies. If you don’t want to delete site data or cookies of a certain site, uncheck it from the list. To delete full data, leave the defaults be and tap on the “Clear” option.

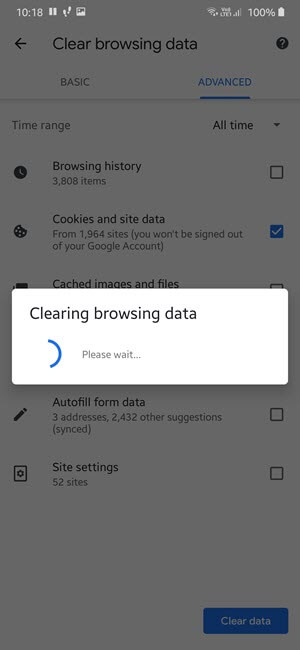
    10. As soon as you tap on the clear option, Chrome will clear cookies. Depending on the number of sites, the operation might take a few seconds.

    11. Once done, you can close the Chrome browser.

    Important Note: When you clear cookies and site data, you might be logged out of websites and your preferences in certain sites might reset. Of course, this does not apply to Google sites and products.

    What are browser cookies?

    In case you don’t know, cookies are nothing but small encrypted text files that contain helpful data stored by sites to provide efficient navigation and other features. For example, when you do things like log into a site, comment, leave a like, select a specific option, configure user specific option, etc., the target website will set a cookie to remember that. When you visit the same website in the future, it will see that cookie and improve your experience by matching your preferences.

    In addition to that, the cookies are also used to track user behavior by many advertising companies. That is one of the reasons why you see ads related to your previous searches.

    I hope that helps. If you need any help, comment below and I will try to help as much as possible.