Category: How To

Don’t know how to do something in android? Looking for a solution to an Android issue, this is the place for all your Android-based how-to guides & tips.

If you are looking for a device-specific guide, please use the tags below or the search form.

Samsung | OnePlus | Motorola | Asus | Xiaomi | Redmi | Realme | Oppo | Vivo

  • How to Change Default Gmail Snooze Times in Google Keep

    Customizing your Gmail experience is essential to optimize productivity. If you’ve been bothered by the default snooze times in Gmail and are looking to change them, you might be surprised to learn that the solution lies not within Gmail itself, but rather in Google Keep. In this tutorial, we’ll guide you through the process of changing Gmail’s default snooze times using Google Keep.

    Step 1: Access Google Keep Settings:

    1. Open Google Keep on your desktop or mobile device.
    2. On desktop, look for the gear icon in the top right corner and tap on it. This will lead you to the Settings.
    3. On android, tab on the hamburger icon and tap on the Settings option.

    Step 2: Locate “Reminder Defaults”:

    1. Within the Settings menu, find the option labeled “Reminder Defaults.” This is where you can customize the default snooze times that appear in Gmail.

    Step 3: Adjust the Reminder Defaults:

    1. Under “Reminder Defaults,” you’ll find options like “Morning” and “Evening.”
    2. The “Morning” time in Google Keep corresponds to the “Tomorrow” snooze time in Gmail.
    3. The “Evening” time in Google Keep corresponds to the “Later today” snooze time in Gmail.
    4. Modify these times according to your preferences. For example, if you want your default “Tomorrow” snooze time in Gmail to be 9 AM instead of 7 AM, adjust the “Morning” time in Google Keep to 9 AM.

    Step 4: Save and Refresh:

    1. After making the desired changes in Google Keep, save the settings. On android, your changed are saved automatically.
    2. Now, open Gmail in the same browser or app, and you’ll find that the default snooze times have been updated according to the changes you made in Google Keep.

    Step 5: Verify the Changes:

    1. Compose an email or select an existing one in Gmail.
    2. Click on the snooze icon (clock) to see the updated default snooze options with the new times you set in Google Keep.

    Conclusion: While it may seem counterintuitive to change Gmail’s default snooze times through Google Keep, this quick workaround offers you greater control over your email management. By following the steps in this tutorial, you can tailor Gmail’s snooze options to better suit your schedule and preferences. This trick might not be widely known, but it can significantly enhance your Gmail experience and help you manage your emails more efficiently.
  • How to Extend Battery Life on Your Android Device

    In our fast-paced digital world, preserving battery life on your Android device is crucial. This comprehensive guide will provide you with detailed strategies and tips to maximize your device’s battery longevity.

    1. Adjust Screen Brightness: Lower your screen brightness or enable adaptive brightness in Settings > Display > Brightness. A dimmer screen uses less power.

    2. Manage Screen Timeout: Shorten the screen timeout duration in Settings > Display > Advanced > Screen timeout. This prevents your screen from staying on when not in use.

    3. Use Battery Saver Mode: Activate Battery Saver mode through Settings > Battery > Battery Saver. This mode limits background processes and adjusts performance to save power.

    4. Monitor App Battery Usage: Identify power-hungry apps in Settings > Battery > Battery usage. Restrict background activity for apps that consume excessive battery.

    5. Disable Unnecessary Notifications: Reduce notification frequency for apps in Settings > Apps & notifications > [App Name] > Notifications. Fewer notifications mean less wake-ups and battery drain.

    6. Manage Location Services: Turn off GPS and location services when not needed. You can control app-specific location access in Settings > Location.

    7. Optimize Wi-Fi and Data Usage: Turn off Wi-Fi and mobile data when not required. Enable Data Saver in Settings > Network & internet > Data usage > Data Saver.

    8. Uninstall or Disable Unused Apps: Uninstall or disable apps you rarely use to free up resources and prevent unnecessary background processes.

    9. Update Apps and Android OS: Keep your apps and Android OS up-to-date. Developers often release updates that improve efficiency and fix bugs.

    10. Limit Background Data Usage: Restrict background data for specific apps in Settings > Apps & notifications > [App Name] > Data usage > Background data.

    11. Use Dark Mode: Switch to Dark Mode where available. Dark interfaces consume less power on devices with OLED or AMOLED screens.

    12. Manage Push Email: Increase the sync interval for email accounts to reduce the frequency of email fetching. Go to Settings > Accounts > [Your Email Account] > Sync frequency.

    13. Disable Vibrations: Turn off vibrations for notifications and keyboard input in Settings > Sound > Advanced > Vibrate on touch.

    14. Limit Widgets and Live Wallpapers: Minimize the use of widgets and live wallpapers on your home screen, as they can contribute to battery drain.

    15. Optimize Battery for Individual Apps: Use the Battery Optimization feature in Settings > Battery > Battery optimization to customize power settings for specific apps.

    16. Clear App Cache and Data: Regularly clear cache and data for apps that tend to accumulate temporary files. Do this in Settings > Apps & notifications > [App Name] > Storage & cache.

    17. Keep Your Device Cool: Heat can accelerate battery degradation. Avoid exposing your device to high temperatures.

    Conclusion: By implementing these detailed strategies, you can significantly extend the battery life of your Android device. Each adjustment might seem small, but when combined, they can make a substantial difference in preserving battery longevity. Embrace these practices to enjoy prolonged usage and enhanced productivity on your Android device.

  • How to Troubleshoot Common Android Wi-Fi Issues

    Staying connected to Wi-Fi is essential for today’s Android users. However, Wi-Fi issues can be frustrating. This comprehensive guide will walk you through troubleshooting common Android Wi-Fi problems, ensuring a seamless online experience.

    1. Check Wi-Fi Signal Strength: A weak signal can lead to connectivity problems. Check the signal strength indicator on your device’s status bar. Move closer to the router for better signal quality.

    2. Restart Your Router: Often, the router may have temporary glitches. Unplug the router’s power cable, wait for a minute, and plug it back in. This can resolve connectivity issues.

    3. Forget and Reconnect: Sometimes, saved network configurations can cause problems. Go to Settings > Wi-Fi, tap on the network, and select “Forget.” Then reconnect by entering the password.

    4. Reset Network Settings: If multiple Wi-Fi networks are causing issues, reset network settings. Go to Settings > System > Reset > Reset Wi-Fi, Mobile & Bluetooth.

    5. Airplane Mode Toggle: Turning on Airplane mode for a few seconds and then turning it off can help reset wireless connections, often resolving connectivity issues.

    6. Clear Wi-Fi Cache: Cached data can interfere with Wi-Fi. Go to Settings > Apps > Show system apps (in the three-dot menu) > Wi-Fi > Storage > Clear cache.

    7. Check Date and Time Settings: Incorrect date and time settings can affect SSL certificates required for secure connections. Make sure they’re set automatically.
    8. Update Android and Apps: Outdated software can lead to compatibility issues. Ensure your Android OS and apps are up-to-date through Settings > System > Software update.

    9. Disable Power Saving Mode: Power-saving modes can limit Wi-Fi functionality. Disable these modes temporarily to troubleshoot connectivity issues.

    10. Safe Mode Testing: Boot your device in Safe Mode (usually by pressing and holding the power button, then tapping and holding “Power off”) to see if third-party apps are causing Wi-Fi problems.

    11. Router Channel Change: Routers can face interference from neighboring networks. Access your router settings via a browser, log in, and change the Wi-Fi channel to minimize interference.

    12. Check for MAC Filtering: If MAC filtering is enabled on your router, ensure your device’s MAC address is allowed.

    13. Disable VPN and Proxy: Virtual Private Networks (VPNs) and proxy servers can sometimes interfere with Wi-Fi connections. Disable them temporarily to diagnose issues.

    14. Factory Reset as Last Resort: If all else fails, consider a factory reset. Back up your data first. Go to Settings > System > Reset > Factory data reset.

    Conclusion: By following these detailed troubleshooting steps, you can effectively diagnose and resolve common Wi-Fi issues on your Android device. Remember that each situation may require a different approach, and patience is key. With a stable Wi-Fi connection, you’ll enjoy uninterrupted browsing, streaming, and online activities on your Android device.

  • How to Set Up Fingerprint and Face Recognition on Android

    In today’s digital age, securing your Android phone is of utmost importance. Biometric authentication such as face recognition & fingerprint offers a convenient and secure way to access your device. This tutorial will guide you through the process of setting up and using biometrics, such as fingerprint and facial recognition, to enhance the security of your Android phone.

    Setting Up Biometrics on an Android Phone

    Step 1: Access Biometric Settings

    1. Open the “Settings” app on your Android device.
    2. Scroll down and select “Password & Security” or a similar option. This may be labeled differently depending on your device and Android version.

    Step 2: Set Up Fingerprint Recognition

    1. In the “Password & Security” section, choose “Fingerprint” or “Fingerprint Recognition.”
    2. If prompted, enter your device PIN, password, or pattern for security verification.
    3. Follow the on-screen instructions to register your fingerprint. You’ll be prompted to place your finger on the fingerprint sensor multiple times from different angles for accurate recognition.
    4. Once your fingerprint is successfully registered, you can choose to enable fingerprint unlock for various functions like unlocking the device, authorizing app purchases, and more.

    Step 3: Set Up Facial Recognition

    1. If your device supports facial recognition, select “Face Recognition” in the “Password & Security” section.
    2. Enter your PIN, password, or pattern if required.
    3. Position your face within the designated frame, and your device will capture your facial data.
    4. Follow any additional prompts to complete the facial recognition setup.

    Step 4: Choose Biometric Preferences

    1. After setting up fingerprint and/or facial recognition, open the Fingerprint or Face Recognition setting and turn it on.
    2. If your device supports it, adjust the sensitivity and speed of biometric recognition to your liking.

    Step 5: Test Biometric Authentication

    1. Lock your device using the power button or by allowing the screen to time out.
    2. Unlock your device using your registered fingerprint or facial recognition. The device should unlock swiftly and securely.

    Tips for Using Biometrics Securely:

    • Register multiple fingers or angles for fingerprint recognition to ensure access from different positions.
    • Use a strong PIN, password, or pattern as a backup in case biometric authentication fails.
    • Update your device’s software regularly to ensure the latest security features and improvements.

    Conclusion: Enabling biometric authentication on your Android phone adds an extra layer of security and convenience. By following the steps outlined in this tutorial, you’ve successfully set up and configured biometrics, making your device more resistant to unauthorized access while maintaining a user-friendly experience. Keep your device updated and enjoy the peace of mind that comes with enhanced security.

  • How to Change DNS Address in Android Phone or Tablet

    Android network settings allow custom DNS server address. Here are the steps to follow to change the DNS address in Android.

    Android by default uses whatever DNS it gets from the router or the ISP (Internet Service Provider). In the case of mobile data, Android automatically gets the DNS address from your mobile carrier who also acts as an ISP. If the default DNS is not to your liking, you can easily change the DNS on Android in just a couple of steps. i.e, you can set a private DNS address in your Android phone.

    Compared to the ISP’s default DNS, public DNS is faster and oftentimes secure. This is especially true for popular services like Google Public DNS and Cloudflare DNS.

    One of the best things about most public DNS services is that their ping time is pretty low. One of the main reasons being the number of data centers close to your location. Due to the lighting fast ping times, if you are looking to play online games then consider using custom DNS for a better gaming experience. Other than that, depending on the DNS service you chose to use, from time to time, you can even bypass region locks or geo-restrictions to access locked content.

    In this quick and simple guide, let me take you through the steps to change DNS on Android.

    How to change DNS on Android

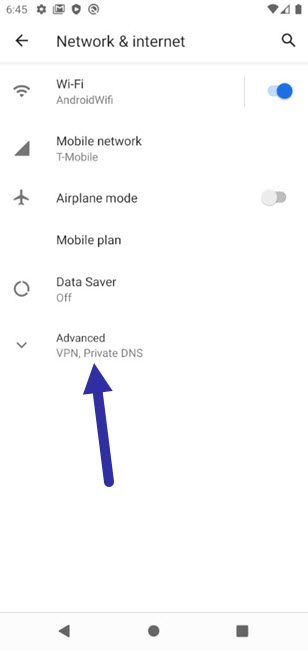
    You can change Android DNS from the Network & Internet page in the Settings app. Here’s how you can find the Private DNS option and change it.

    1. Open android settings. Just tap on the Settings icon on the home screen or in the app drawer to open Settings.

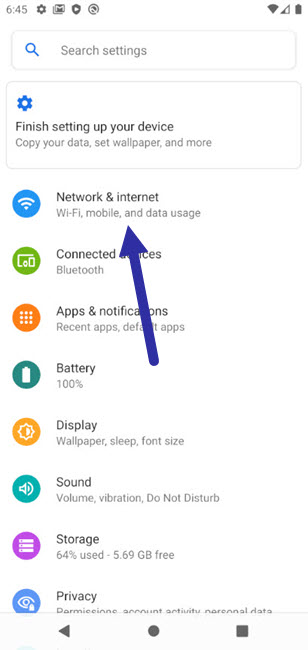
    2. Select the “Network & Internet” option in the Settings app. You will find this option at the top of the Settings page.

    open network internet settings 010121

    3. Tap on the “Advanced” option at the bottom of the page. Being an advanced feature, the private DNS option is buried one level deeper.

    advanced network settings 010121

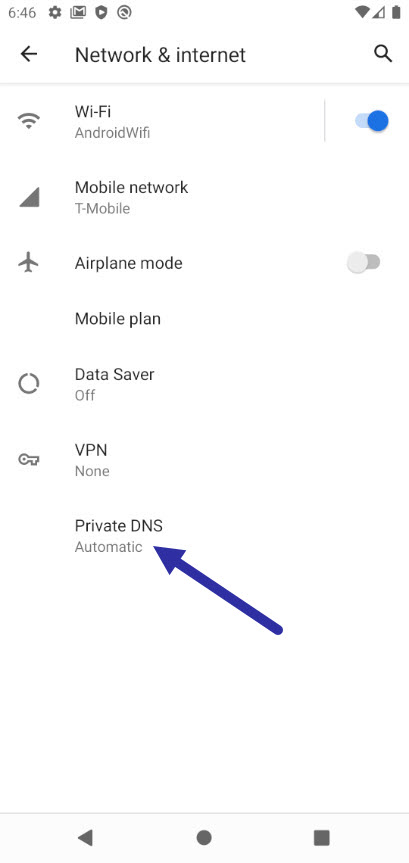
    4. Select the “Private DNS” option. This is the option that lets you set custom DNS in Android.

    private dns option android 010121

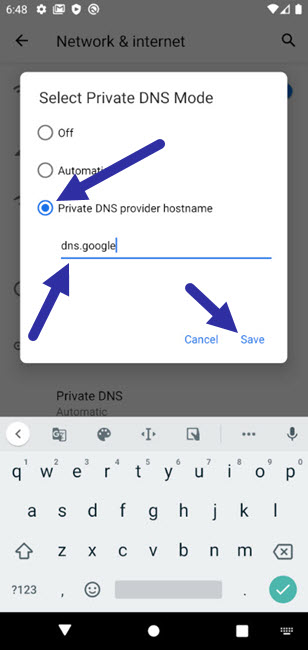
    5. Select the “Private DNS provider hostname” option, enter the DNS hostname, and tap on the “Save” button. Google Public DNS and Cloudflare DNS hostnames are given below.

    • Google Public DNS hostname: dns.google
    • Cloudflare DNS hostname: 1dot1dot1dot1.cloudflare-dns.com
    change dns in android 010121
    change DNS in android

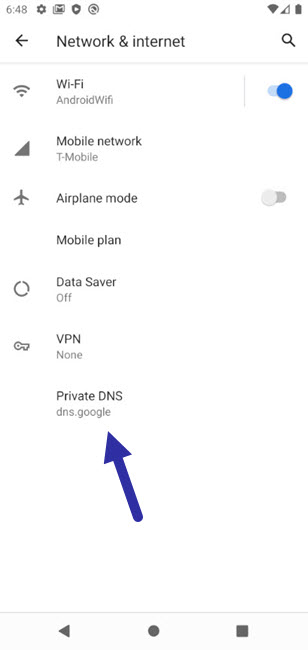
    Settings all automatically saved. You can close the settings app. From now on, your Android phone will use the custom DNS instead of the ISP or router DNS.

    set private dns in android 010121
    set private DNS in android

    Change DNS on Samsung Android Phone

    You can change Samsung DNS settings from the connections page. Here’s how you can do it.

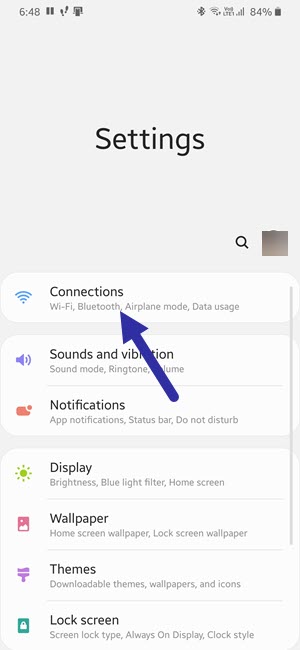
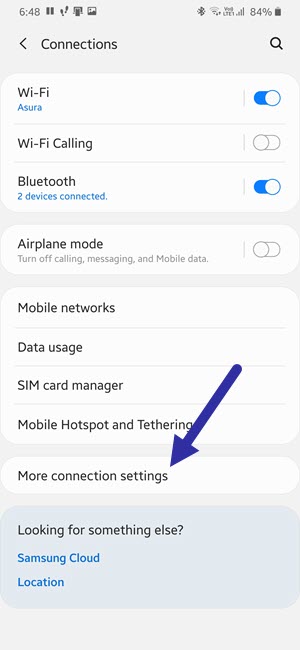
    1. Open the Settings app and select the “Connections” option. You see it at the top of the settings page.

    samsung connections option 010121

    2. Select the “More connection settings” option at the bottom of the Connections page.

    samsung advanced connection settings 010121

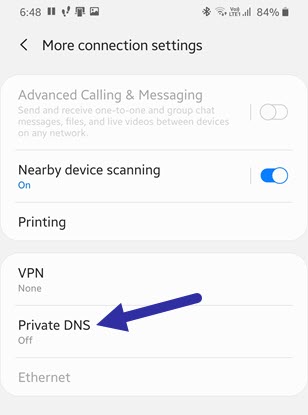
    3. Tap on the “Private DNS” option. This is the option that lets you set custom DNS on a Samsung Android phone.

    samsung set private dns 010121

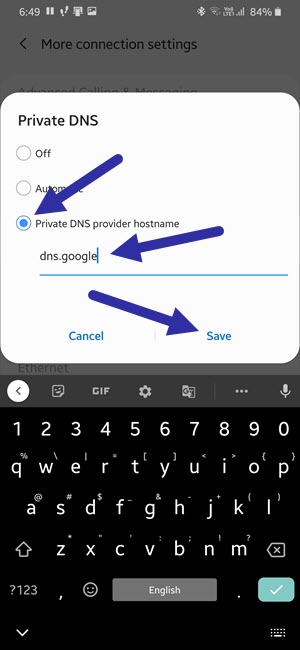
    4. Select the “Private DNS provider hostname” option, type the DNS hostname in the blank field, and hit the “Save” button. Google Public DNS and Cloudflare DNS hostnames are given below.

    • Google Public DNS hostname: dns.google
    • Cloudflare DNS hostname: 1dot1dot1dot1.cloudflare-dns.com
    change dns in samsung phone 010121
    change DNS in Samsung Android phone

    That’s it. From now on you Samsung phone will use the custom DNS instead of the DNS it got from the router or ISP.

    Important note: In case you are wondering, like on a computer or router, you cannot use the regular IP addresses as the DNS address. To set a custom DNS in Android, you need the DNS provider hostname. Without it, you cannot set the private DNS. The good thing is, most DNS providers list their hostname along with the regular IP addresses. Just go to the DNS provider website to get the hostname.

    I hope that helps. If you need any help, comment below and I will try to help as much as possible. If you like this article, check out how to set data limit in Samsung phone.

  • Google Drive: Make File Available Offline in Android

    Google Drive: Make File Available Offline in Android

    Google Drive’s offline access feature lets you use files without the internet. Here’s how you can make any file available offline in Google Drive on Android.

    When syncing files with Google Drive, you can access them on any device as long as you have the internet. Sometimes you might have to install the Google Drive app but the files are available to you at all times.

    If you’ve installed the Google Drive application on a computer, you might know that you can make your favorite files and folders available offline. All you have to do is select the checkboxes next to the file or folder and you are done. That way, you can access those files and folders without an active internet connection. If your internet connection is dodgy or to have 24×7 access to a certain file(s), enabling offline access in Google Drive is very helpful.

    On Android, you can make the Google Drive app store files for offline usage using the “Make Available Offline” option. However, unlike on the desktop applications, it can be a bit tricky to enable offline access in the Google Drive app.

    In this simple and straightforward guide, let me show you the steps to force Google Drive to make file available offline in Android.

    Enable offline access in Google Drive app

    To make a file available for offline use, follow the steps given below.

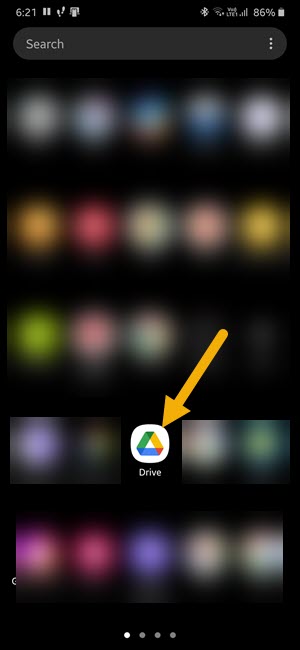
    Step 1: Open the Google Drive app on Android. You can do that by tapping on the Google Drive icon on the home screen or in the app drawer.

    open google drive 030121

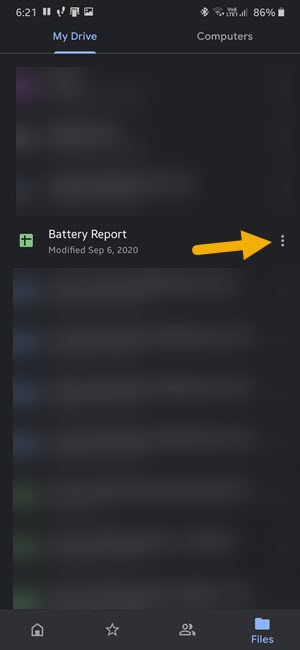
    Step 2: Find the file that you want to be available offline and tap on the menu icon (three vertical dots) next to it.

    file options in google drive 030121

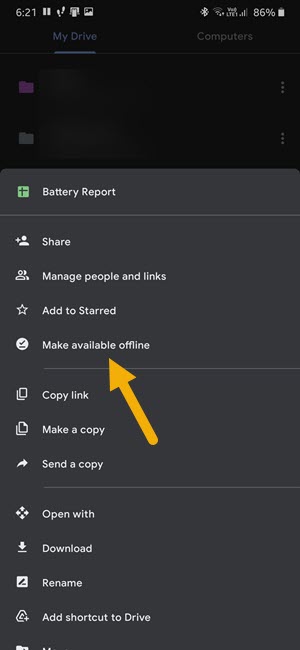
    Step 3: Select the “Make available offline” option from the list of options.

    google drive make file available offline 030121
    Google Drive make file available offline

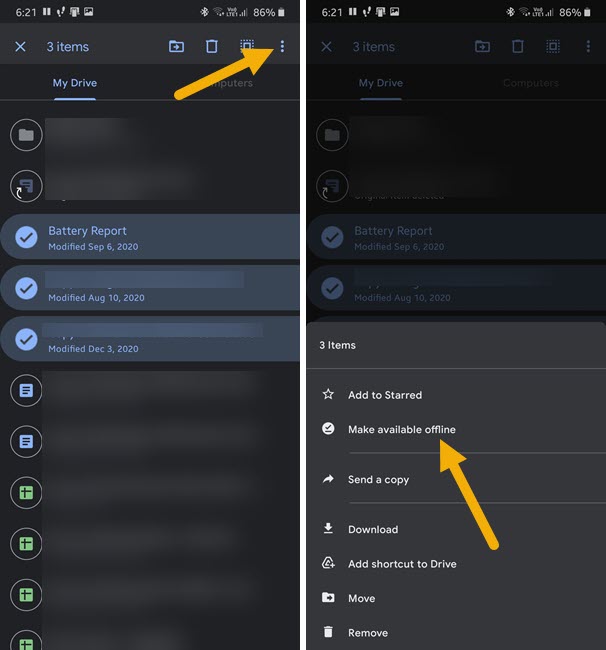
    If you want multiple files to be available offline, tap and hold on a file to enter the selection mode. Next, select all the files you want to make available offline. After that, tap on the menu icon (three vertical dots) at the top right corner and select the “Make available offline” option.

    google drive make multiple files available offline 030121
    Google Drive make multiple files available offline

    That is it. Google Drive app will download the selected files and make them available for offline access.

    Important Note: You can only make files available offline in Google Drive. As of now, there is no way to make entire folders available offline. That being said, you can always select all the files in the target folder and mark them for offline access.

    Wrapping up: Google Drive offline files in android

    As you can see, it is pretty easy to force Google Drive app to make files available offline in Android. Do keep in mind that by default the Google Drive app will download offline files while connected to a Wi-Fi network only. To make Google Drive download files over mobile data, open the Google Drive Settings, and turn OFF the “Transfer files over Wi-Fi only” option.

    That is all. I hope that helps. If you need any help, comment below and I will try to help as much as possible.

  • How to Make Google Chrome Default Browser in Android

    How to Make Google Chrome Default Browser in Android

    Love to use Google Chrome on your Android device. Here are the steps to make Google Chrome the default browser on Android.

    Out of the box, Google Chrome is the default browser in most Android devices. However, if you’ve installed multiple browsers then there is a chance that either you or the app might have intentionally or accidentally changed the default browser choice. When you change the default browser in Android, all links will be opened in that browser only. For example, I recently wanted to try a new browser. So, I installed it from the Play Store and made it my default browser for a few days. After that, I eventually switched back to Google Chrome mainly because of its syncing feature and the password manager.

    In the same manner, if you don’t like the current default browser, you can always change it in Android. i.e, you can make Google Chrome the default browser.

    In this quick and simple guide, let me show you the steps to make Google Chrome the default browser in Android. Before proceeding, make sure you’ve already installed Google Chrome on your Android device. If not, download it from the Play Store.

    Make Google Chrome Default Browser in Android

    Time needed: 1 minute

    To change the default browser to Google Chrome, follow the steps below.

    1. Open the Settings app in Android phone.

      You can change the default browser from the Android Settings app. So, open the Settings app by tapping on the Settings icon (gear) in the app drawer or on the home screen.android apps and notifications 030121

    2. Go to ‘Apps & notifications’ and select the ‘Default apps’ option.

      In the settings app, go to the “Apps & notifications → Default apps” page. This is where you can change default apps for various Android functions.android default apps 030121

    3. Tap on ‘Browser app’ and select the ‘Chrome’ option.

      Since we want to change the default browser to Chrome, select the “Browser app” option and then select “Chrome” from the list of available browsers. If you have multiple browsers installed on your phone, you will see all those apps in the Browser App list.make google chrome default browser 030121

    That is it. With the above steps, you have changed the default browser in Android to Google Chrome. If you ever want to set another browser as the default, follow the same steps but select that browser in the Browser Apps screen.

    Change default browser in Samsung

    To change the default browser in a Samsung Android phone, follow these steps.

    1. Open the Settings app.
    2. Scroll down and select the “Apps” option.
    3. Tap on the menu icon (three vertical dots) on the top-right corner.
    4. Select the “Default apps” option.
    5. Tap on the “Browser apps” option.
    6. Select “Chrome” from the list of browsers.
    7. Close the settings app.

    With that, you’ve successfully changed the default browser to Google Chrome in a Samsung Android phone.

    That is all. I hope that helps. If you need any help, comment below and I will try to help as much as possible. If you like this article, check out how to play T-Rex game in the Google Chrome browser.

  • How to Change Gmail App Swipe Actions on Android

    How to Change Gmail App Swipe Actions on Android

    Don’t like the default swipe actions in the Gmail app? Here are the steps to change Gmail app swipe action on Android phone or tablet.

    To make the app user experience easy and intuitive, Gmail has a couple of swipe actions. The default two options are swipe to delete in Gmail or swipe to archive. By default, the actions are assigned to the left and right swipes. For the most part, both the right and left swipes are set to archive emails. On some occasions, the left swipe to assigned to delete emails. If you like to manage your emails on your phone, these swipe actions are really helpful to quickly archive, delete, mark as read, mark as unread, move to, and snooze.

    No matter the default swipe action, you can easily change it from the Gmail app’s settings page. Not only can you change the default actions but you can also disable Gmail swipe actions.

    Without any delay, let me show you the steps to change Gmail app swipe action in Android.

    How to change Gmail swipe actions

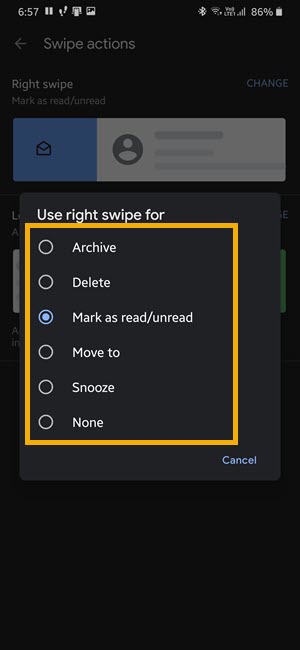
    The Gmail app gives you six different swipe actions. They are archive, delete, mark as read or unread, move to, snooze, and none. Here’s how you can open the Settings app to change the swiping behavior in the Gmail app.

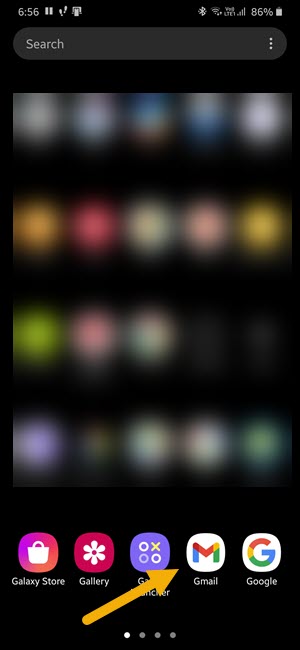
    1. Open the Gmail app on your Android phone. You can do that by tapping on the Gmail app icon in the app drawer or on the home screen.

    open gmail 311220

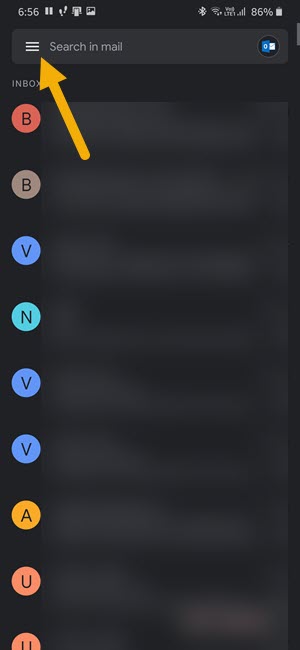
    2. Tap on the top-left menu icon (three horizontal lines) to open the sliding menu. You will see all the email folders along with the Settings option in the sliding menu.

    open gmail sliding menu 311220

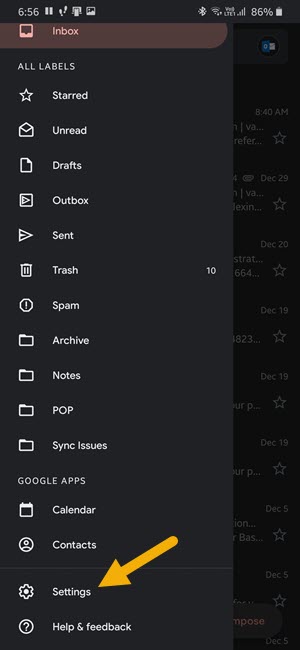
    3. Scroll down and tap on the “Settings” option to open the Gmail settings page.

    open gmail settings 311220

    4. Select the “General settings” option. This is where you will find all the options to manage your Gmail app.

    gmail general settings 311220 1

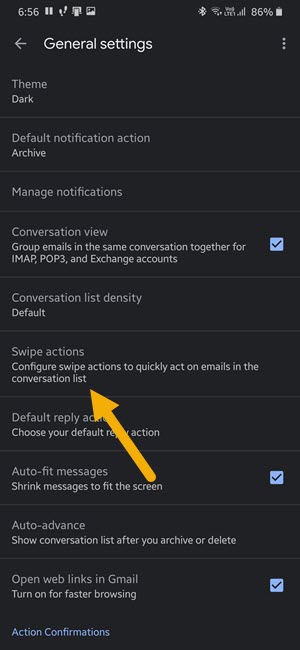
    5. Tap on the “Swipe actions” option in the Settings page. This is the option that lets you change swipe actions in Gmail app on Android.

    change gmail swipe actions 311220

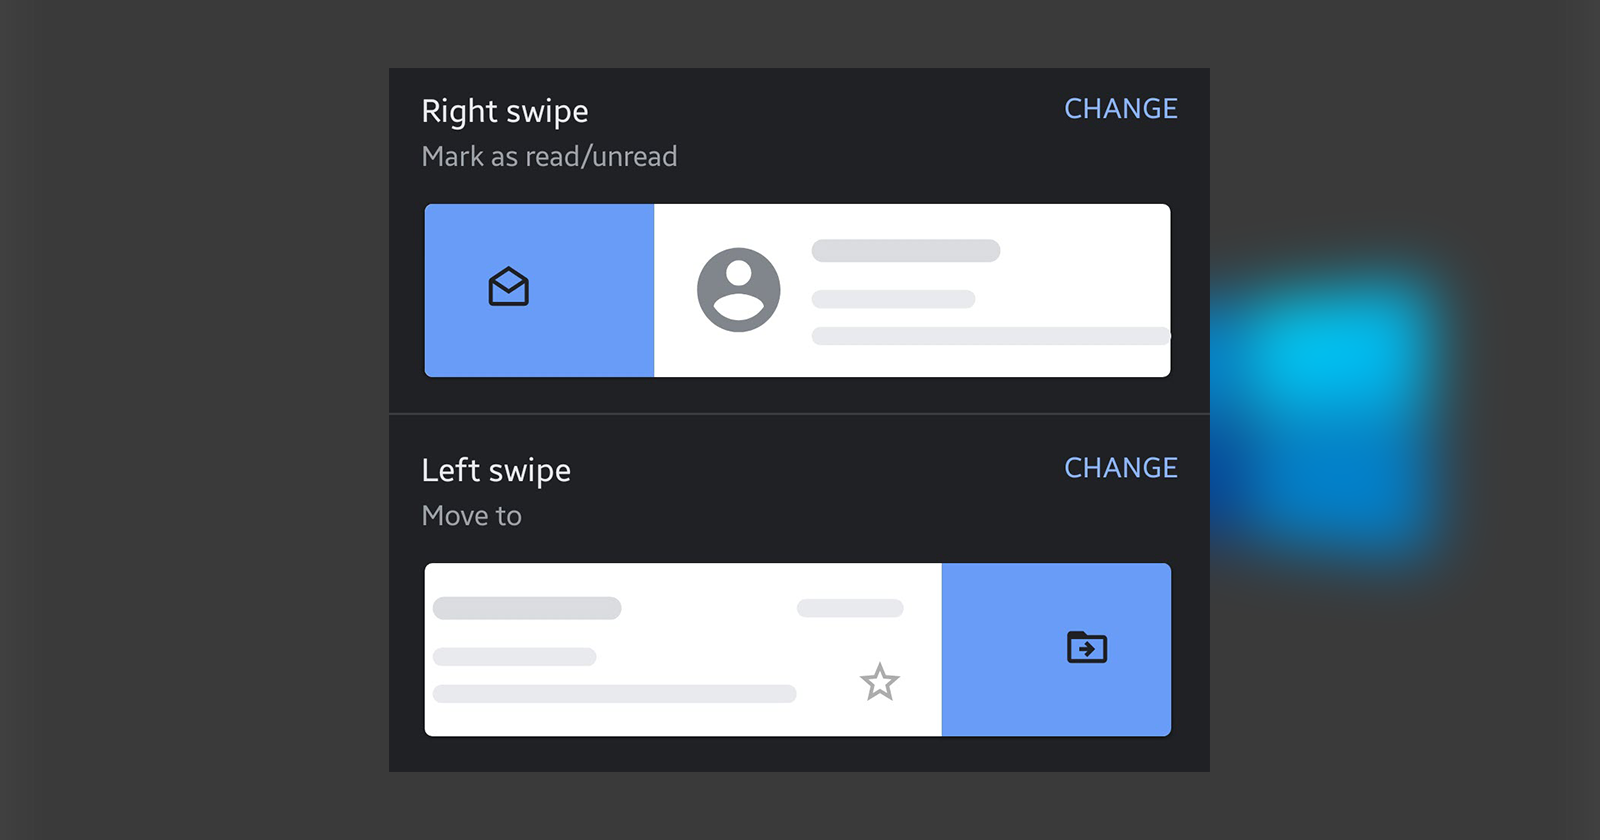
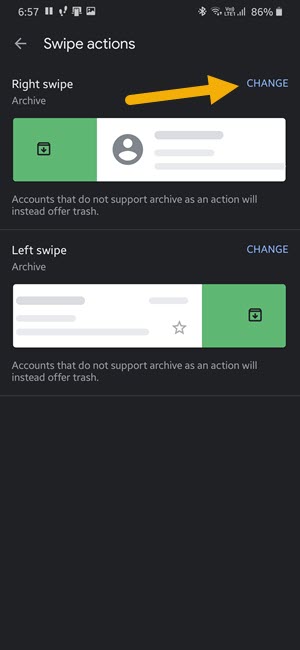
    6. To change right swipe action, tap on the “Change” option under “Right swipe.”

    right swipe action 311220

    7. Select a swipe action from the flyout menu. In my case, I chose the “Mark as read/unread” option.

    change gmail right wipe action 311220

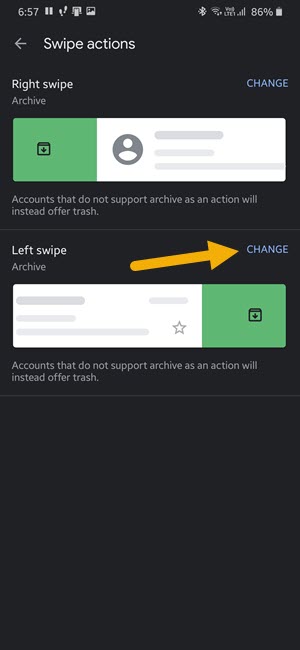
    8. To change left swipe action, tap on the “Change” option under “Left swipe.”

    left swipe action 311220

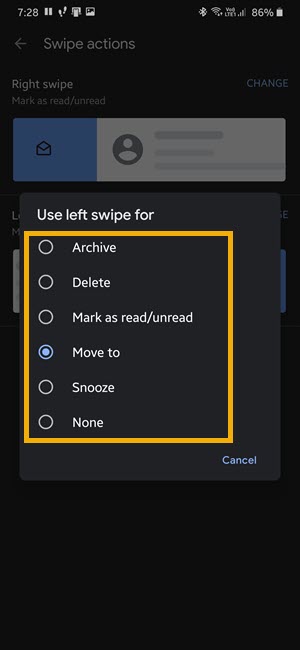
    9. Select a swipe action from the flyout menu. In my case, I chose the “Move to” option.

    change gmail left wipe action 311220

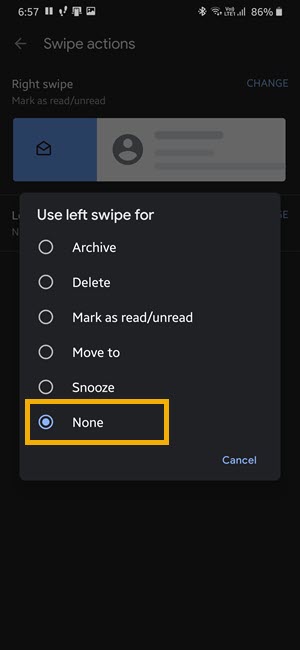
    10. To disable Gmail swipe action, select the “None” option in the flyout menu. You can disable both left and right swipe actions by selecting the None option.

    disable gmail swipe actions 311220

    Wrapping up – Change Gmail swipe action

    That is all. With the above steps, you are all done with changing Gmail swipe actions in Android. You can go back to the main screen to start using the swipe action in the Gmail app. In case you are wondering, as of writing this, Gmail doesn’t give you any way to set your own swipe actions. All you can do is select from the default actions only.

    I hope that helps. If you need any help, comment below and I will try to help as much as possible.

    Check out how to turn on dark mode in Gmail app on Android.

  • Turn On or Off Developer Options on OnePlus

    Turn On or Off Developer Options on OnePlus

    Developer Options are quite useful if you want to enable USB debugging, feature flags, advanced Bluetooth settings, and other advanced settings. Though enabling developer options is quite easy, each device and how you enable it is a bit different. This guide teaches OnePlus users how to turn on or enable the developer options quickly and easily.

    Note: You need an app lock pin/pattern to enable OnePlus developer options.

    Enable OnePlus Developer Options

    OnePlus users should follow the below steps to enable or turn on developer options.

    Step 1: Open the app list and tap on the Settings icon. This will open the OnePlust Settings app.

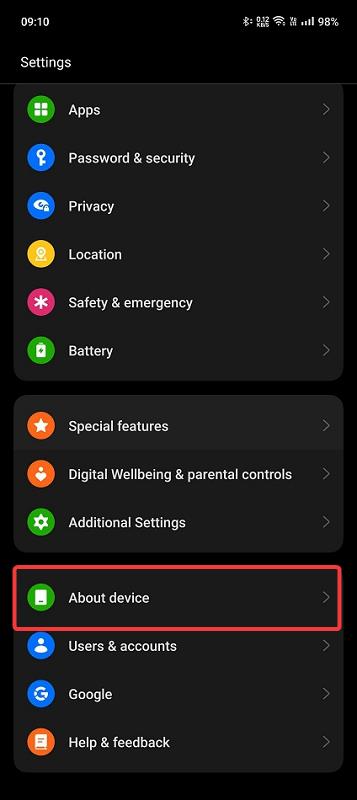
    Step 2: Scroll down and tap on the “About Device” option.

    tap on about device

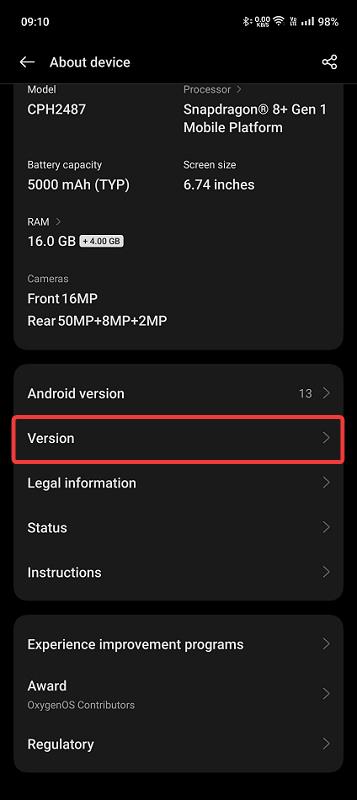
    Step 3: Tap on the Version option.

    tap on version option

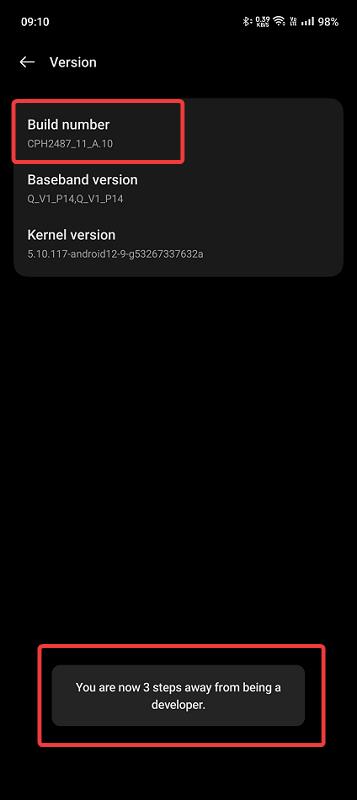
    Step 4: Repeatedly tap seven (7) times on the Build Number option. As you tap, your device will show how many taps are remaining to enable developer options.

    tap seven times on build number

    Step 5: At the last step, type the app lock pin/pattern.

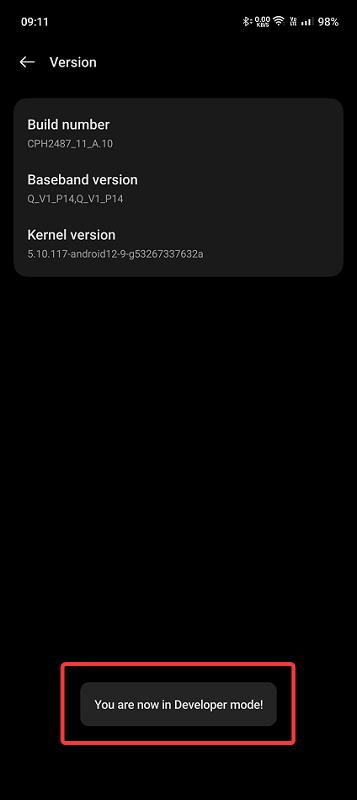
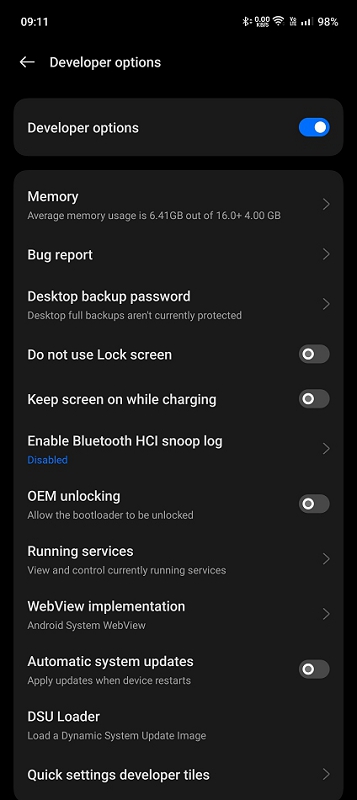
    Step 6: As soon as you do that, developer options are enabled on your OnePlus device. You will see the “You are now in Developer mode!” message at the bottom.

    developer options enabled on oneplus

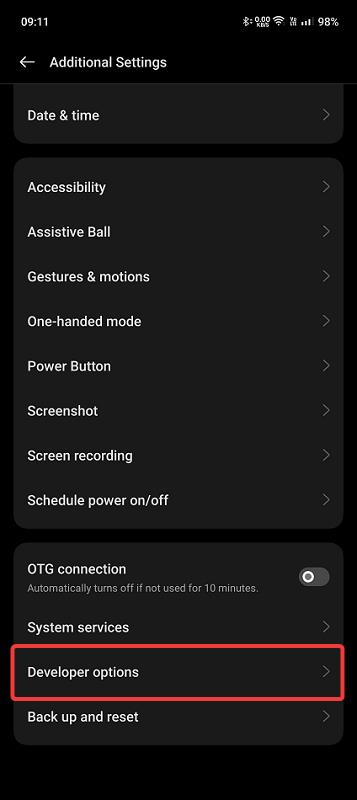
    Step 7: To open developer options, go to “Settings > Additional Settings > Developer options.”

    oneplus developer options

    Important note: Some banking and other finance apps don’t like when developer options are enabled. If that’s the case, they might stop working. For instance, the Indian mobile banking app, iMobile Pay, stops working if you enable developer options. In that case, you have to disable developer options if you want to use that app.

    Disable Developer Options on OnePlus

    If you no longer need developer options, follow these steps to disable developer options on OnePlus.

    Step 1: Open the Settings app on your OnePlus device.

    Step 2: Scroll down and tap the “Additional Settings” option.

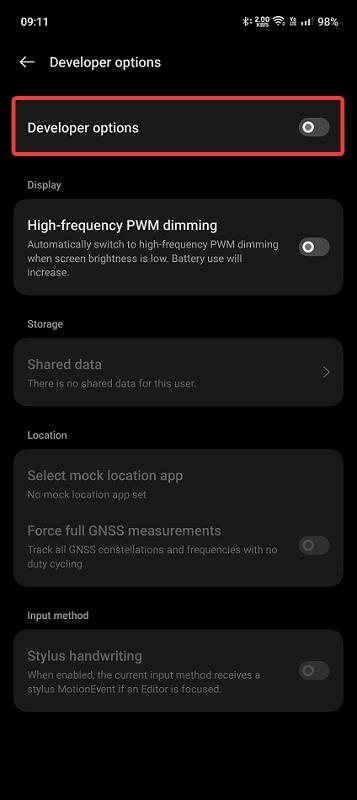
    Step 3: Scroll down and tap on “Developer Options.”

    tap on developer options

    Step 4: Turn off the Developer Options switch.

    disable developer options

    Step 5: Close the Settings app and the developer options are disabled on OnePlus. You will no longer see the “Developer Options” entry in the Additional Settings page.

    That’s it. It is that simple to enable or disable developer options on a OnePlus device.