Tag: samsung

  • How to Add or Remove Apps to Sleeping Apps List on Samsung

    How to Add or Remove Apps to Sleeping Apps List on Samsung

    Samsung Android phone lets you put any app to sleep. Here’s how you can add or remove any app to the Sleeping Apps list on Samsung.

    In Android, you can install almost any application either from the Play Store or using an APK file. Every app you install can start or stop automatically. The app auto-start feature is pretty helpful as it allows the app(s) to send and receive notifications and provide other app-specific services.

    However not every app needs to auto-start or always run in the background. This is especially true for apps you only use occasionally. After all, when there are more apps running in the background the system memory (RAM) fills up quickly and even the phone battery drains faster. To avoid these kinds of situations, you can put unused apps to sleep using Samsung’s Sleeping Apps feature. Apps added to the Sleeping Apps list are automatically put into sleep if the apps are not used for a while. This prevents the apps from auto-starting and draining battery and system memory unncessarily.

    In this quick and straightforward guide, let me show the steps to put unused apps to sleep by adding them to the Sleeping Apps link on a Samsung phone.

    Put unused apps to sleep – Add app to Sleeping Apps list

    To add an app to the Sleeping Apps list, follow the steps shown below.

    1. Open the Settings app.
    2. Select the “Device care” option.
    3. Tap on the “Battery” option.
    4. Here, tap on the “App power management” option.
    5. Turn ON the “Put unused apps to sleep” option.
    6. Next, select the “Sleeping apps” option.
    7. Scroll all the way down and tap on “Add apps”.
    8. Select the app(s) from the list.
    9. Tap on the “Add” button to add it to the Sleeping Apps list.
    10. Close the Settings app.

    Detailed steps

    You can enable the “Put unused apps to sleep” from the Device Care section in the Settings app and then add apps to the Sleeping Apps list.

    1. First, open the Settings app from the app drawer. In the Settings app, scroll down and select the “Device Care” option.

    Note: If you cannot find the Device Care option in the Settings app, you can find it as an app icon in the app drawer.
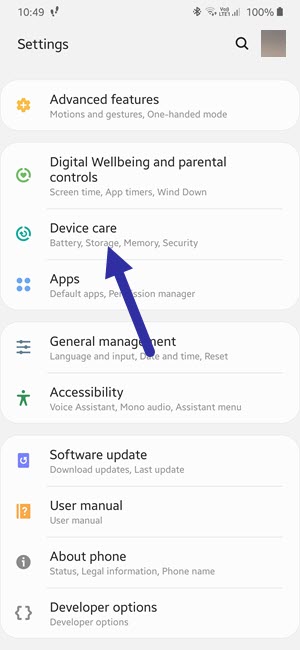
    samsung device care

    2. Since the Sleeping Apps feature is considered a power management feature, tap on the “Battery → App power management” option.
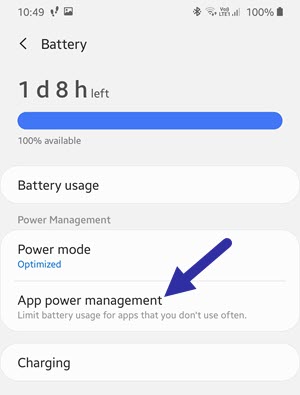
    samsung app power management

    3. Once you are here, turn on the “Put unused apps to sleep” option.

    4. Next, tap on the “Sleeping apps” option. This is where you will be able to add apps to the sleep list.
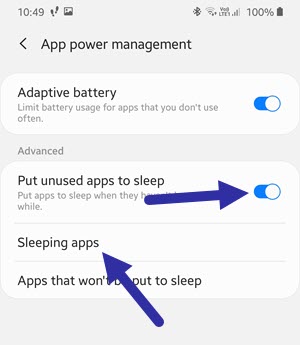
    turn on put unused apps to sleep on samsung

    5. Scroll all the way down on this page. At the bottom of the page, tap on the “Add apps” option.
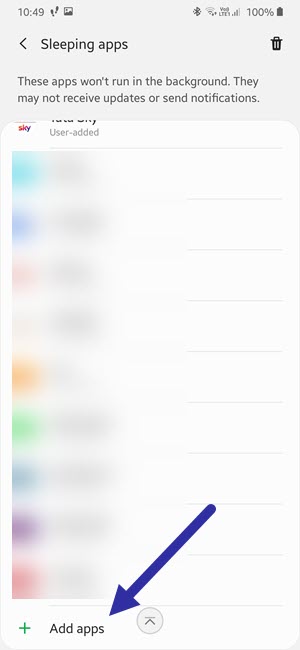
    add apps to sleeping list samsung

    6. Your phone will now show all the apps that are not on the sleep list. Select the apps you want to put to sleep and then tap on the “Add” button.

    select apps to add to sleeping list samsung

    7. As soon as you tap on the add button, the selected apps will be added to the Samsung sleeping apps list. You will generally find the newly added apps at the top of the list with the “N” indicator on the icon.

    8. You can now close the Settings app.
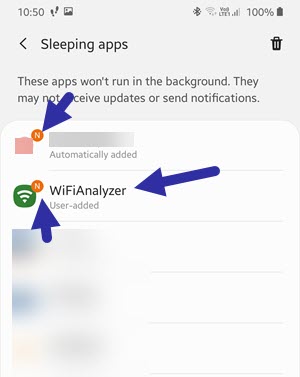
    apps added to sleeping list

    From now on, the apps you put in the Sleeping Apps list will automatically put into sleep mode if you don’t use them for around a week or so. Once an app is put to sleep, it might not be able to run in the background or send you notifications.

    That being said, you can still manually open the app like always. When you manually open the app, the sleep clock for that specific app will reset. So, if you don’t use the app again for a week or so, it is deemed unused and Samsung will put the app to sleep.

    In case you are wondering, as of writing this there is no way to change how long the phone will wait before putting an unused app to sleep.

    Remove app in Sleeping Apps list

    Just as you can add apps, you can also remove apps from the Sleeping Apps list. Here are the steps to follow.

    1. Open the Settings app.
    2. Go to the “Device care → Battery” page.
    3. Tap on the “App power management” option.
    4. Select the “Sleeping apps” option.
    5. Tap on the “Dustbin” icon on the top-right corner.
    6. Select the apps to remove from the list.
    7. Tap on the “Remove ” button at the bottom.
    8. Close the Settings app.

    That is all. It is that simple to add or remove to sleeping apps list on a Samsung Android phone. If you need any help, comment below and I will try to help as much as possible.

    If you like this article, check out how to change the ringtone on a Samsung Android phone.
  • How to Change Ringtone on Samsung Android Phone

    How to Change Ringtone on Samsung Android Phone

    You can set any song as a ringtone on Samsung. Here are the steps to fully change the ringtone on a Samsung Android phone.

    Changing the ringtone on a phone is one of the most common things most of us do. In fact, the ability to change the ringtone is available in almost all types of phones, including the good old feature phones and even the dumbphones. One of the best things about having a custom ringtone is that it makes it easy to differentiate your phone ring from other phones that use the default ringtone. In general, most phone manufacturers use their own default ringtone to differentiate themselves. However, it can still be an issue if multiple people have phones from the same manufacturer.

    Thankfully, you can easily change the ringtone from the Android settings. A Samsung phone is nothing different as it has a long list of awesome ringtones to choose from. If needed, you can set your favorite song or audio clip as the ringtone on Samsung.

    In this quick and straightforward article, let me guide you through the steps to change the ringtone on a Samsung phone.

    Steps to change ringtone on Samsung

    To change the ringtone on a Samsung phone, follow the steps listed below.

    1. Open settings on Samsung.
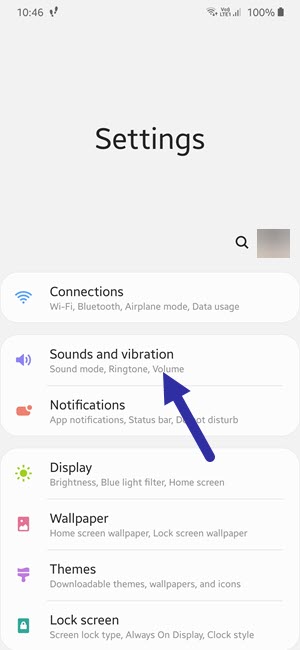
    2. Tap on the “Sounds and vibration” option.
    3. (optional) Select the SIM card.
    4. Choose the “Media Storage” option if prompted.
    5. Select the ringtone of your choice.

    Note: To set a song or other audio file as the ringtone, follow the section below the detailed steps.

    Detailed steps

    1. First, open the Samsung settings app. You can do that by tapping on the “Settings” icon in the app drawer. Being a system setting, you will find the option to change the ringtone in the Settings app.

    2. After opening the Settings app, tap on the “Sound and vibration” option. As you can tell from the name itself, there is where you can change the ringtone and other sound settings.

    open sound settings samsung

    3. On this page, tap on the “Ringtone” option.

    select samsung ringtone settings

    4. If your Samsung phone has multiple active SIM cards, you will be prompted to choose a SIM to change the ringtone. This lets you set different ringtones for different SIM cards.

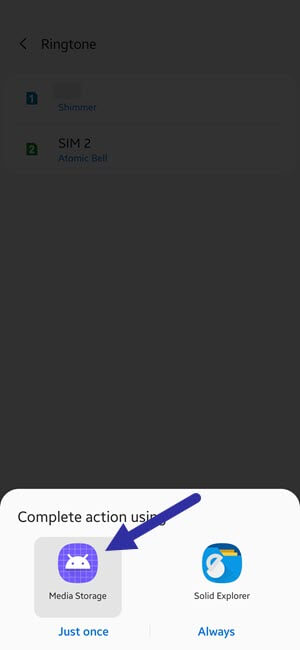
    5. If your phone prompts you to select an app to complete the action, select the “Media Storage” option. This dialog only appears when there are multiple apps that can complete this specific action.

    select media storage on samsung

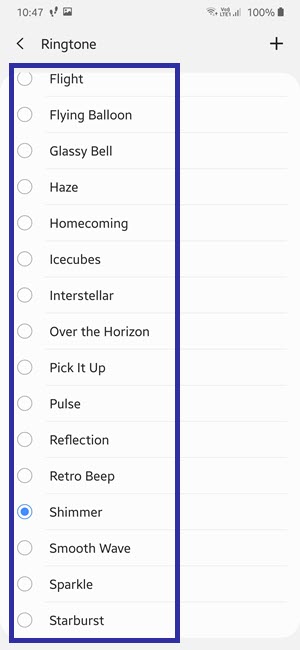
    6. Samsung will show a list of predefined ringtones. Select any ringtone of your choice to listen to it.

    7. Once you find the ringtone of your choice, keep the selection as is, and tap on the “Back” button on the top left corner.

    change samsung ringtone

    The setting is saved automatically. From now on, you will listen to the new ringtone whenever you receive a phone call.

    Set custom song or audio as the ringtone in Samsung

    Apart from the predefined ringtones, you can also set a custom song or audio file as the ringtone. This is particularly useful if did not like the predefined ringtones or if you just want to use your favorite song, music, or audio file. Before following the below steps, make sure the song or audio file is in MP3 format and stored in the Internal Storage (not in external or SD card storage).

    1. Open settings on Samsung.
    2. Tap on the “Sounds and vibration” option.
    3. (optional) Select the SIM card.
    4. Choose the “Media Storage” option if prompted.
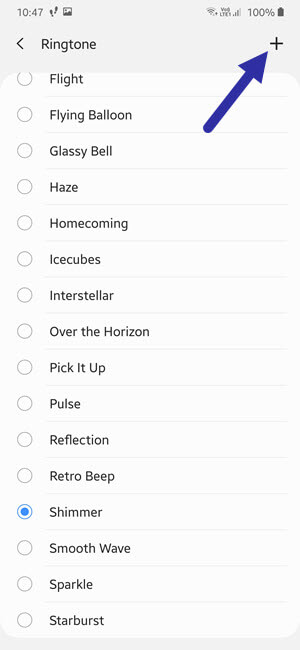
    5. Tap on the “+” icon on the top-right corner.
      add custom song as ringtone on samsung
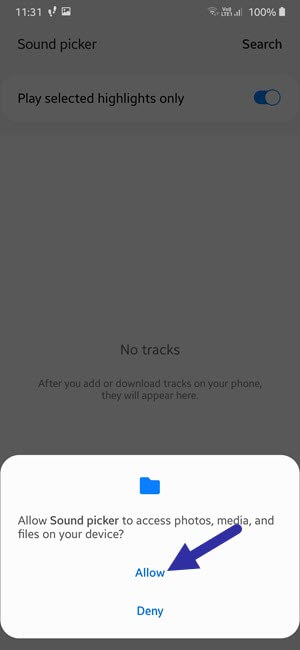
    6. If prompted for permission, tap on “Allow”.
      allow media permission
    7. Browse through the catalog and select the song of your choice.
    8. (optional) You use the “Search” option on the top to find the song you are looking for.
    9. After selecting, tap on the “Done” button on the top.
    10. Close the Settings app.

    From now on, your Samsung phone will play the custom song or audio clip as the phone ringtone.

    Important note: While picking a song from the catalog, the “Play selected highlights only” option might be turned ON by default. What this option does is play a section of the selected song it thinks is good. It might not play the song from the beginning. If you want the song to play from the beginning, turn OFF the “Play selected highlights only” option.

    That is all. I hope that helps. If you need any help, comment below and I will try to help as much as possible.

  • How to Turn ON Wi-Fi Calling on Android (with pictures)

    How to Turn ON Wi-Fi Calling on Android (with pictures)

    Wi-Fi calling feature gives you the best possible indoor connection. Here’s how you can turn on Wi-Fi calling on Android.

    Most modern Android phones and a lot of carriers support Wi-Fi calling. When indoors, it is better to enable the Wi-Fi calling feature because it gives you better quality audio and even reduces call drops and other general disturbances. Generally, cellphone reception will be pretty good when you are outdoors. However, when indoors, the reception might be reduced due to a number of reasons. This can cause low-quality audio, disturbance in the audio, and even the call drops. This is especially true if the cell reception is generally low where you live.

    To mitigate all this, most carriers now support Wi-Fi calling. As the name implies, when enabled, your phone and the carrier will utilize the Wi-Fi signal to enhance the overall call quality. The good thing is, the Wi-Fi calling feature is virtually free and built into almost all Android phones and tablets. As long as your carrier supports Wi-Fi calling, you can turn on the Wi-Fi calling feature on Android and start using it.

    In this quick and straightforward guide, let me show you the steps to turn on Wi-Fi calling on Android.

    Jump to:

    Steps to turn ON Wi-Fi calling on Android

    To enable Wi-Fi calling feature on an Android device, follow the steps listed below.

    1. Open the Settings app.
    2. Select the “Network & Internet” option.
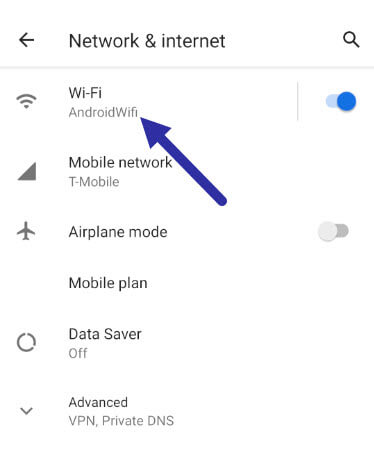
    3. On this page, select the “Wi-Fi” option.
      select wi fi settings 291120
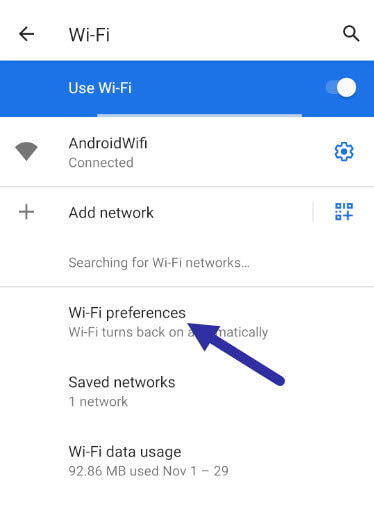
    4. Select the “Wi-Fi Preferences” option.
      android wi fi preference 291120
    5. Now, tap on the “Wi-Fi calling” option.
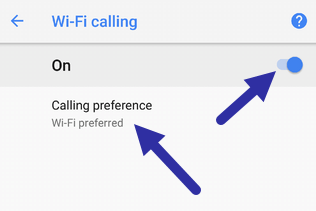
    6. Turn on the Wi-Fi calling feature.
    7. Select the “Calling preference” option.
    8. Select the “Wi-Fi preferred” option.
      turn on wi fi calling on android 291120
    9. Close the Settings app.

    From now on, your Android phone will automatically choose the Wi-Fi connection, if already connected to it, for regular phone calls. If the Wi-Fi signal is low, of poor quality, or lost, the phone call will seamlessly and automatically switch to the regular carrier signal. You don’t have to do anything and the call won’t be dropped even if you are in the middle of a conversation.

    Enable Wi-Fi calling on Samsung phone

    If you are using a Samsung Galaxy phone, these are the steps you should follow to turn on Wi-Fi calling on a Samsung phone.

    1. Open the Settings app on your Samsung phone.
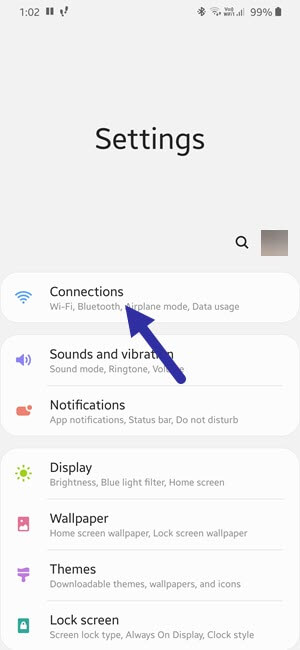
    2. Select the “Connections” option.
    3. samsung connections setting 291120
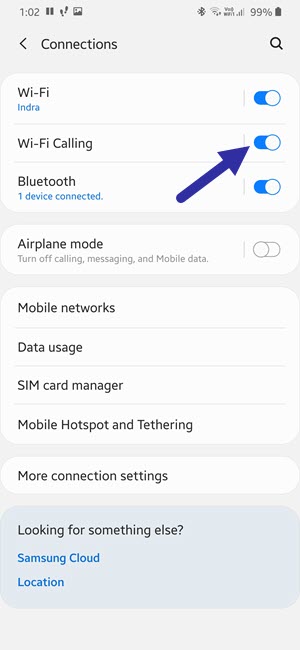
    4. Now, turn on the “Wi-Fi calling” feature.
      turn on wi fi calling on samsung 291120
    5. Close the Settings app.

    Just like the regular stock Android, your Samsung phone will choose the Wi-Fi connection, if already connected to it, for regular phone calls. If the Wi-Fi signal is low, of poor quality, or lost, the phone call will seamlessly and automatically switch to the regular carrier signal. You don’t have to do anything and the call won’t be dropped even if you are in the middle of a conversation.

    Important points to remember about the Wi-Fi Calling feature

    There are a few things you should note or remember when it comes to Wi-Fi calling on Android. Here is what they are:

    • Wi-Fi Calling feature should be supported both by your Android device and the cellular carrier. If you don’t see the Wi-Fi calling option in your Android settings, it is possible that your device doesn’t support it. If you are unsure about your mobile carrier, you have to contact their customer support.
    • Depending on your Android device manufacturer, the Wi-Fi Calling feature can be in a different place or page. However, you will generally find it on the Wi-Fi settings page in the Settings app.
    • Wi-Fi Calling uses the regular VoIP protocol (Voice over Internet Protocol). As such, you need to have an active internet connection to use Wi-Fi calling.
    • If your Wi-Fi connection is not strong enough, the voice clarity may be reduced. Depending on the device, the phone will switch to the carrier single if it thinks the cell signal gives you a better experience.
    • If too many devices are connected to the same Wi-Fi network, the Wi-Fi calling quality might deteriorate. So, it is not a good option for public spaces like airports or coffee shops.
    • Compared to the regular cellular network, Wi-Fi Calling gives you better battery life.
    • On most Android phones, the Wi-Fi calling feature can be turned on or off directly from the Notification Shade itself. Just slide down the notification shade and tap on the Wi-Fi calling icon to turn it on or off.

    That is all. I hope that helps. If you need any help, comment below and I will try to help as much as possible. If you like this article, check out how to find if your Android phone supports Wi-Fi 5Ghz.

  • How to Turn ON Hotspot on Samsung Android Phone

    How to Turn ON Hotspot on Samsung Android Phone

    To share the internet with other devices, you have to turn on the mobile hotspot on your Samsung phone. Here’re the steps you should follow to do so.

    Though not often, there might be situations where you need to share the mobile data in your Samsung phone with other devices. There are any number of situations like unstable internet at your home or office, quick internet access to your laptop while traveling, sharing the internet with your friends or family, etc., where a mobile hotspot is very useful. No matter the reason, the Samsung phone makes it easy to create and turn on the hotspot. Once you turn on the hotspot, any device can connect to it with a password and use your internet.

    In this quick and straightforward article, let me guide you step by step on how to turn on the hotspot on a Samsung Android phone and how to manage it properly for better security.

    Jump to:

    Steps to turn ON hotspot on Samsung phone

    You can turn on the mobile hotspot on a Samsung phone in two different ways. One — from the Settings app and the other from the Notification slide. If this is your first time enabling the Hotspot, I recommend you follow the first method as you need to know the default hotspot password.

    Turn on hotspot from settings

    1. First, open Settings from the app drawer.
    2. Tap on the “Connections” option in Settings.
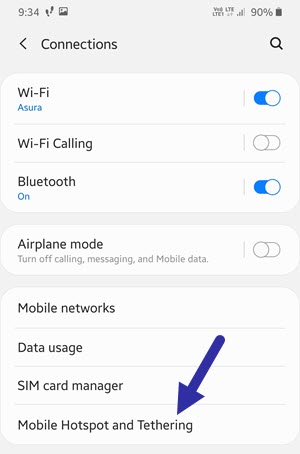
    3. Select the “Mobile Hotspot and Tethering” option.
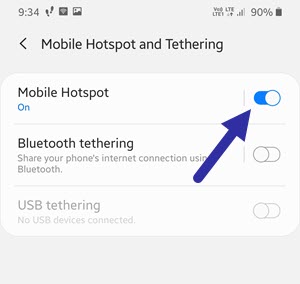
    4. Now, turn on the “Mobile Hotspot” option using the toggle button.

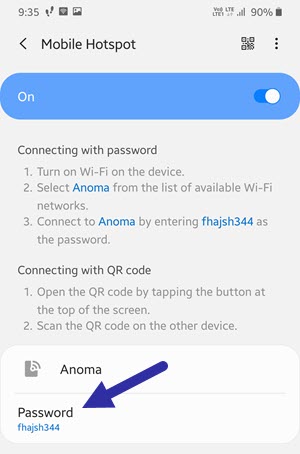
    By default, the hotspot is password protected. Each Samsung device has a different default hotspot password. To know your Samsung mobile hotspot password, tap on the “Mobile Hotspot” option. You will see it under the “Password Section.” If you want to, you can also change the Samsung hotspot password.

    Turn on hotspot from notification slide

    Samsung gives you a quick way to turn on the hotspot directly from the notification slide itself.

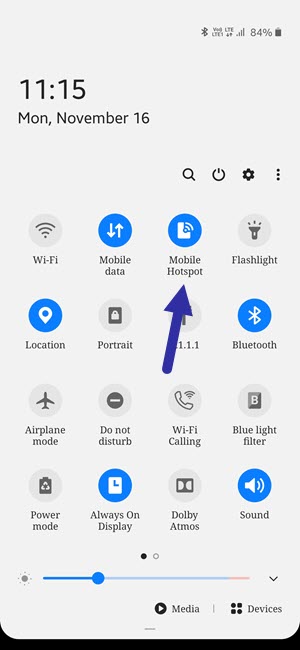
    First, swipe down from the top edge to open the Notification panel. From the icon grid, find and tap on the “Mobile Hotspot” icon. Once turned on, the icon will change to blue or some other accent color.

    Depending on how the icons are laid out, the mobile hotspot icon can be in a different location in the notification panel. So, if you cannot find the icon right away, go to the second page by swiping to left in the notification panel.

    Configure Samsung mobile hotspot settings

    Samsung offers extra configuration options to better manage the hotspot. Though these options are not necessary to configure, modifying them as need will make your life a tad bit easier. For example, the default hotspot password is just jumbled letters and numbers which hard to remember.

    Change hotspot password

    To change the hotspot password on Samsung Android phone follow the steps given below.

    1. Open the Settings app.
    2. Go to the “Connections → Mobile hotspot and tethering” page.
    3. Tap on the “Mobile Hotspot” option.
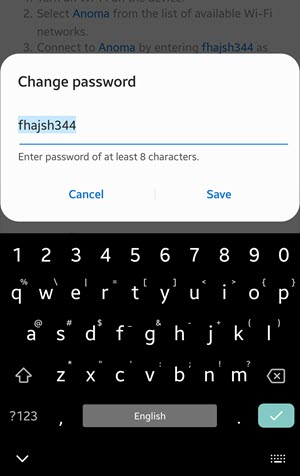
    4. Tap on the “Password” option.
    5. Input the password of your choice and tap on the “Ok” button.
    6. Close the Settings app.

    While setting the password, make sure that it is easy to remember but hard to guess. I recommend you make the password at least 8 characters long with both alphabets and numbers in it.

    Change hotspot timeout setting

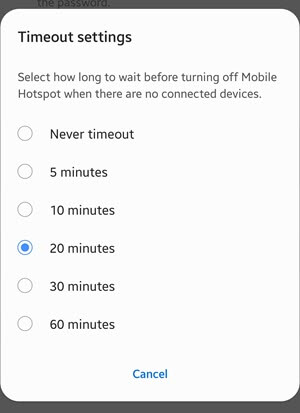
    When no device is connected to the hotspot, it is best to turn it off. In Samsung, you can configure the hotspot to turn itself off after a set timeout when there is no device is connected to it.

    1. Open the Settings app.
    2. Go to the “Connections → Mobile hotspot and tethering” page.
    3. Tap on the “Mobile Hotspot” option.
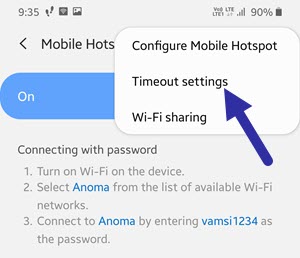
    4. Tap on the “three vertical dots” on the top-right corner.
    5. Select the “Timeout settings” option.
    6. Select the timeout length of your choice.
    7. Changes are saved automatically.
    8. Close the settings app.

    Things to keep in mind while using hotspot

    While using the hotspot feature, there are few general things you should know. They are as follows:

    • You need to turn off the WiFi to turn on the hotspot. If you don’t, you will see a message asking you to turn off WiFi.
    • Sometimes, if the data saver feature is turned on, you might be able to turn on hotspot.
    • Since mobile data is limited, be wary when connected to other devices. It is very easy to go overboard and reach/exceed the data limit. This is especially true when a computer is connected to the mobile hotspot. If you are using Windows 10, I recommend you enable metered connection to limit computer data usage.
    • You can see how many and what devices are connected to the WiFi hotspot from “Settings → Connections → Mobile hotspot and tethering → Mobile hotspot” page.
    • From the same page, you can change the device name by tapping on the default name. This is that name that appears to other devices.

    That is all for now. I hope that helps. If you need any help, comment below and I will try to help as much as possible. If you like this article, check out how to remove a WiFi network on Samsung Android phone.

  • How to Remove WiFi Network on Samsung Android Phone

    How to Remove WiFi Network on Samsung Android Phone

    If you no longer need access to a specific WiFi network, you can remove that WiFi network from Samsung phone. Here’re the steps.

    In any Android device, you can connect to as many WiFi networks as you want to. In fact, the Android device will automatically store the details of every WiFi network you connect to. This makes it easier to connect to that same network in the future. As you can guess, having the ability to save WiFi network details and connect to it when the network is available is very useful in a lot of situations.

    However, this might not be the case for every WiFi network. There might be times when you don’t want to connect to a specific WiFi network automatically. This is especially true with WiFi networks you don’t trust.

    When you don’t want to connect to a WiFi network, you can delete or remove that WiFi network on your Samsung phone. All you have to do is find the WiFi network and delete it from the saved list.

    Steps to Remove WiFi Network from Samsung Phone

    Follow the steps shown below to remove or delete WiFi network on a Samsung Android phone.
    1. Open Settings.
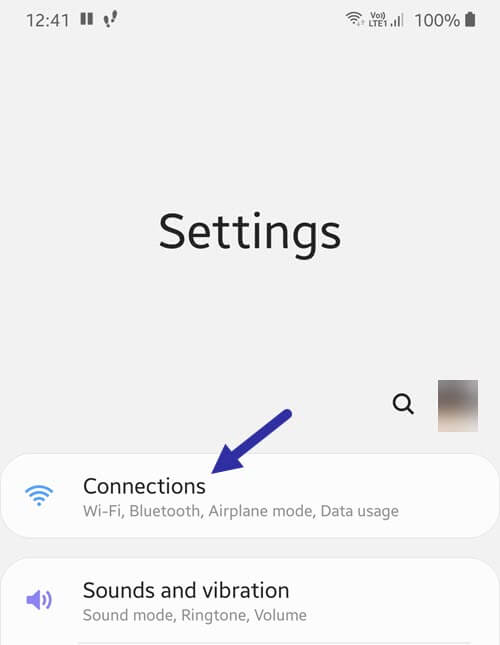
    2. Tap on “Connections”.
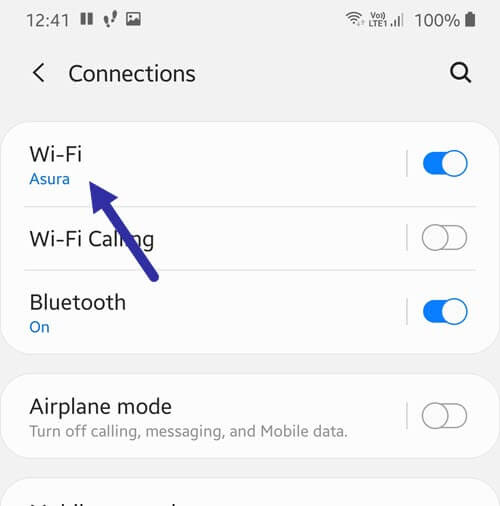
    3. Now, tap on the “Wi-Fi” option.
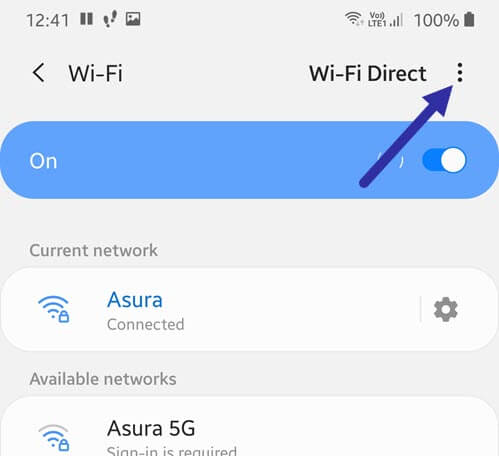
    4. Tap on the “Menu” icon.
    5. Select “Advanced”.
    6. Select the “Manage networks” option.
    7. Tap on the “Delete”
    8. Select the WiFi network(s) you want to delete.
    9. Tap the “Delete” button.

    Detailed Steps

    1. First, open the Settings app on your Samsung phone or tablet. You can do that by tapping on the Settings (gear) icon in the App drawer.

    2. After opening it, tap on the “Connections” option. This is where you will find various network options like WiFi, Bluetooth, Mobile Data, Hotspot, etc.

    3. Now, tap on the “WiFi” option. Don’t tap on the toggle button, it will either enable or disable WiFi.

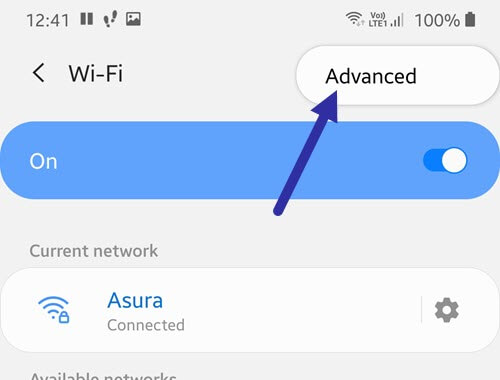
    4. Here you will see the current and available WiFi networks. Tap on the “Menu” icon on the top-right corner. You will see it as a three-dotted vertical line.

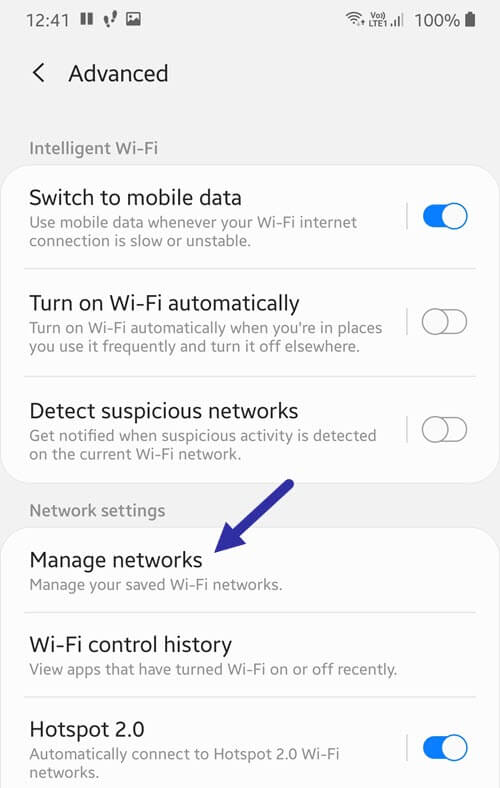
    5. Select the “Advanced” option form the menu.

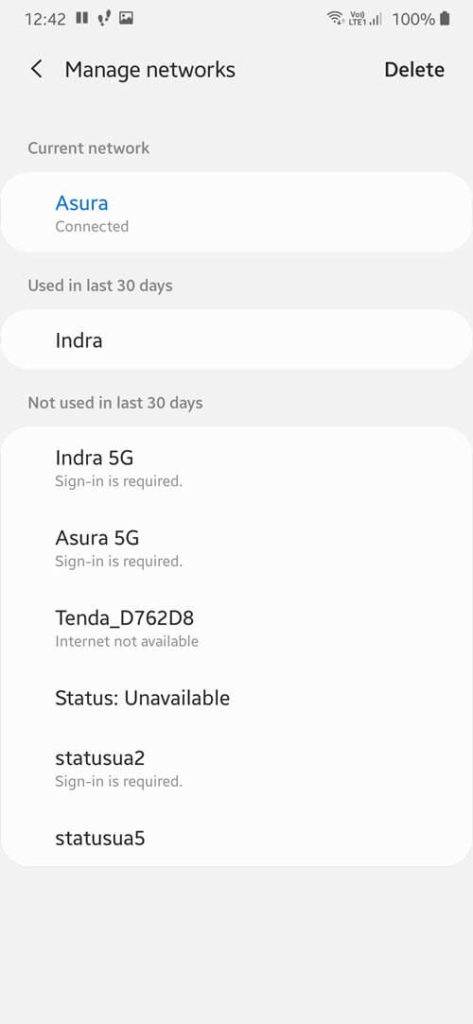
    6. On this page, select the “Manage networks” option under the “Network settings” section.

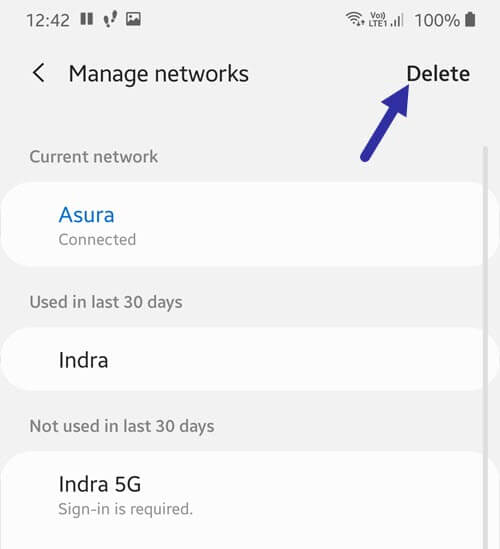
    7. Now, tap on the “Delete” button on the top-right corner.

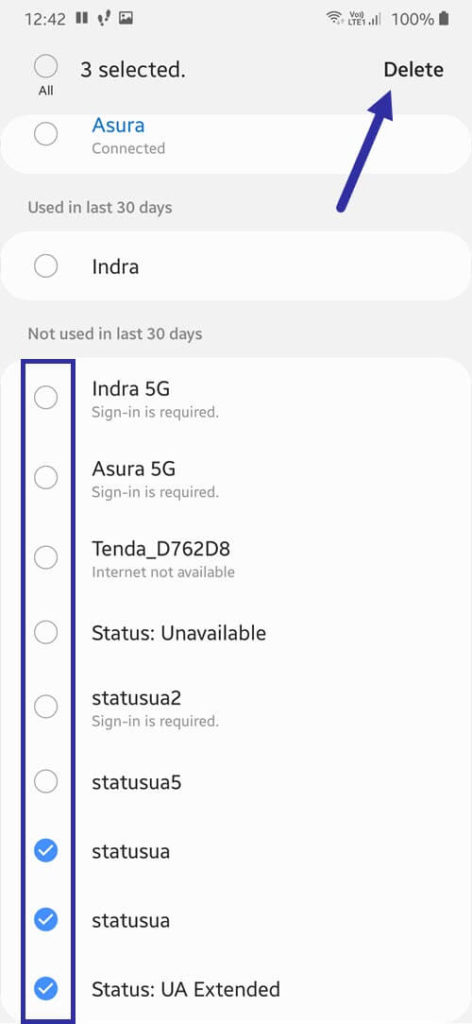
    8. Select the WiFi networks you want to remove. In my case, I’ve selected three WiFi network to delete.

    9. After selecting, press the “Delete” option to remove WiFi network on Samsung phone.

    10. Finally, close the Settings app.

    That is all. It is that simple to remove WiFi network on a Samsung Android phone running One UI.

    I hope that helps. If you need any help, comment below and I will try to help as much as possible.

  • How to Set Data Limit on Samsung Android Phone

    How to Set Data Limit on Samsung Android Phone

    To restrict mobile data usage, you can set data limit on your Samsung Android phone. Here are the exact steps you should follow to do so.

    No matter where you live, mobile data is limited and precious. Unlike your regular broadband connection where unlimited or over-the-top FUPs (Fair Usage Policy) are a norm, the mobile data is still very much limited. Some networks limit you on daily basis and some on monthly basis. Not only that but the amount of mobile data you get is entirely dependent on your connection plan. For instance, I get 1.5GB/day. When I exceed that limit, the speed drops to 64kbps which is practically unusable. Some ISPs might even charge extra when you go over the limit.

    Considering how important and limited mobile data is, it is important that you set data limits to make sure you won’t go overboard on any given month. The data limit also helps you budget mobile data so that you won’t be stranded in emergencies. If you are using a Samsung Android phone, it has a built-in way to quickly set and change the data limit.

    In this quick and straightforward article, let me guide you through the steps to set the data limit on a Samsung Android phone.
    Jump to:

    Steps to set data limit on Samsung

    To set the data limit on Samsung, follow the steps shown below.

    1. Open settings on the Samsung device.
    2. Tap on the “Connections” option.
    3. Select the “Data usage” option.
    4. Now, select the “Billing cycle and data warning” option.
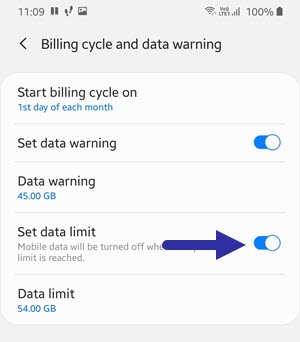
    5. Turn on the “Set data limit” option.
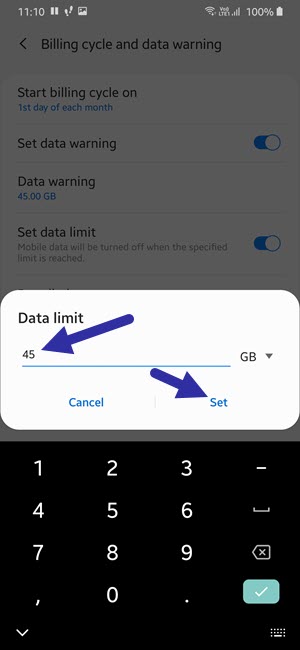
    6. Tap on the “Data limit” option.
    7. Set the limit in GBs and tap “Set“.
    8. Close settings.

    Detailed steps with images

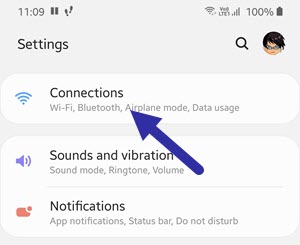
    1. First, open the Settings app and tap on the “Connections” option. This is where you will find all the options related to mobile data.

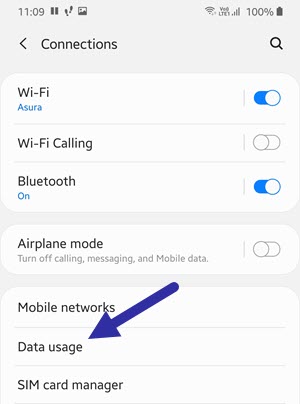
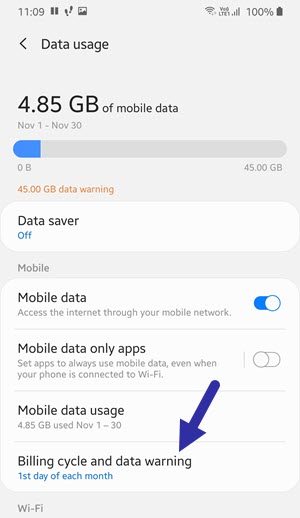
    2. Here, select the aptly titled “Data usage” option.

    3. Select the “Billing cycle and data usage” option. In this case, the billing cycle, in general, refers to the monthly quota for your mobile data.

    4. On this screen, turn on the “Set data limit” option. This is the option that lets you restrict mobile data on Samsung.

    5. Now, tap on the “Data limit” option. This option lets you set the absolute limit for the mobile data.

    6. Set the data limit in GBs and tap on the “Set” button. Once your phone reaches this limit, it will stop you from using any more.

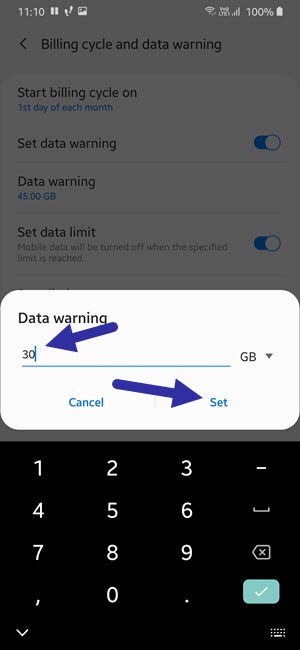
    7. Next, you need to set the data limit warning. That way, the phone can show you a warning message when you are reaching the data limit. To do that, tap on the “Data warning” option on the same page.

    8. Set the data warning limit in GBs. The warning limit should be below to actual data limit. Otherwise, the data warning will be useless. In my case, I set the data warning limit at 10GBs less than the actual data limit.

    9. Finally, close the settings app.

    That is it. Once you set the data limit, your Samsung device monitors how much data you are using. When you reach the limit, it will stop you from using any more data to help avoid excessive billing.

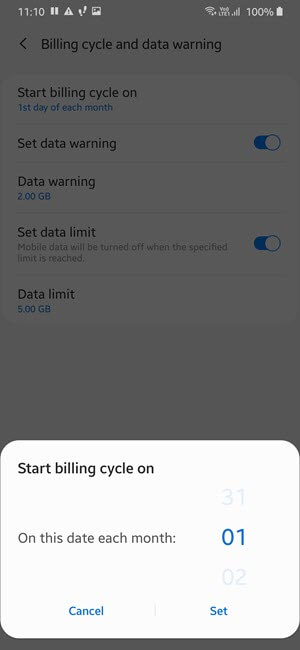
    Important note: By default, the billing cycle is set to the 1st of every month. If your mobile data billing cycle is different, i.e, if it resets at a different data, you need to change it for accurate data limit. To change the billing cycle, tap on the “Start billing cycle on” option, and set the data limit as needed.

    Steps to change data limit on Samsung

    If the data limit is too restrictive or not sufficient, you can change the data limit on Samsung. Here’s how.

    1. Open Settings and select “Connections”.
    2. Go to the “Data usage → Billing cycle and data warning”.
    3. Select the “Data limit” option.
    4. Change the data limit as needed.
    5. Tap “Set” to save changes.
    6. Close settings.

    Note: If the data limit option is grey out, it means that you did not set the limit in the first place. Turn on the “Set data limit” option to enable the “Data limit” option.

    That is all. I hope that helps. If you need any help, comment below and I will try to help as much as possible. If you like this article, check out how to turn on hotspot on a Samsung phone to share the internet.