Tag: wifi

  • How to Troubleshoot Common Android Wi-Fi Issues

    Staying connected to Wi-Fi is essential for today’s Android users. However, Wi-Fi issues can be frustrating. This comprehensive guide will walk you through troubleshooting common Android Wi-Fi problems, ensuring a seamless online experience.

    1. Check Wi-Fi Signal Strength: A weak signal can lead to connectivity problems. Check the signal strength indicator on your device’s status bar. Move closer to the router for better signal quality.

    2. Restart Your Router: Often, the router may have temporary glitches. Unplug the router’s power cable, wait for a minute, and plug it back in. This can resolve connectivity issues.

    3. Forget and Reconnect: Sometimes, saved network configurations can cause problems. Go to Settings > Wi-Fi, tap on the network, and select “Forget.” Then reconnect by entering the password.

    4. Reset Network Settings: If multiple Wi-Fi networks are causing issues, reset network settings. Go to Settings > System > Reset > Reset Wi-Fi, Mobile & Bluetooth.

    5. Airplane Mode Toggle: Turning on Airplane mode for a few seconds and then turning it off can help reset wireless connections, often resolving connectivity issues.

    6. Clear Wi-Fi Cache: Cached data can interfere with Wi-Fi. Go to Settings > Apps > Show system apps (in the three-dot menu) > Wi-Fi > Storage > Clear cache.

    7. Check Date and Time Settings: Incorrect date and time settings can affect SSL certificates required for secure connections. Make sure they’re set automatically.

    8. Update Android and Apps: Outdated software can lead to compatibility issues. Ensure your Android OS and apps are up-to-date through Settings > System > Software update.

    9. Disable Power Saving Mode: Power-saving modes can limit Wi-Fi functionality. Disable these modes temporarily to troubleshoot connectivity issues.

    10. Safe Mode Testing: Boot your device in Safe Mode (usually by pressing and holding the power button, then tapping and holding “Power off”) to see if third-party apps are causing Wi-Fi problems.

    11. Router Channel Change: Routers can face interference from neighboring networks. Access your router settings via a browser, log in, and change the Wi-Fi channel to minimize interference.

    12. Check for MAC Filtering: If MAC filtering is enabled on your router, ensure your device’s MAC address is allowed.

    13. Disable VPN and Proxy: Virtual Private Networks (VPNs) and proxy servers can sometimes interfere with Wi-Fi connections. Disable them temporarily to diagnose issues.

    14. Factory Reset as Last Resort: If all else fails, consider a factory reset. Back up your data first. Go to Settings > System > Reset > Factory data reset.

    Conclusion: By following these detailed troubleshooting steps, you can effectively diagnose and resolve common Wi-Fi issues on your Android device. Remember that each situation may require a different approach, and patience is key. With a stable Wi-Fi connection, you’ll enjoy uninterrupted browsing, streaming, and online activities on your Android device.
  • How to Turn ON Wi-Fi Calling on Android (with pictures)

    How to Turn ON Wi-Fi Calling on Android (with pictures)

    Wi-Fi calling feature gives you the best possible indoor connection. Here’s how you can turn on Wi-Fi calling on Android.

    Most modern Android phones and a lot of carriers support Wi-Fi calling. When indoors, it is better to enable the Wi-Fi calling feature because it gives you better quality audio and even reduces call drops and other general disturbances. Generally, cellphone reception will be pretty good when you are outdoors. However, when indoors, the reception might be reduced due to a number of reasons. This can cause low-quality audio, disturbance in the audio, and even the call drops. This is especially true if the cell reception is generally low where you live.

    To mitigate all this, most carriers now support Wi-Fi calling. As the name implies, when enabled, your phone and the carrier will utilize the Wi-Fi signal to enhance the overall call quality. The good thing is, the Wi-Fi calling feature is virtually free and built into almost all Android phones and tablets. As long as your carrier supports Wi-Fi calling, you can turn on the Wi-Fi calling feature on Android and start using it.

    In this quick and straightforward guide, let me show you the steps to turn on Wi-Fi calling on Android.

    Jump to:

    Steps to turn ON Wi-Fi calling on Android

    To enable Wi-Fi calling feature on an Android device, follow the steps listed below.

    1. Open the Settings app.
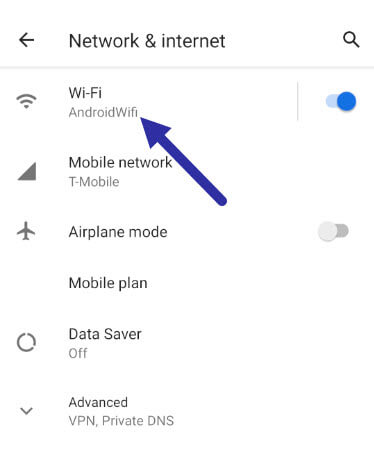
    2. Select the “Network & Internet” option.
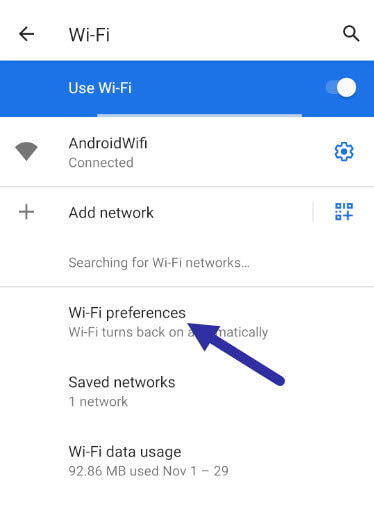
    3. On this page, select the “Wi-Fi” option.
      select wi fi settings 291120
    4. Select the “Wi-Fi Preferences” option.
      android wi fi preference 291120
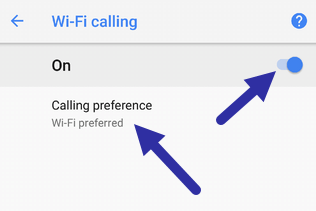
    5. Now, tap on the “Wi-Fi calling” option.
    6. Turn on the Wi-Fi calling feature.
    7. Select the “Calling preference” option.
    8. Select the “Wi-Fi preferred” option.
      turn on wi fi calling on android 291120
    9. Close the Settings app.

    From now on, your Android phone will automatically choose the Wi-Fi connection, if already connected to it, for regular phone calls. If the Wi-Fi signal is low, of poor quality, or lost, the phone call will seamlessly and automatically switch to the regular carrier signal. You don’t have to do anything and the call won’t be dropped even if you are in the middle of a conversation.

    Enable Wi-Fi calling on Samsung phone

    If you are using a Samsung Galaxy phone, these are the steps you should follow to turn on Wi-Fi calling on a Samsung phone.

    1. Open the Settings app on your Samsung phone.
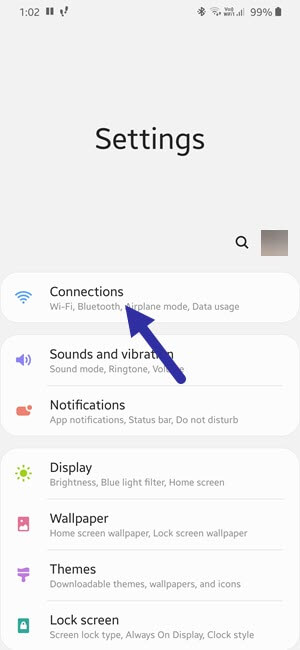
    2. Select the “Connections” option.
    3. samsung connections setting 291120
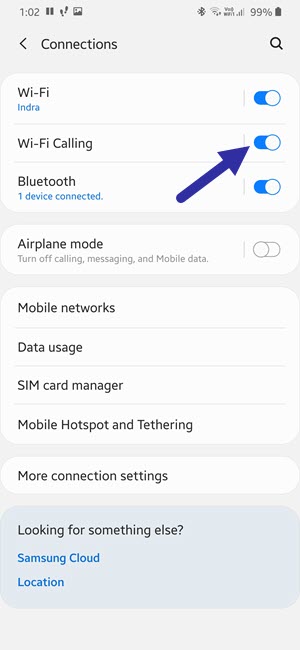
    4. Now, turn on the “Wi-Fi calling” feature.
      turn on wi fi calling on samsung 291120
    5. Close the Settings app.

    Just like the regular stock Android, your Samsung phone will choose the Wi-Fi connection, if already connected to it, for regular phone calls. If the Wi-Fi signal is low, of poor quality, or lost, the phone call will seamlessly and automatically switch to the regular carrier signal. You don’t have to do anything and the call won’t be dropped even if you are in the middle of a conversation.

    Important points to remember about the Wi-Fi Calling feature

    There are a few things you should note or remember when it comes to Wi-Fi calling on Android. Here is what they are:

    • Wi-Fi Calling feature should be supported both by your Android device and the cellular carrier. If you don’t see the Wi-Fi calling option in your Android settings, it is possible that your device doesn’t support it. If you are unsure about your mobile carrier, you have to contact their customer support.
    • Depending on your Android device manufacturer, the Wi-Fi Calling feature can be in a different place or page. However, you will generally find it on the Wi-Fi settings page in the Settings app.
    • Wi-Fi Calling uses the regular VoIP protocol (Voice over Internet Protocol). As such, you need to have an active internet connection to use Wi-Fi calling.
    • If your Wi-Fi connection is not strong enough, the voice clarity may be reduced. Depending on the device, the phone will switch to the carrier single if it thinks the cell signal gives you a better experience.
    • If too many devices are connected to the same Wi-Fi network, the Wi-Fi calling quality might deteriorate. So, it is not a good option for public spaces like airports or coffee shops.
    • Compared to the regular cellular network, Wi-Fi Calling gives you better battery life.
    • On most Android phones, the Wi-Fi calling feature can be turned on or off directly from the Notification Shade itself. Just slide down the notification shade and tap on the Wi-Fi calling icon to turn it on or off.

    That is all. I hope that helps. If you need any help, comment below and I will try to help as much as possible. If you like this article, check out how to find if your Android phone supports Wi-Fi 5Ghz.

  • How to Remove WiFi Network on Samsung Android Phone

    How to Remove WiFi Network on Samsung Android Phone

    If you no longer need access to a specific WiFi network, you can remove that WiFi network from Samsung phone. Here’re the steps.

    In any Android device, you can connect to as many WiFi networks as you want to. In fact, the Android device will automatically store the details of every WiFi network you connect to. This makes it easier to connect to that same network in the future. As you can guess, having the ability to save WiFi network details and connect to it when the network is available is very useful in a lot of situations.

    However, this might not be the case for every WiFi network. There might be times when you don’t want to connect to a specific WiFi network automatically. This is especially true with WiFi networks you don’t trust.

    When you don’t want to connect to a WiFi network, you can delete or remove that WiFi network on your Samsung phone. All you have to do is find the WiFi network and delete it from the saved list.

    Steps to Remove WiFi Network from Samsung Phone

    Follow the steps shown below to remove or delete WiFi network on a Samsung Android phone.

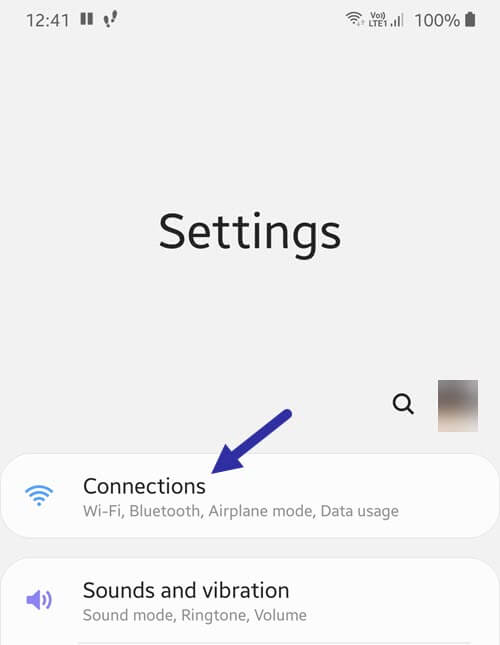
    1. Open Settings.
    2. Tap on “Connections”.
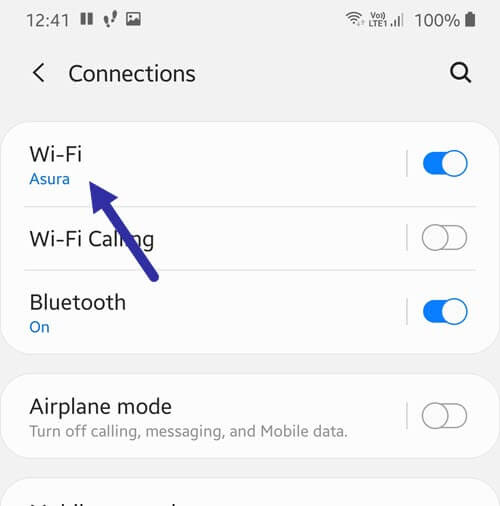
    3. Now, tap on the “Wi-Fi” option.
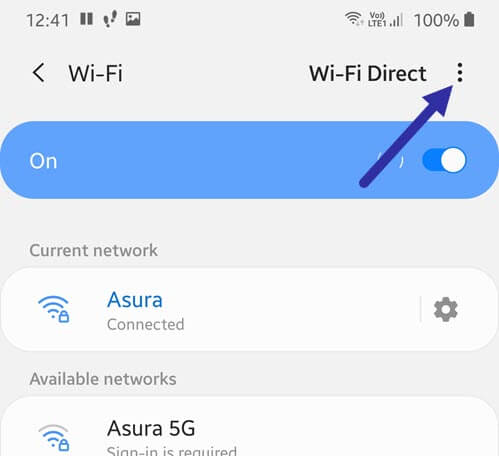
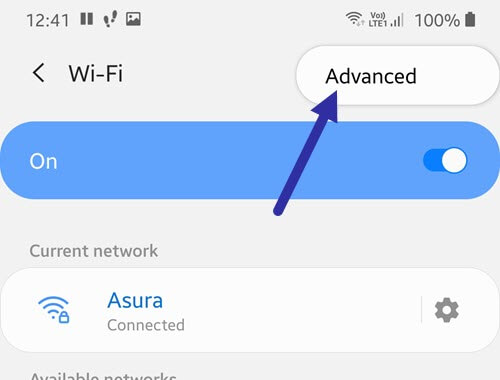
    4. Tap on the “Menu” icon.
    5. Select “Advanced”.
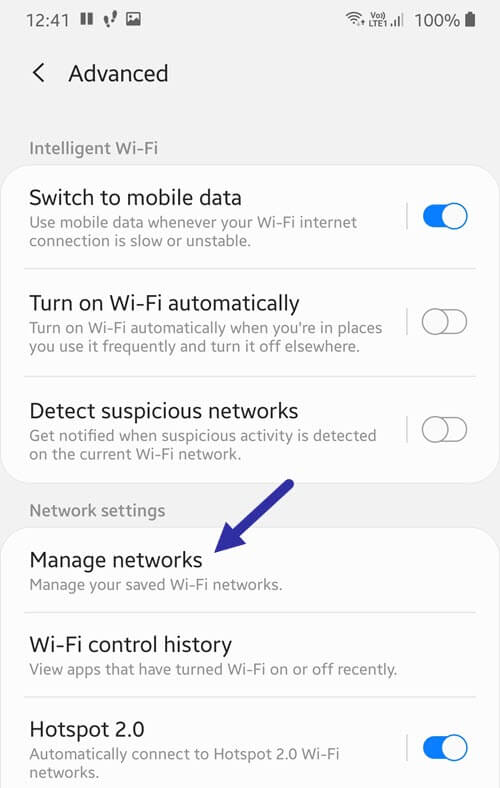
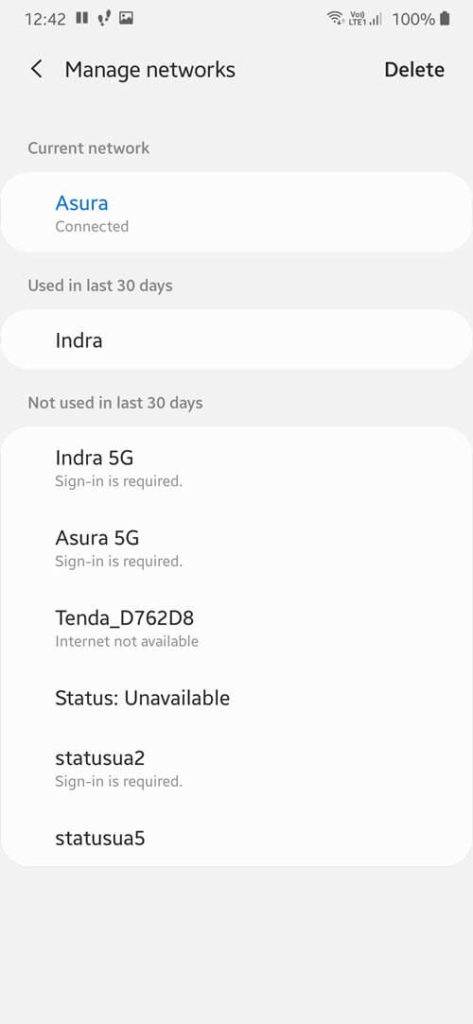
    6. Select the “Manage networks” option.
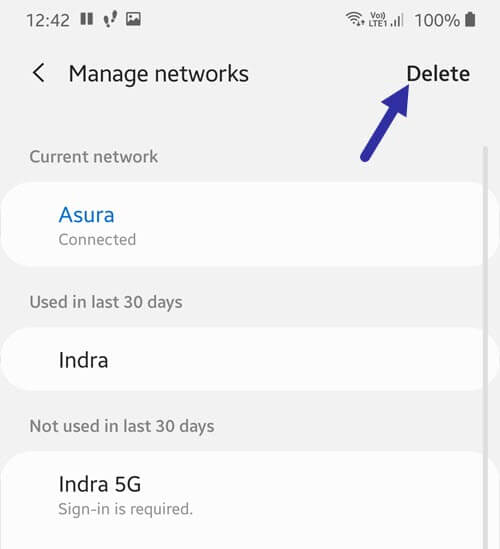
    7. Tap on the “Delete”
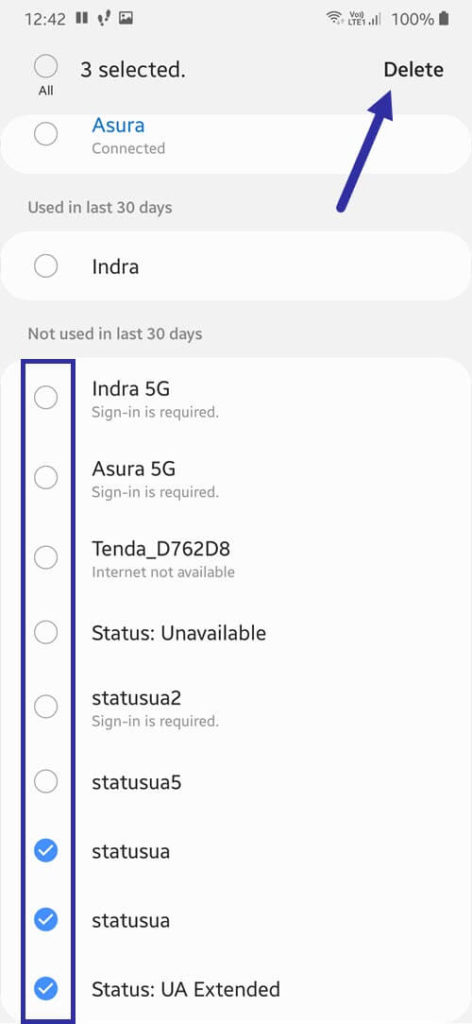
    8. Select the WiFi network(s) you want to delete.
    9. Tap the “Delete” button.

    Detailed Steps

    1. First, open the Settings app on your Samsung phone or tablet. You can do that by tapping on the Settings (gear) icon in the App drawer.

    2. After opening it, tap on the “Connections” option. This is where you will find various network options like WiFi, Bluetooth, Mobile Data, Hotspot, etc.

    3. Now, tap on the “WiFi” option. Don’t tap on the toggle button, it will either enable or disable WiFi.

    4. Here you will see the current and available WiFi networks. Tap on the “Menu” icon on the top-right corner. You will see it as a three-dotted vertical line.

    5. Select the “Advanced” option form the menu.

    6. On this page, select the “Manage networks” option under the “Network settings” section.

    7. Now, tap on the “Delete” button on the top-right corner.

    8. Select the WiFi networks you want to remove. In my case, I’ve selected three WiFi network to delete.

    9. After selecting, press the “Delete” option to remove WiFi network on Samsung phone.

    10. Finally, close the Settings app.

    That is all. It is that simple to remove WiFi network on a Samsung Android phone running One UI.

    I hope that helps. If you need any help, comment below and I will try to help as much as possible.

  • How to Check If Android Device Supports WiFi 5GHz

    How to Check If Android Device Supports WiFi 5GHz

    If you want to check if your Android device supports WiFi 5GHz along with 2.4GHz, these are the steps you should follow to know.

    Any Android device with WiFi capability supports the 2.4GHz band. Being the last generation, WiFi 2.4GHz is pretty slow and cannot properly support multiple devices on the same network. In fact, when it comes to things like home streaming and online games, 5GHz band WiFi is markedly better compared to 2.4GHz. That is one of the reasons why WiFi 5GHz support is important if you are into online gaming, home streaming, local network sharing, or anything network intensive.

    For the most part, WiFi 5GHz is becoming the standard in all most all modern routers. Thankfully, Android devices nowadays support both 2.4GHz and 5GHz bands for WiFi. When your device supports 5GHz, you can connect to a WiFi 5GHz network without any problems.

    However, if you are using an older Android phone or tablet and don’t know whether it supports 5GHz or not, follow the steps shown below to check if the Android device has support for WiFi 5GHz.

    Steps to Check Android Device Support for 5GHz

    To know if your Android phone supports WiFi 5GHz band, follow the steps listed below.

    1. First, install the open-source WiFi Analyzer from the Play Store.

    2. After installing WiFi Analyzer, open it from the app drawer.

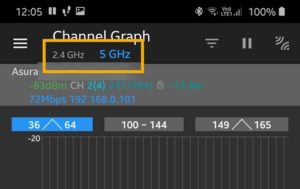
    3. As soon as you open the app, you will see all the available access points. Since we want to know if the device supports WiFi 5GHz, tap on the “Channel Graph” option on the bottom bar.

    4. If your Android phone supports both 2.4GHz and 5GHz bands, you will see it right under the “Channel Graph” heading on the top bar.

    If your device doesn’t support the 5GHz band, you will only see “2.4GHz” on the top bar.

    Advantages of WiFi 5GHz

    Below are some of the advantages of 5GHz over 2.4GHz.

    • Compared to 2.4GHz, 5GHz has way better bandwidth. In the real-world, 5GHz gives you around 210Mbps to 1Gbps while 2.4GHz gives you around 150 Mbps.
    • The 5GHz band is outside the other common devices like microwaves, cordless phones, home security and monitoring systems, etc which work in the 2.4GHz band. This means that your WiFi network will be interference-free from other devices.
    • Compared to 11 channels in 2.4GHz, the 5GHz band has 25 channels. This means that you can fine-tune your network to function in different channels to reduce interference.
    • 5GHz 802.11ac WiFi routers are more advanced thanks to useful features like Dynamic Frequency Seelction, Power Control, Beamforming, etc.

    One major disadvantage of 5GHz band is that its range is shorter than 2.4GHz and it cannot effectively penetrate through thick walls. So, if you want to cover a big area with walls in between then 2.4GHz is the ideal solution. Since all the 5GHz Android devices also have 2.4GHz built-in to them, this should be a problem.

    Do keep in mind that to get the advantages of 5GHz WiFi network, you need to connect to it via your Android device.

    That is all. I hope that helps. If you need any help, comment below and I will try to help as much as possible.