Tag: network

  • How to Troubleshoot Common Android Wi-Fi Issues

    Staying connected to Wi-Fi is essential for today’s Android users. However, Wi-Fi issues can be frustrating. This comprehensive guide will walk you through troubleshooting common Android Wi-Fi problems, ensuring a seamless online experience.

    1. Check Wi-Fi Signal Strength: A weak signal can lead to connectivity problems. Check the signal strength indicator on your device’s status bar. Move closer to the router for better signal quality.

    2. Restart Your Router: Often, the router may have temporary glitches. Unplug the router’s power cable, wait for a minute, and plug it back in. This can resolve connectivity issues.

    3. Forget and Reconnect: Sometimes, saved network configurations can cause problems. Go to Settings > Wi-Fi, tap on the network, and select “Forget.” Then reconnect by entering the password.

    4. Reset Network Settings: If multiple Wi-Fi networks are causing issues, reset network settings. Go to Settings > System > Reset > Reset Wi-Fi, Mobile & Bluetooth.

    5. Airplane Mode Toggle: Turning on Airplane mode for a few seconds and then turning it off can help reset wireless connections, often resolving connectivity issues.

    6. Clear Wi-Fi Cache: Cached data can interfere with Wi-Fi. Go to Settings > Apps > Show system apps (in the three-dot menu) > Wi-Fi > Storage > Clear cache.

    7. Check Date and Time Settings: Incorrect date and time settings can affect SSL certificates required for secure connections. Make sure they’re set automatically.

    8. Update Android and Apps: Outdated software can lead to compatibility issues. Ensure your Android OS and apps are up-to-date through Settings > System > Software update.

    9. Disable Power Saving Mode: Power-saving modes can limit Wi-Fi functionality. Disable these modes temporarily to troubleshoot connectivity issues.

    10. Safe Mode Testing: Boot your device in Safe Mode (usually by pressing and holding the power button, then tapping and holding “Power off”) to see if third-party apps are causing Wi-Fi problems.

    11. Router Channel Change: Routers can face interference from neighboring networks. Access your router settings via a browser, log in, and change the Wi-Fi channel to minimize interference.

    12. Check for MAC Filtering: If MAC filtering is enabled on your router, ensure your device’s MAC address is allowed.

    13. Disable VPN and Proxy: Virtual Private Networks (VPNs) and proxy servers can sometimes interfere with Wi-Fi connections. Disable them temporarily to diagnose issues.

    14. Factory Reset as Last Resort: If all else fails, consider a factory reset. Back up your data first. Go to Settings > System > Reset > Factory data reset.

    Conclusion: By following these detailed troubleshooting steps, you can effectively diagnose and resolve common Wi-Fi issues on your Android device. Remember that each situation may require a different approach, and patience is key. With a stable Wi-Fi connection, you’ll enjoy uninterrupted browsing, streaming, and online activities on your Android device.
  • How to Change DNS Address in Android Phone or Tablet

    Android network settings allow custom DNS server address. Here are the steps to follow to change the DNS address in Android.

    Android by default uses whatever DNS it gets from the router or the ISP (Internet Service Provider). In the case of mobile data, Android automatically gets the DNS address from your mobile carrier who also acts as an ISP. If the default DNS is not to your liking, you can easily change the DNS on Android in just a couple of steps. i.e, you can set a private DNS address in your Android phone.

    Compared to the ISP’s default DNS, public DNS is faster and oftentimes secure. This is especially true for popular services like Google Public DNS and Cloudflare DNS.

    One of the best things about most public DNS services is that their ping time is pretty low. One of the main reasons being the number of data centers close to your location. Due to the lighting fast ping times, if you are looking to play online games then consider using custom DNS for a better gaming experience. Other than that, depending on the DNS service you chose to use, from time to time, you can even bypass region locks or geo-restrictions to access locked content.

    In this quick and simple guide, let me take you through the steps to change DNS on Android.

    How to change DNS on Android

    You can change Android DNS from the Network & Internet page in the Settings app. Here’s how you can find the Private DNS option and change it.

    1. Open android settings. Just tap on the Settings icon on the home screen or in the app drawer to open Settings.

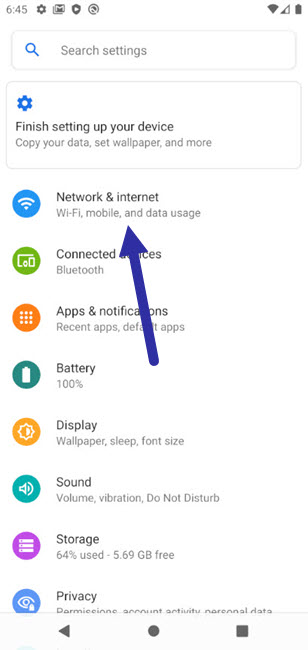
    2. Select the “Network & Internet” option in the Settings app. You will find this option at the top of the Settings page.

    open network internet settings 010121

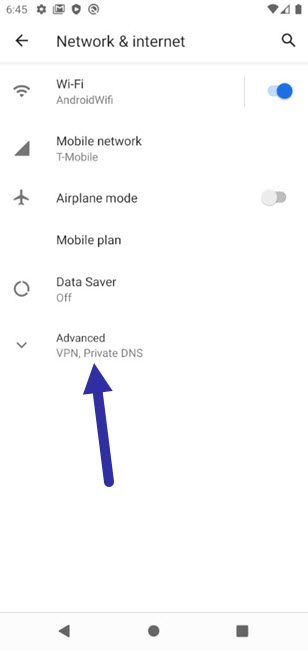
    3. Tap on the “Advanced” option at the bottom of the page. Being an advanced feature, the private DNS option is buried one level deeper.

    advanced network settings 010121

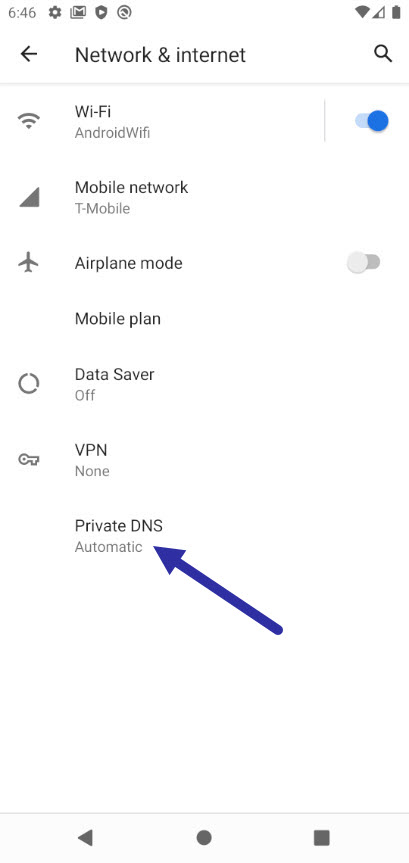
    4. Select the “Private DNS” option. This is the option that lets you set custom DNS in Android.

    private dns option android 010121

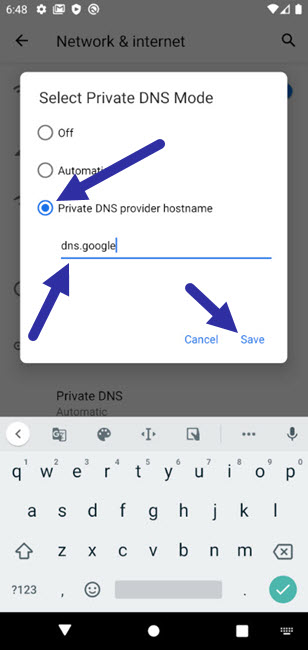
    5. Select the “Private DNS provider hostname” option, enter the DNS hostname, and tap on the “Save” button. Google Public DNS and Cloudflare DNS hostnames are given below.

    • Google Public DNS hostname: dns.google
    • Cloudflare DNS hostname: 1dot1dot1dot1.cloudflare-dns.com
    change dns in android 010121
    change DNS in android

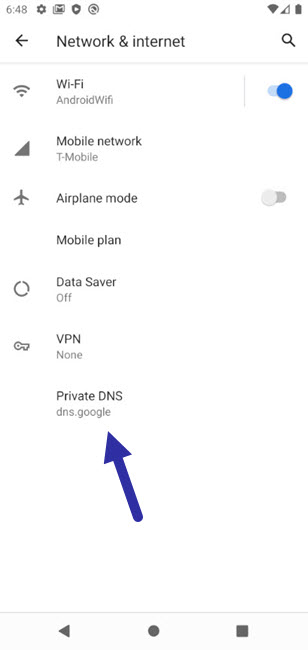
    Settings all automatically saved. You can close the settings app. From now on, your Android phone will use the custom DNS instead of the ISP or router DNS.

    set private dns in android 010121
    set private DNS in android

    Change DNS on Samsung Android Phone

    You can change Samsung DNS settings from the connections page. Here’s how you can do it.

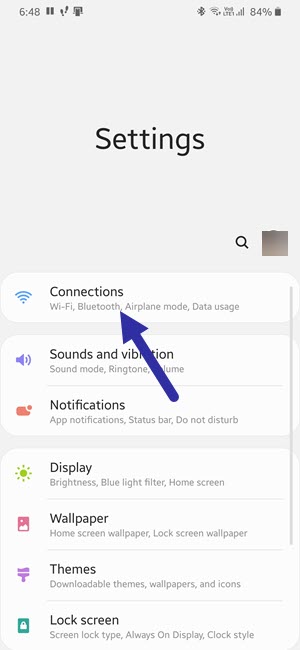
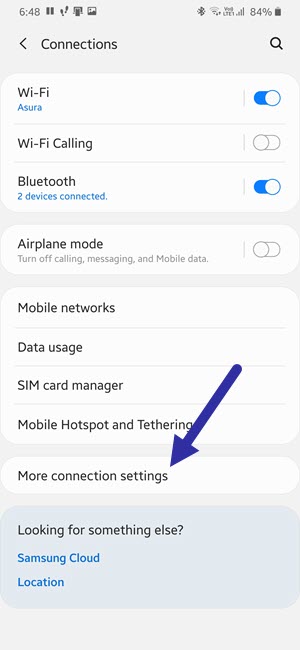
    1. Open the Settings app and select the “Connections” option. You see it at the top of the settings page.

    samsung connections option 010121

    2. Select the “More connection settings” option at the bottom of the Connections page.

    samsung advanced connection settings 010121

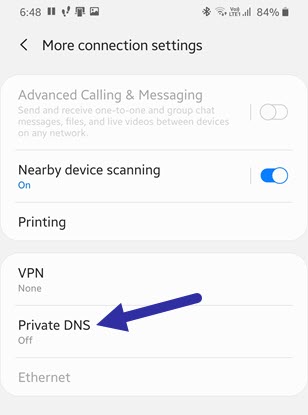
    3. Tap on the “Private DNS” option. This is the option that lets you set custom DNS on a Samsung Android phone.

    samsung set private dns 010121

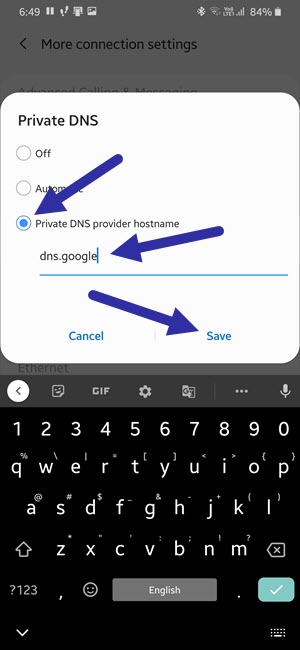
    4. Select the “Private DNS provider hostname” option, type the DNS hostname in the blank field, and hit the “Save” button. Google Public DNS and Cloudflare DNS hostnames are given below.

    • Google Public DNS hostname: dns.google
    • Cloudflare DNS hostname: 1dot1dot1dot1.cloudflare-dns.com
    change dns in samsung phone 010121
    change DNS in Samsung Android phone

    That’s it. From now on you Samsung phone will use the custom DNS instead of the DNS it got from the router or ISP.

    Important note: In case you are wondering, like on a computer or router, you cannot use the regular IP addresses as the DNS address. To set a custom DNS in Android, you need the DNS provider hostname. Without it, you cannot set the private DNS. The good thing is, most DNS providers list their hostname along with the regular IP addresses. Just go to the DNS provider website to get the hostname.

    I hope that helps. If you need any help, comment below and I will try to help as much as possible. If you like this article, check out how to set data limit in Samsung phone.

  • How to Set Data Limit on Samsung Android Phone

    How to Set Data Limit on Samsung Android Phone

    To restrict mobile data usage, you can set data limit on your Samsung Android phone. Here are the exact steps you should follow to do so.

    No matter where you live, mobile data is limited and precious. Unlike your regular broadband connection where unlimited or over-the-top FUPs (Fair Usage Policy) are a norm, the mobile data is still very much limited. Some networks limit you on daily basis and some on monthly basis. Not only that but the amount of mobile data you get is entirely dependent on your connection plan. For instance, I get 1.5GB/day. When I exceed that limit, the speed drops to 64kbps which is practically unusable. Some ISPs might even charge extra when you go over the limit.

    Considering how important and limited mobile data is, it is important that you set data limits to make sure you won’t go overboard on any given month. The data limit also helps you budget mobile data so that you won’t be stranded in emergencies. If you are using a Samsung Android phone, it has a built-in way to quickly set and change the data limit.

    In this quick and straightforward article, let me guide you through the steps to set the data limit on a Samsung Android phone.

    Jump to:

    Steps to set data limit on Samsung

    To set the data limit on Samsung, follow the steps shown below.

    1. Open settings on the Samsung device.
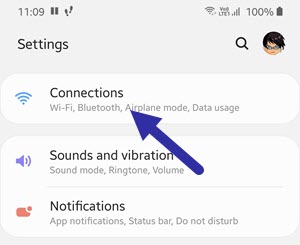
    2. Tap on the “Connections” option.
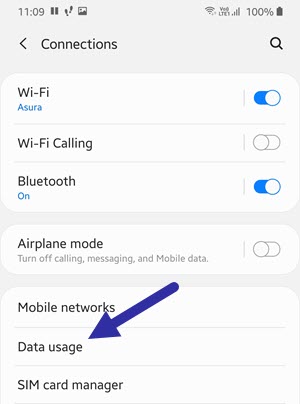
    3. Select the “Data usage” option.
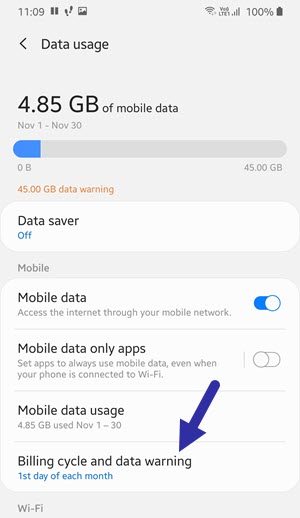
    4. Now, select the “Billing cycle and data warning” option.
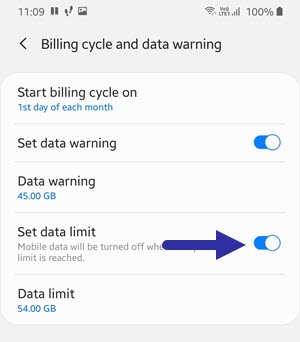
    5. Turn on the “Set data limit” option.
    6. Tap on the “Data limit” option.
    7. Set the limit in GBs and tap “Set“.
    8. Close settings.

    Detailed steps with images

    1. First, open the Settings app and tap on the “Connections” option. This is where you will find all the options related to mobile data.

    2. Here, select the aptly titled “Data usage” option.

    3. Select the “Billing cycle and data usage” option. In this case, the billing cycle, in general, refers to the monthly quota for your mobile data.

    4. On this screen, turn on the “Set data limit” option. This is the option that lets you restrict mobile data on Samsung.

    5. Now, tap on the “Data limit” option. This option lets you set the absolute limit for the mobile data.

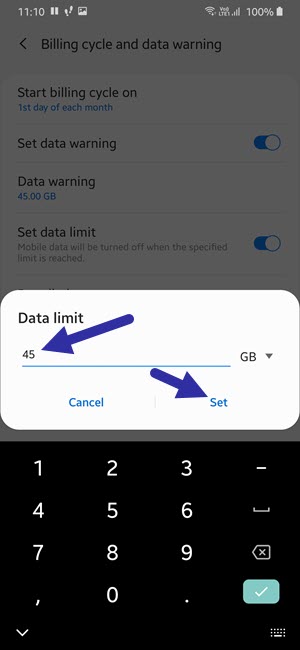
    6. Set the data limit in GBs and tap on the “Set” button. Once your phone reaches this limit, it will stop you from using any more.

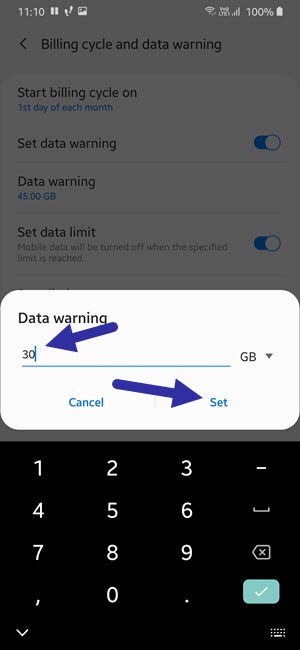
    7. Next, you need to set the data limit warning. That way, the phone can show you a warning message when you are reaching the data limit. To do that, tap on the “Data warning” option on the same page.

    8. Set the data warning limit in GBs. The warning limit should be below to actual data limit. Otherwise, the data warning will be useless. In my case, I set the data warning limit at 10GBs less than the actual data limit.

    9. Finally, close the settings app.

    That is it. Once you set the data limit, your Samsung device monitors how much data you are using. When you reach the limit, it will stop you from using any more data to help avoid excessive billing.

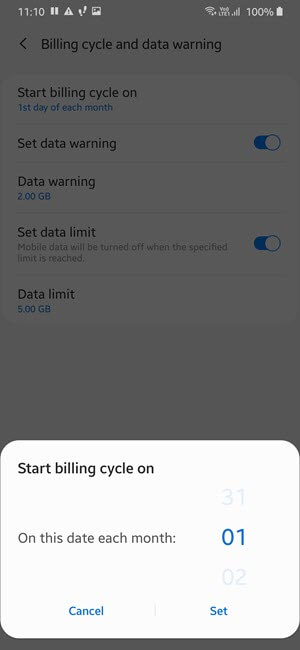
    Important note: By default, the billing cycle is set to the 1st of every month. If your mobile data billing cycle is different, i.e, if it resets at a different data, you need to change it for accurate data limit. To change the billing cycle, tap on the “Start billing cycle on” option, and set the data limit as needed.

    Steps to change data limit on Samsung

    If the data limit is too restrictive or not sufficient, you can change the data limit on Samsung. Here’s how.

    1. Open Settings and select “Connections”.
    2. Go to the “Data usage → Billing cycle and data warning”.
    3. Select the “Data limit” option.
    4. Change the data limit as needed.
    5. Tap “Set” to save changes.
    6. Close settings.

    Note: If the data limit option is grey out, it means that you did not set the limit in the first place. Turn on the “Set data limit” option to enable the “Data limit” option.

    That is all. I hope that helps. If you need any help, comment below and I will try to help as much as possible. If you like this article, check out how to turn on hotspot on a Samsung phone to share the internet.

  • How to Check If Android Device Supports WiFi 5GHz

    How to Check If Android Device Supports WiFi 5GHz

    If you want to check if your Android device supports WiFi 5GHz along with 2.4GHz, these are the steps you should follow to know.

    Any Android device with WiFi capability supports the 2.4GHz band. Being the last generation, WiFi 2.4GHz is pretty slow and cannot properly support multiple devices on the same network. In fact, when it comes to things like home streaming and online games, 5GHz band WiFi is markedly better compared to 2.4GHz. That is one of the reasons why WiFi 5GHz support is important if you are into online gaming, home streaming, local network sharing, or anything network intensive.

    For the most part, WiFi 5GHz is becoming the standard in all most all modern routers. Thankfully, Android devices nowadays support both 2.4GHz and 5GHz bands for WiFi. When your device supports 5GHz, you can connect to a WiFi 5GHz network without any problems.

    However, if you are using an older Android phone or tablet and don’t know whether it supports 5GHz or not, follow the steps shown below to check if the Android device has support for WiFi 5GHz.

    Steps to Check Android Device Support for 5GHz

    To know if your Android phone supports WiFi 5GHz band, follow the steps listed below.

    1. First, install the open-source WiFi Analyzer from the Play Store.

    2. After installing WiFi Analyzer, open it from the app drawer.

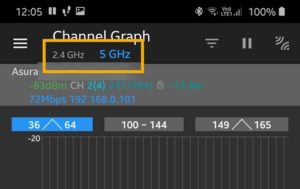
    3. As soon as you open the app, you will see all the available access points. Since we want to know if the device supports WiFi 5GHz, tap on the “Channel Graph” option on the bottom bar.

    4. If your Android phone supports both 2.4GHz and 5GHz bands, you will see it right under the “Channel Graph” heading on the top bar.

    If your device doesn’t support the 5GHz band, you will only see “2.4GHz” on the top bar.

    Advantages of WiFi 5GHz

    Below are some of the advantages of 5GHz over 2.4GHz.

    • Compared to 2.4GHz, 5GHz has way better bandwidth. In the real-world, 5GHz gives you around 210Mbps to 1Gbps while 2.4GHz gives you around 150 Mbps.
    • The 5GHz band is outside the other common devices like microwaves, cordless phones, home security and monitoring systems, etc which work in the 2.4GHz band. This means that your WiFi network will be interference-free from other devices.
    • Compared to 11 channels in 2.4GHz, the 5GHz band has 25 channels. This means that you can fine-tune your network to function in different channels to reduce interference.
    • 5GHz 802.11ac WiFi routers are more advanced thanks to useful features like Dynamic Frequency Seelction, Power Control, Beamforming, etc.

    One major disadvantage of 5GHz band is that its range is shorter than 2.4GHz and it cannot effectively penetrate through thick walls. So, if you want to cover a big area with walls in between then 2.4GHz is the ideal solution. Since all the 5GHz Android devices also have 2.4GHz built-in to them, this should be a problem.

    Do keep in mind that to get the advantages of 5GHz WiFi network, you need to connect to it via your Android device.

    That is all. I hope that helps. If you need any help, comment below and I will try to help as much as possible.