Tag: android studio

  • How to Install Play Store in Android Studio Emulator

    How to Install Play Store in Android Studio Emulator

    No Play Store in your Android emulator? Follow these simple steps to install the Play Store in Android Studio Emulator.

    Depending on how you installed the emulator in the Android Studio, there might no be a Play Store. If you are just using the emulator to test your own apps then you don’t need the Play Store. That being said, if you want to try apps that are already available via the Play Store then you need to have it installed in the Android emulator. Of course, if you really want to you can install APK files in the emulator directly in two different ways.

    However, if you want the full authentic experience or to avoid the hassle of installing apps via APK files, you have to have the Play Store in the Android emulator. The good thing is, the AVD Manager in Android Studio allows you to create emulators with Play Store built into them.

    In this quick and simple article, Let me show you a simple way to create a new Android emulator with Play Store built into it.

    Steps to Install Play Store in Android Studio Emulator

    To install the Play Store in the Android Studio emulator, you have to create a new emulator with a system image that already has Play Store included. The good thing is, the AVD Manager gives you the system image with the Play Store. You don’t have to download it from a third-party.

    You might have to download a system image which will around 1.5GB to 2GB. If you have data limits on your internet connection, becareful.

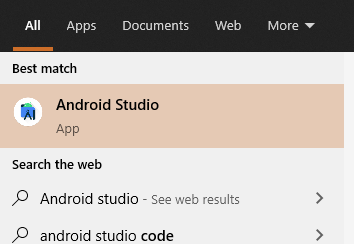
    1. Open Android Studio. If you are using Windows, open the Start menu, search for “Android Studio” and click on it. If you have one, you can also double-click on the desktop shortcut.

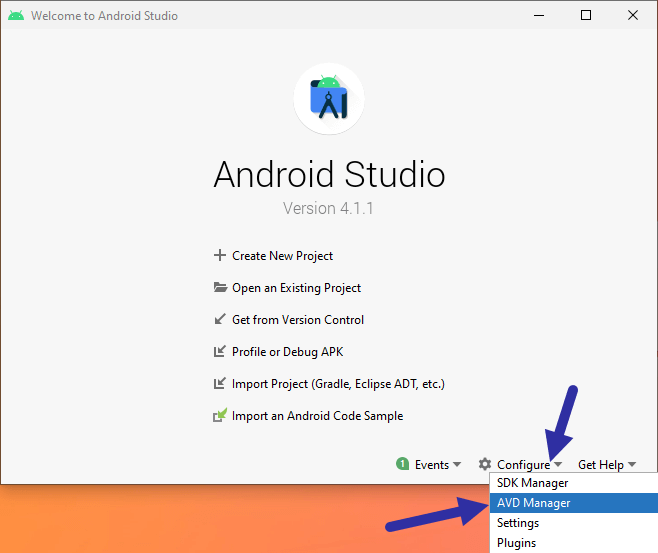
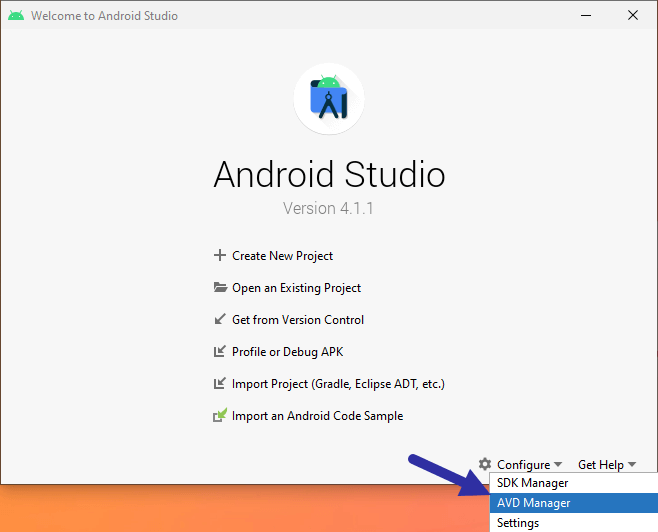
    2. Click “Configure → AVD Manager” option on the main screen.
    open avd manager 271220 1

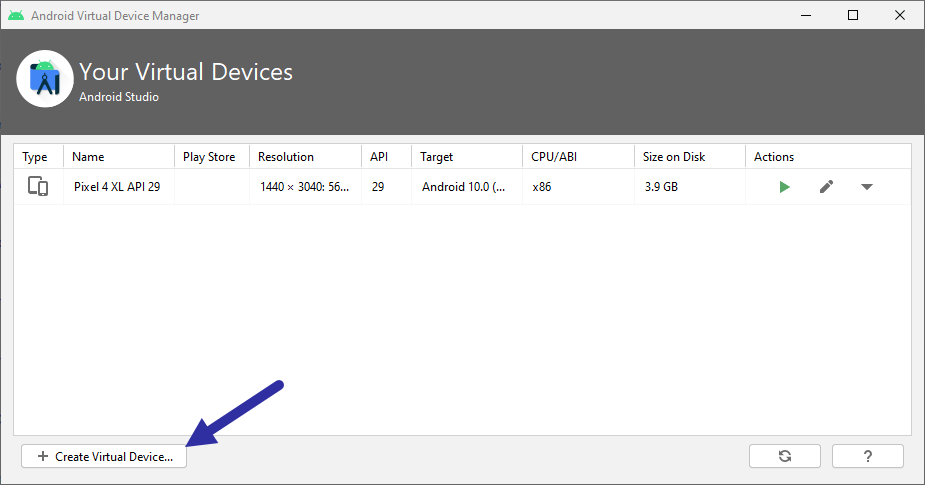
    3. After opening the AVD Manager, click on the “Create virtual device” option. This is how you create a new emulator.
    create new virtual device 271220

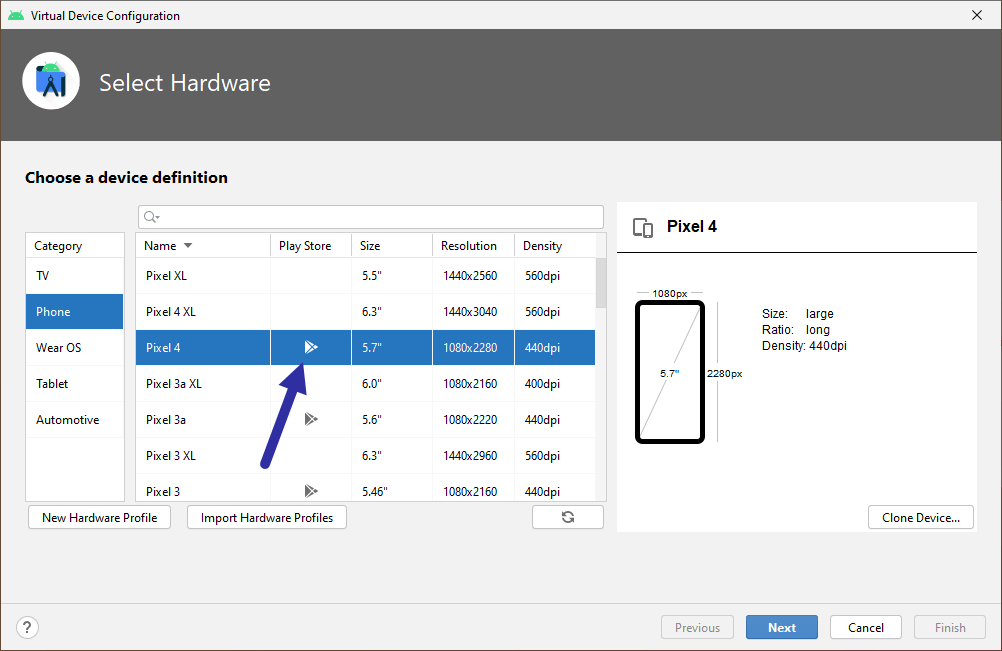
    4. Select “Phone” on the left panel, select the device in the middle plane. While selecting, make sure it has the “Play Store” icon in the Play Store column. This icon signifies the virtual device is compatible and comes with the Play Store. Click on the “Next” button.
    android emulator with play store 271220

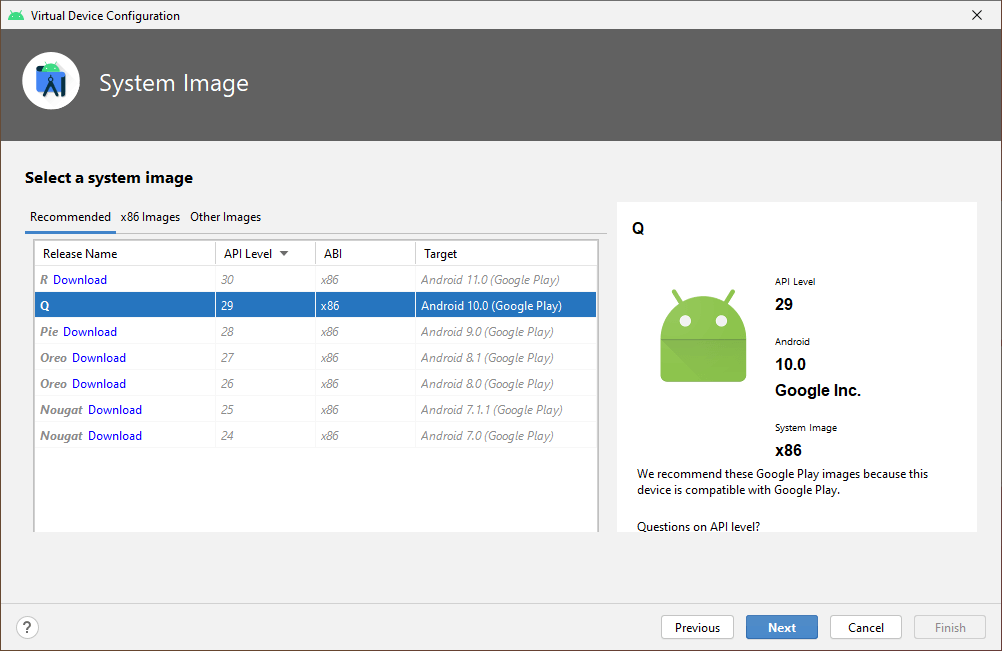
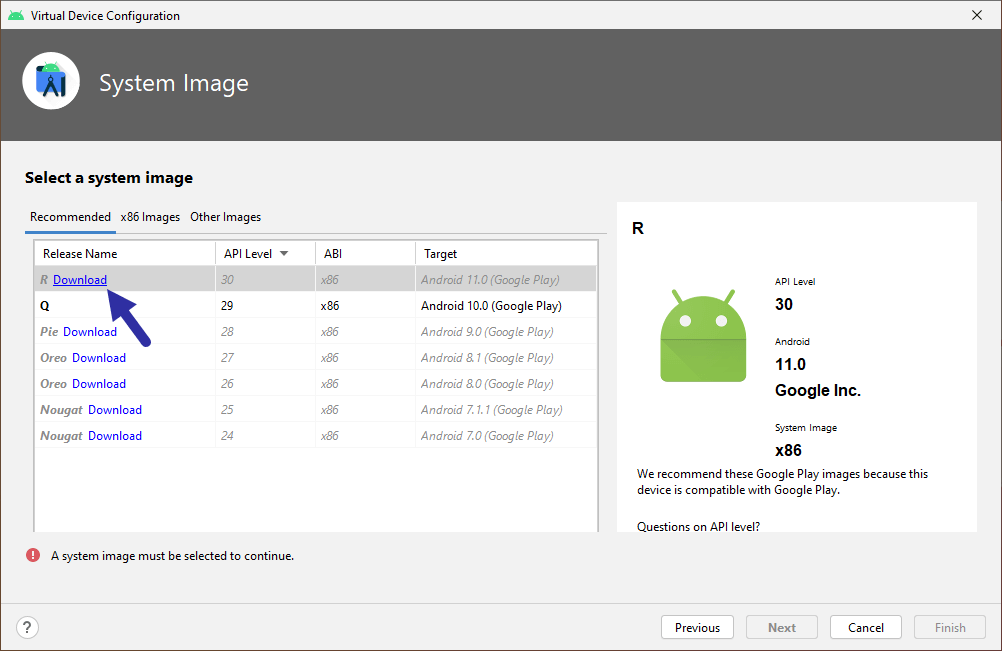
    5. Here, select the system image you want to install and click “Next”.
    system image with play store 271220

    If the system image is not installed, you can download and install it by clicking on the “Download” link next to Release Name. This action will download the system image from Google. As I said before, the system image will be anywhere from 1.5GB to 2GB.download system image with play store 271220
    6. Name the virtual device and click on the “Finish” button.
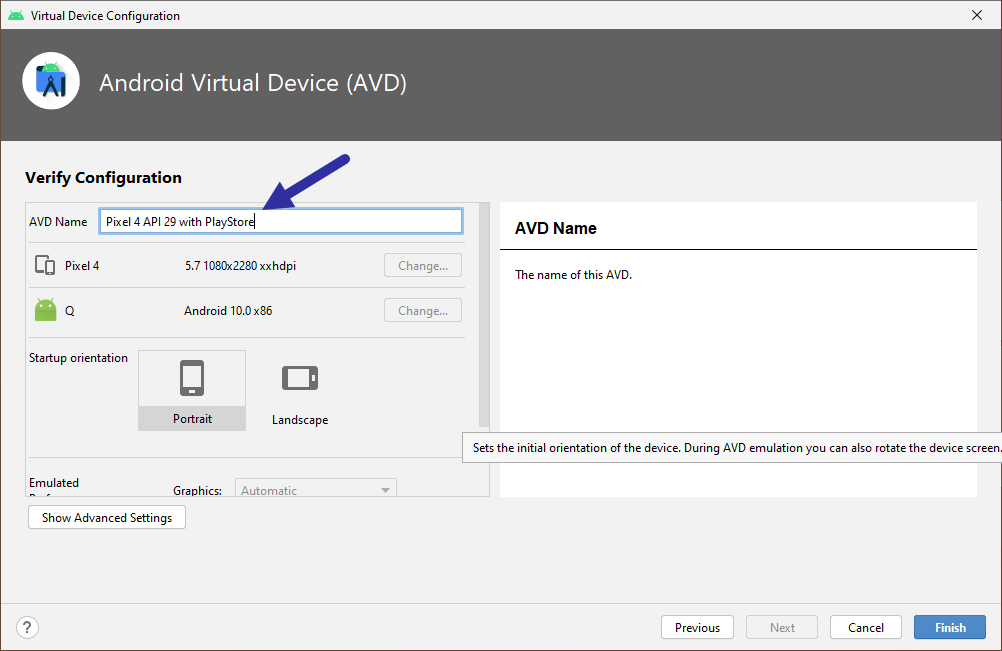
    name virtual device 271220

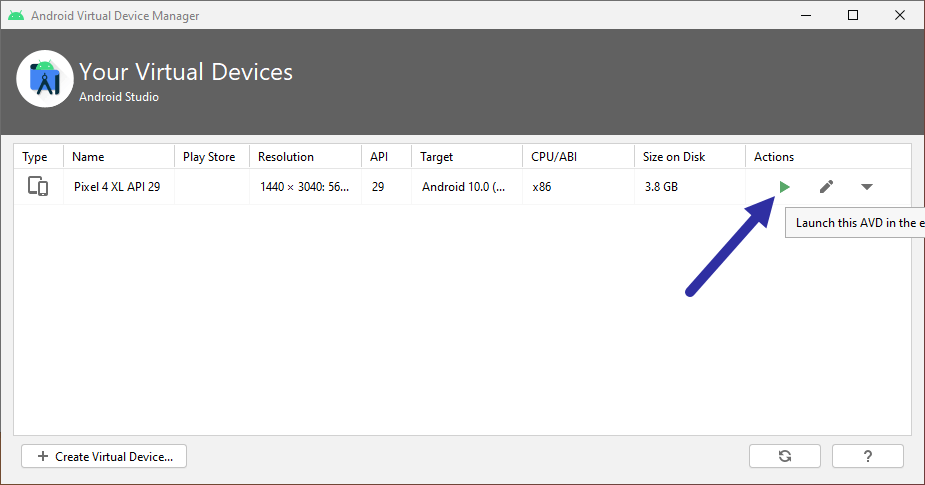
    That is all. With that, you have created a new emulator with Play Store, AKA, you’ve installed Play Store in Android Studio Emulator. You can launch the emulator by clicking on the “Play” icon in AVD Manager.
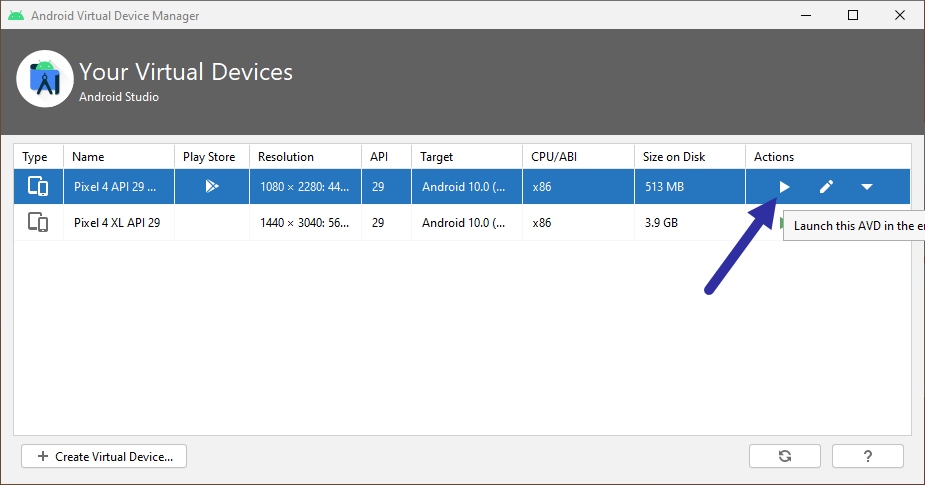
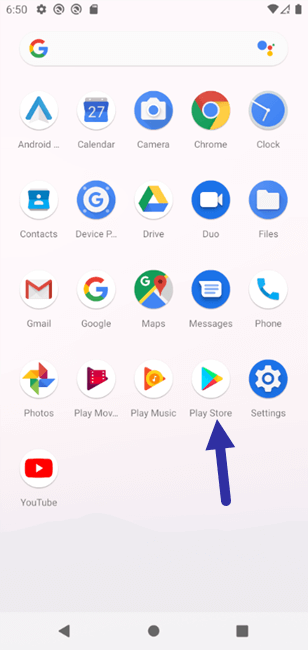
    launch emulator 271220
    install play store in android studio emulator 271220

    Why can’t I install Play Store manually?

    In case you are wondering why you need to create an entirely new virtual device just to have Play Store, it’s because Google doesn’t allow you to install the Play Store like any other app. The Play Store is deeply linked with the Android operating system and other core Google apps. As such, it is not possible to install it via the APK file. A few of the main reasons for this kind of behavior being security, reliability, and control.

    You can try to install the Play Store by download an APK from the internet. However, when you try that you will see the “The APK failed to install. Error: Could not parse error string.” message.
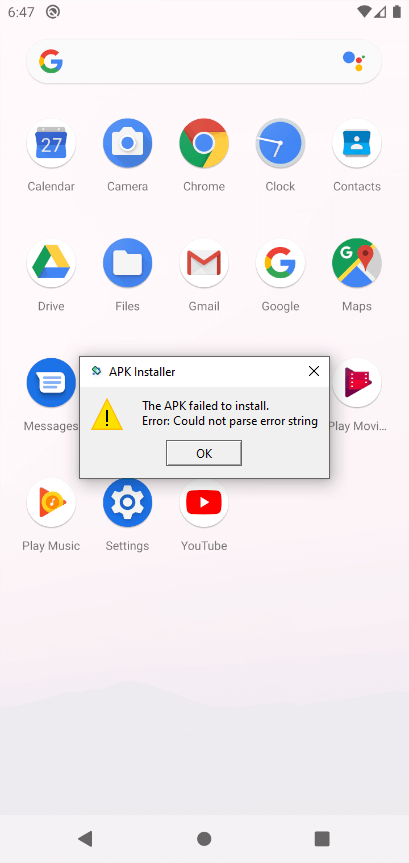
    apk failed to install 271220

    Now, there are some roundabout ways like using Open GApps. However, it is not worth the time and you couldn’t guarantee its compatibility or reliability. This is especially important since Google itself gives you the option to install a system image with Play Store already included.

    I hope that helps. If you need any help, comment below and I will try to help as much as possible.

  • How to Find Android SDK Folder Location in Windows

    How to Find Android SDK Folder Location in Windows

    Don’t know where the Android SDK folder is in Windows? Here are simple steps to find the Android SDK folder location no matter where it is in your system.

    When you install Android Studio, it automatically installs the Android SDK so that you can develop and run apps directly on your computer. By default, in Windows, Google installs the Android SDK folder in the User directory. However, that might not be the case at all times. For example, if you install the Android Studio in some other directory, then the Android SDK location will be different. This is also true if you are using a portable version of Android Studio.

    If you want to use ADB commands or any other Android platform-tools from the command line, you need to know the Android SDK platform. For example, recently I wanted to install an APK file in the emulator with an ADB command. To do that, I needed to know the Android SDK location in Windows. Without knowing the exact location, I could not execute the ADB command.

    The good thing is, it is pretty easy to locate where the Android SDK folder is.

    In this quick and straightforward guide, let me show you the steps to find the Android SDK folder location no matter where it is.

    Android SDK folder location in Windows

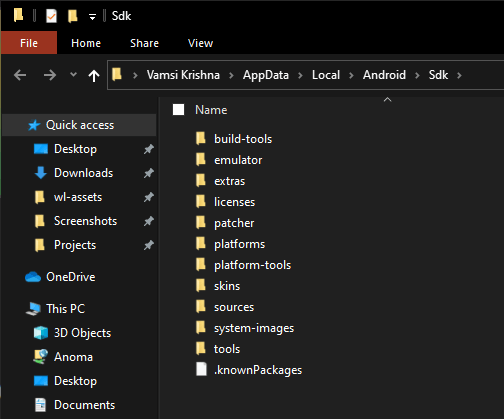
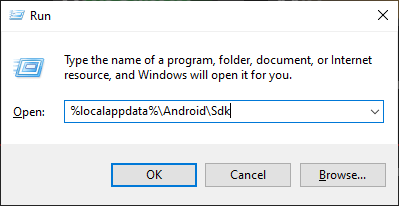
    The default Android SDK location in Windows is “%localappdata%\Android\Sdk“. Just open the Run window (Windows key + R), paste the given path, and click “Ok”. This will open the Android SDK folder instantly.

    windows android sdk lcoation 281220

    In case you are wondering, %localappdata% is a Windows environment variable mapped to the Local App Data folder (C:\Users\Username\AppData\Local) in your user directory.

    android sdk folder 281220

    Find SDK location in Android Studio

    The SDK Manager in Android Studio gives you the exact location of the SDK folder. Here’s how you can open the SDK Manager to find the location.

    1. First, open the Android Studio. If you are using Windows, you can search for “Android Studio” in the Start menu or double-click on the desktop icon.

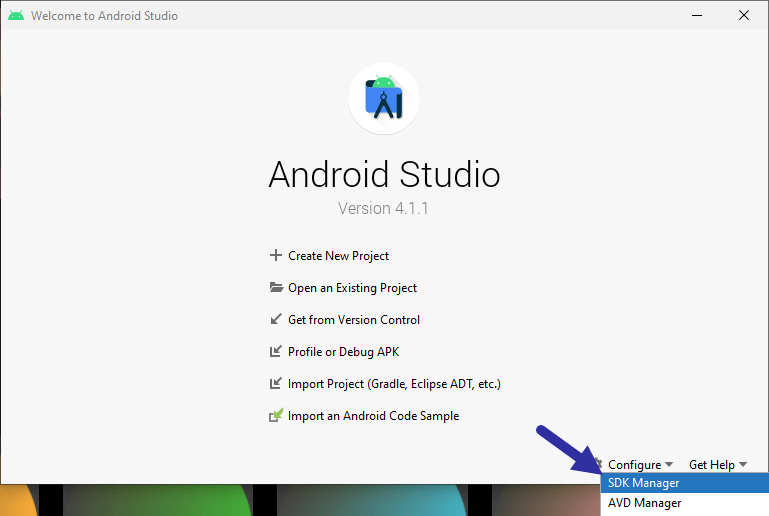
    2. After opening the Android Studio, click on the “Configure” button and select the “SDK Manager” option. If you are inside the Android IDE, select the “File → Settings” option.

    open sdk manager 281220

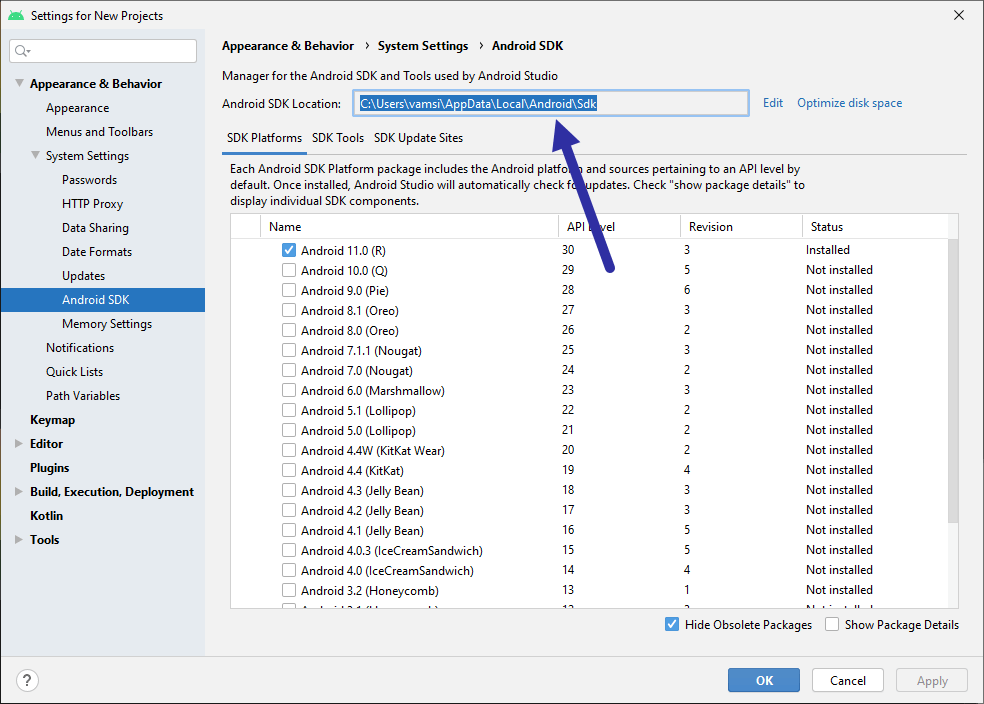
    3. As soon as you click on the option, Android Studio will open the Settings window. Here, you will see the Android SDK location on the right panel in the “Android SDK Location” field. If you are not seeing it, make you are on the “Appearance & behavior → System settings → Android SDK” page.

    sdk location in sdk manager 281220

    Once you found the location, you can copy it by double-clicking on the location and pressing the “Ctrl + C” shortcut.

    That is all. It is that simple to find the SDK location in Android Studio. The good thing about this method is that it allows you to manage the SDK to install new APIs, SDK tools, and even update sections of SDK as and when the updates are available. If you don’t need a specific API, you can simply uninstall it by unchecking it in the SDK manager.

    I hope that helps. If you need any help, comment below and I will try to help as much as possible.
  • How to Install APK File in Android Studio Emulator

    How to Install APK File in Android Studio Emulator

    When running an Android Studio emulator, you can install APK files directly. Here are the steps to install APK file in the Android emulator.

    If you don’t have Play Store installed in your emulator, it can be pretty hard to install apps. Of course, if you are developing an app with Android Studio, you can run it directly from the Studio itself. However, if you want to install your favorite app or test a third-party app in the emulator, you have to install it via the APK. This is especially true if your emulator doesn’t have Play Store installed or if the app itself is not available via the Play Store. For example, recently I wanted to try an app that is blocked in the Play Store in a safe environment. So, I downloaded the apk file, installed apk in the Android emulator, and run it there. Though the app is garbage, it satisfied my curiosity.

    It’s not obvious at first glance, but the Android Studio emulator gives you two ways to install an APK file. I will show those two methods. Follow the one you like.

    Without further ado, let me guide you through the steps to install APK file in Android emulator.

    Jump to:

    Drag and drop to install APK file in Android Studio Emulator

    To install apk file, just drag and drop the file on the emulator. Android will automatically install the apk. For more guidance, follow the below steps.

    1. Open Android Studio

    The first thing you need to do is open the Android Studio. To do that, double-click on the desktop icon or search for it in the Start menu.

    open android studio 271220

    2. Open the AVD manager in Android Studio

    Next, open the AVD manager by clicking on the “Configure → AVD Manager” option in the Android Studio main screen.

    open avd manager 271220

    3. Launch the emulator from AVD manager

    In the AVD manager, click on the “Play” button next to the emulator. This action will open the Android emulator. If you don’t have an emulator in the AVD Manager, create one by clicking on the “Create virtual device” button.

    open android emulator 271220

    4. Drag and drop APK file in emulator

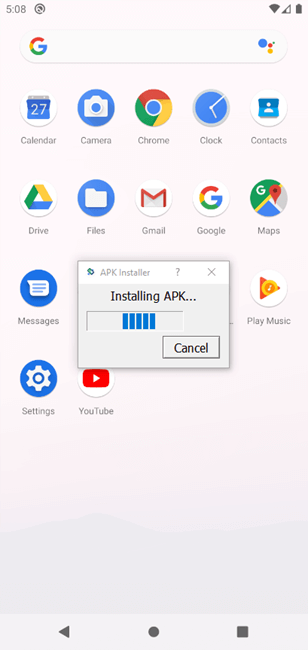
    After opening the Android emulator, drag and drop the APK file in the emulator. As soon as you do that, the emulator will recognize the APK and installs it automatically.

    install apk in android emulator 271220

    Once the app has been installed, you can launch it from the app drawer. Keep in mind that once the app has been installed, you might not see it on the home screen. That is the reason why you need to go to the app drawer to find the newly installed app. Of course, this completely depends on the launcher you are using in the emulator.

    ADB command to install APK in Android Studio Emulator

    When the Android emulator is actively running, you can also use the ADB command to install an apk file in the emulator. This is very helpful if you want to execute additional commands or create your own script. So, here’s how you can install APK files in the emulator with the ADB command.

    Before proceeding, make sure you know the Android SDK location and the APK file location on your hard drive. Since we are executing a command, both these location paths are important.

    1. First, open the Android Studio and click on “Configure → AVD Manager” to launch the AVD manager.

    open avd manager 271220

    2. Here, click on the “Play” button next to the emulator to start it.

    open android emulator 271220

    3. Once you have the emulator running, open a command window. In Windows, you can do that by searching for “CMD” in the Start menu.

    4. In the command line window, execute the below commands one after the other. Replace the dummy SDK path and APK path with the actual Android SDK path and APK file path.

    cd "c:\path\to\android\sdk\platform-tools"

    next

    adb install "c:\path\to\app.apk"

    adb command to install apk file 271220

    As soon as you execute the command, ADB will install the APK file in the running Android emulator. Once installed, you will see the “Success” message. You can open the newly installed app from the app drawer in the emulator.

    app installed with adb command 271220

    That is all. I hope that helps. I hope that helps. If you need any help, comment below and I will try to help as much as possible.